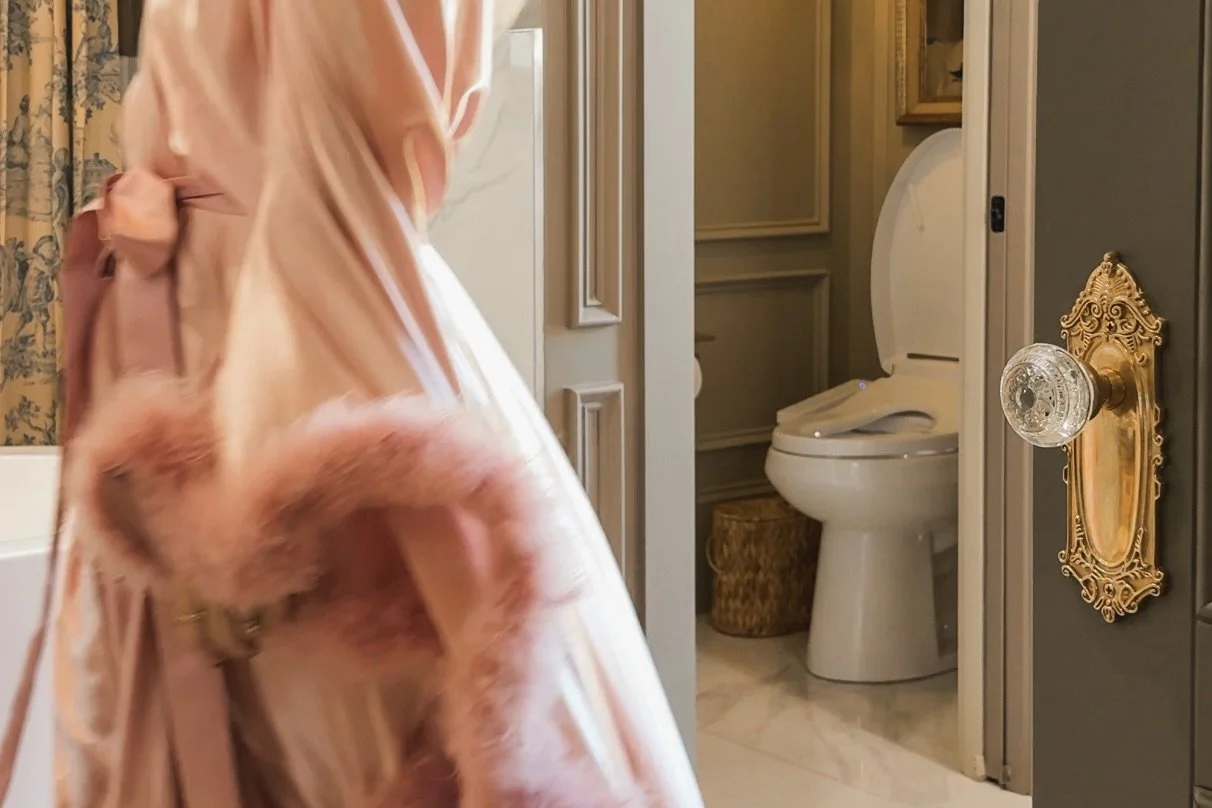
Our Primary Bathroom Glow-Up

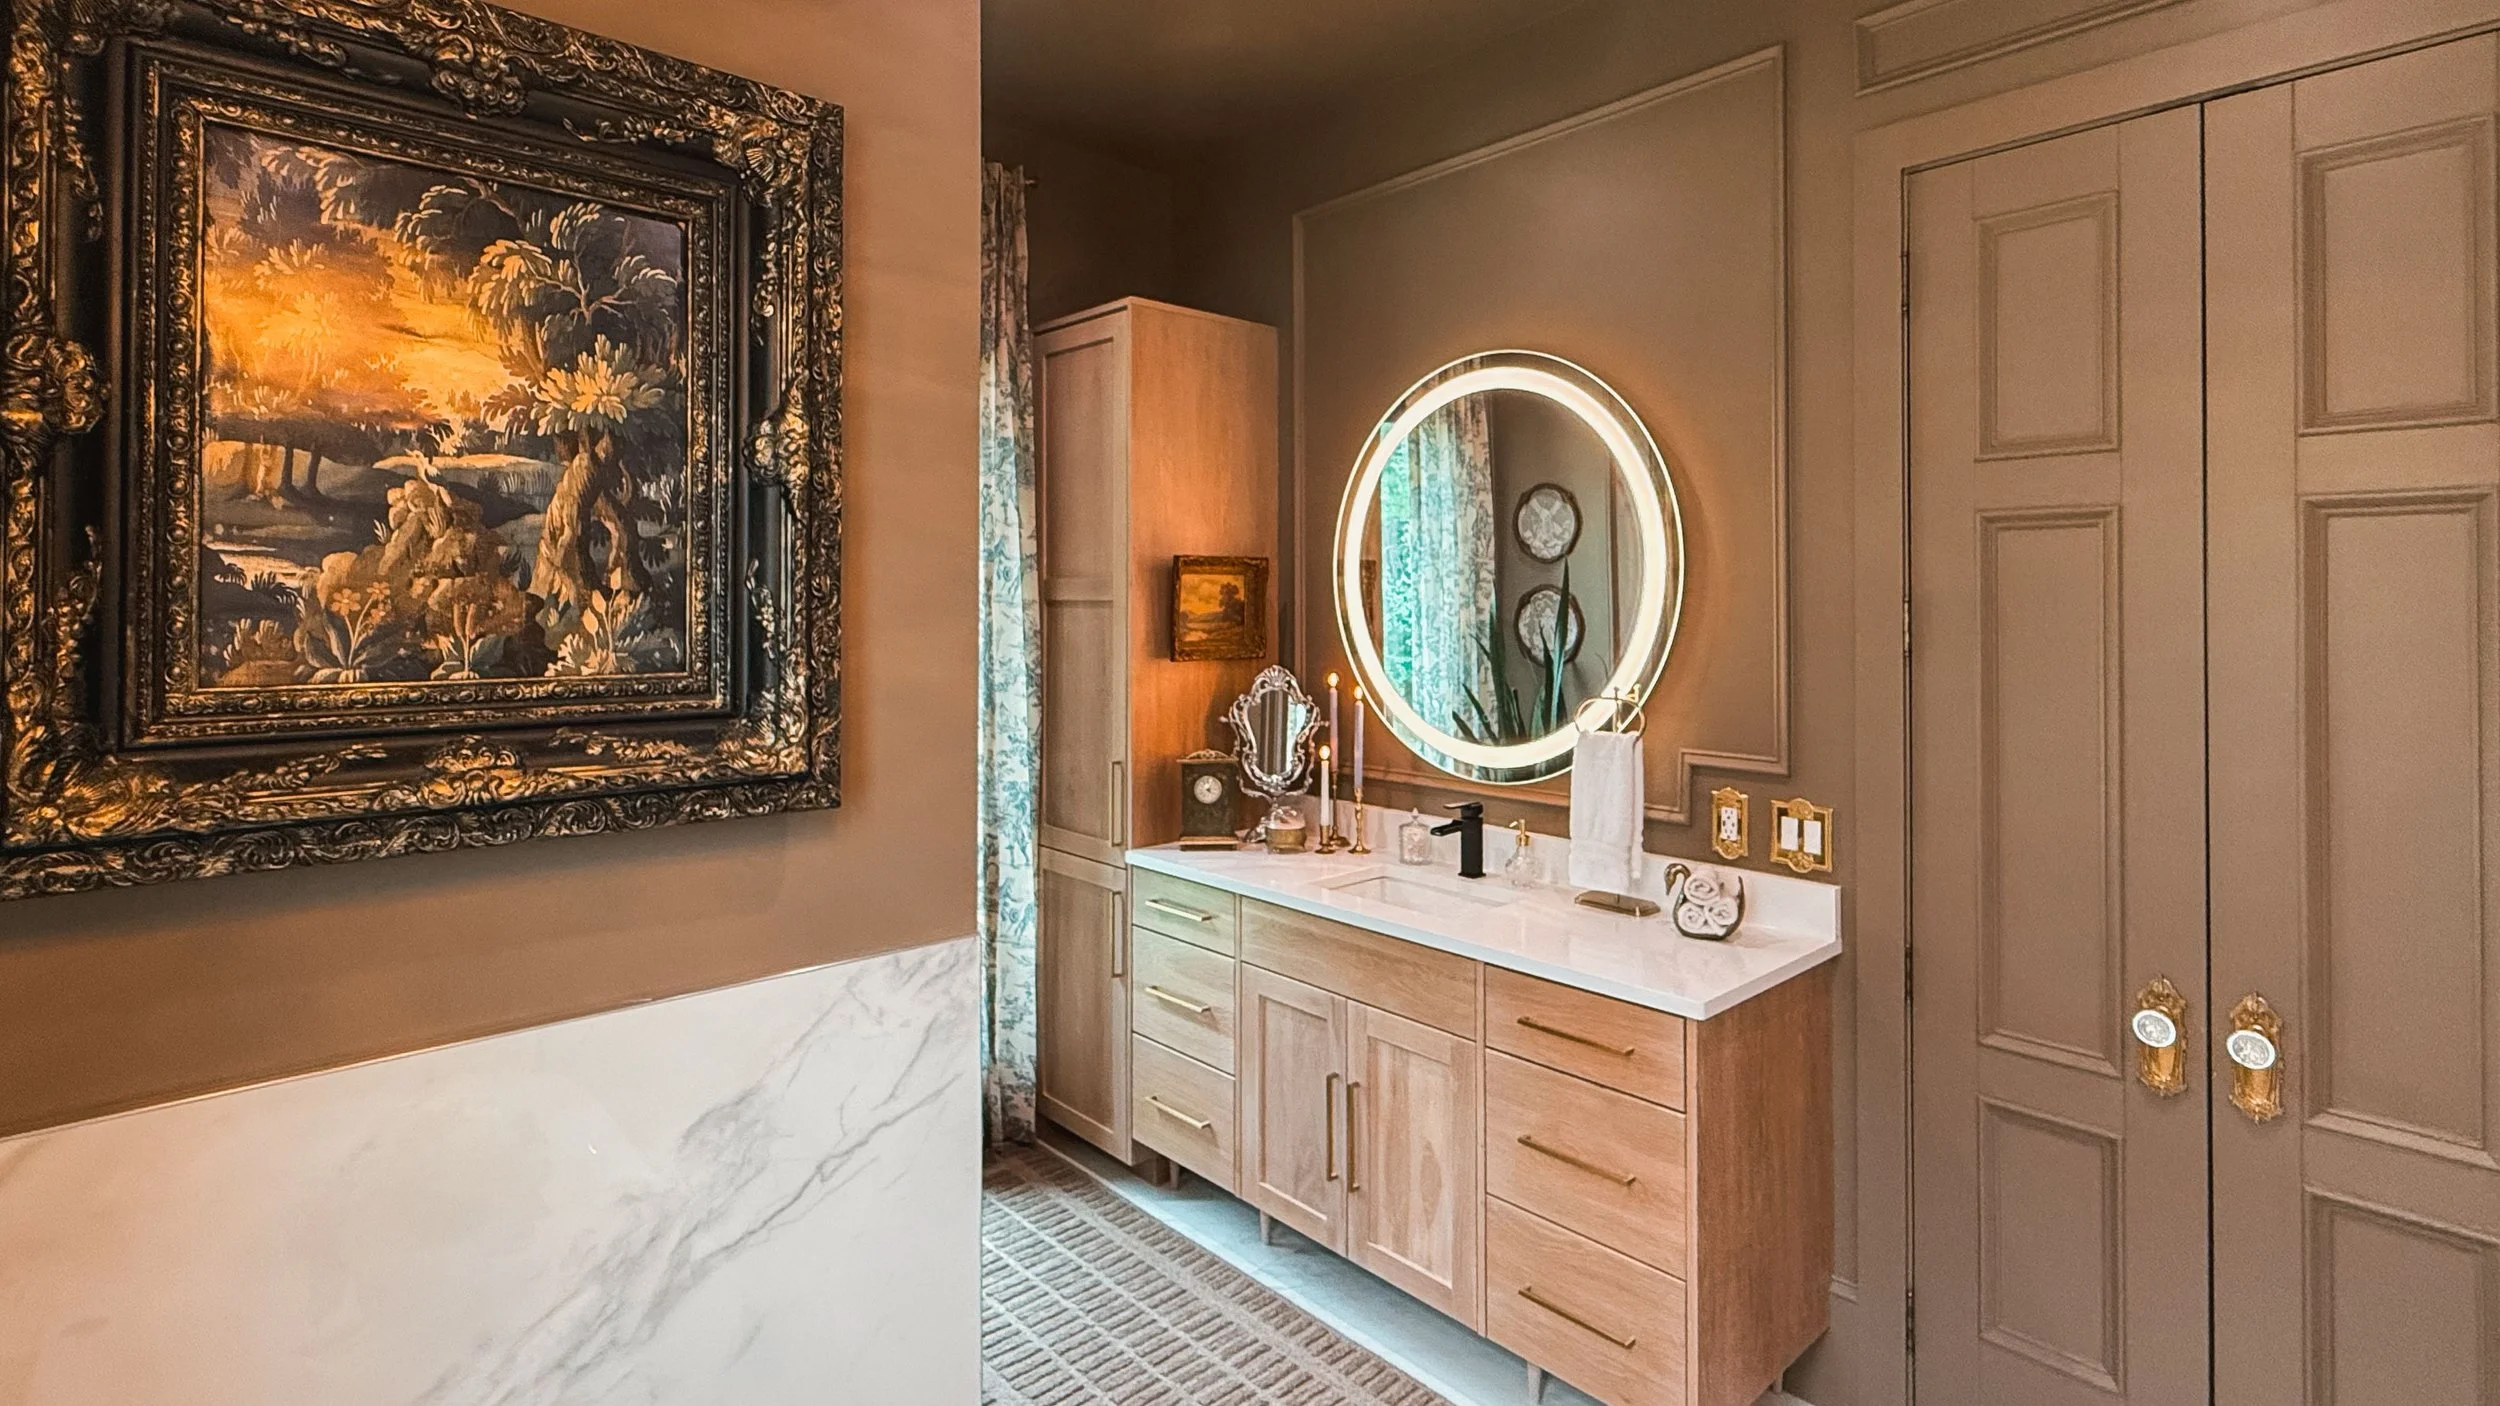
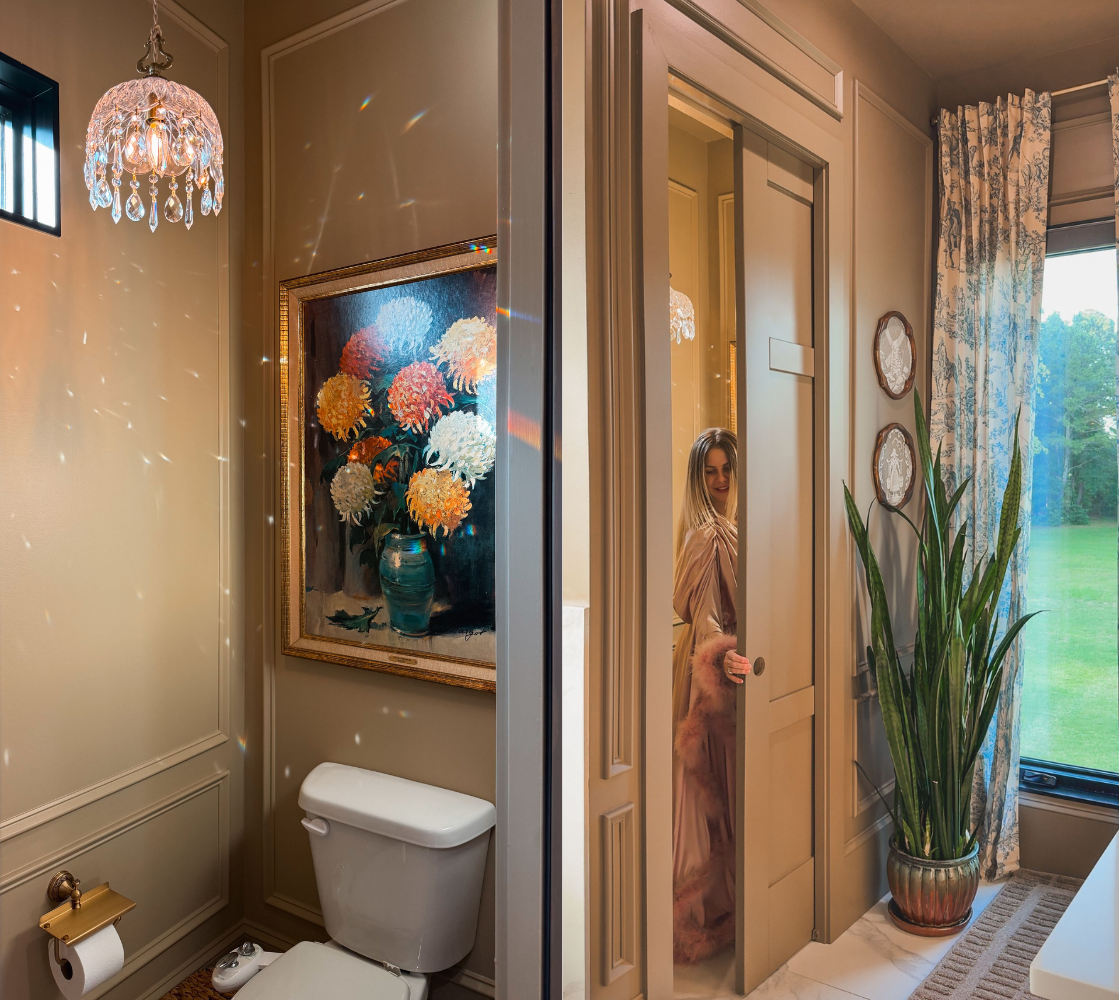
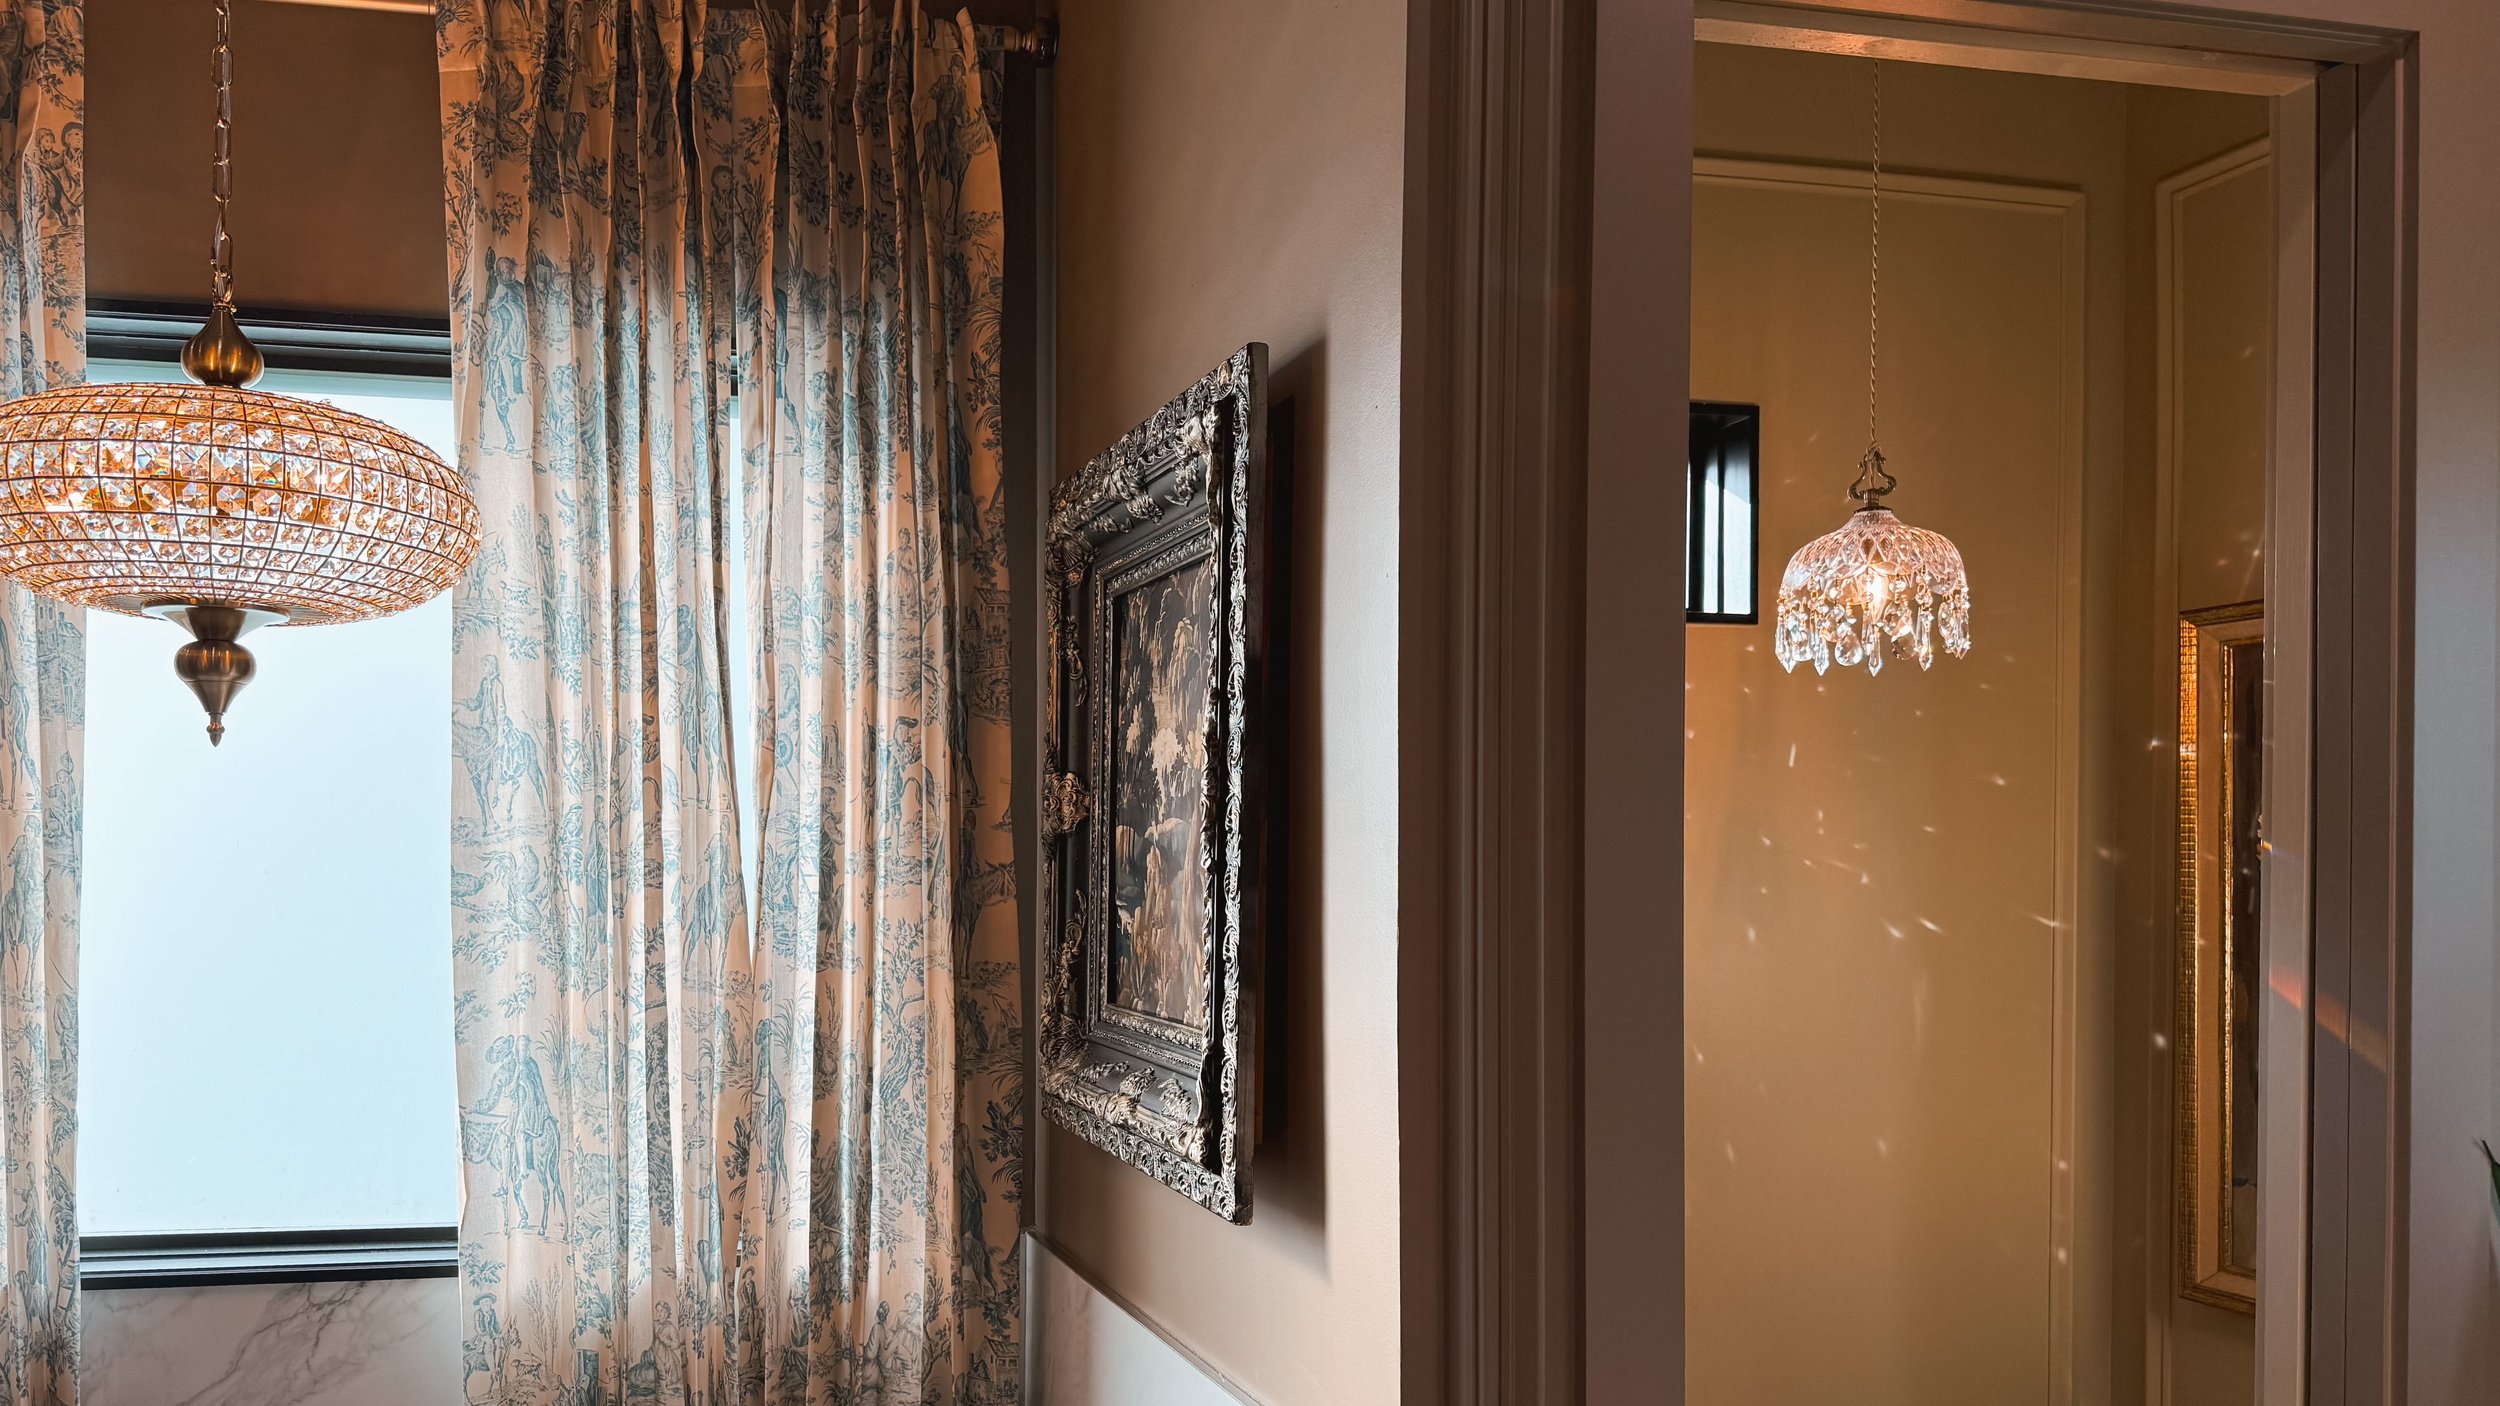
Our primary bathroom finally got the moody makeover it’s been begging for. I kept all of the plumbing fixtures and those round backlit mirrors, but everything else got a cozy, color-drenched upgrade.
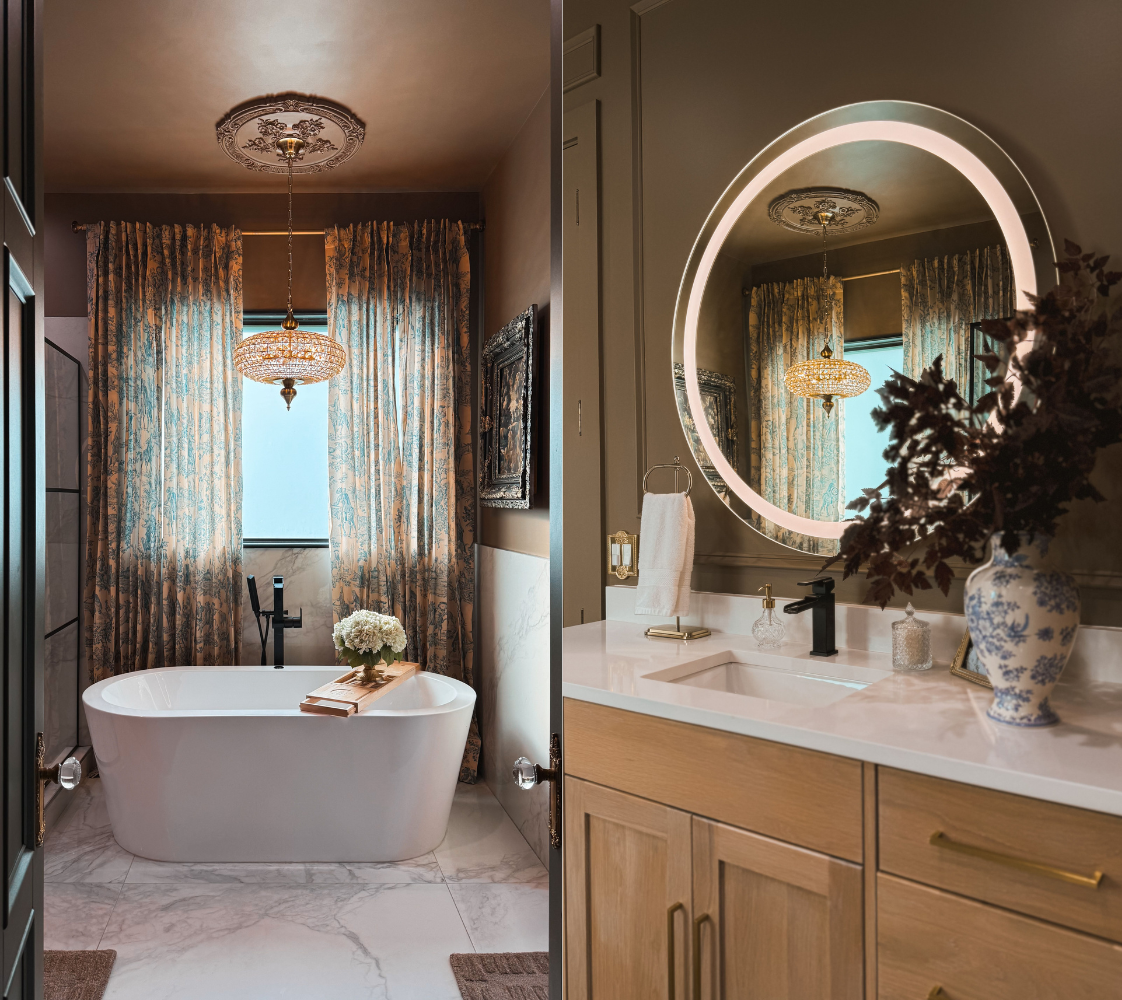
I painted the main space Virtual Taupe by HGTV Home by Sherwin-Williams and used Favorite Tan in the water closet for a subtle contrast. We added wall trim, and while the crown moulding is on backorder, I’m already loving the added character.
New rugs, toile blue curtains, and TWO chandeliers brought so much warmth and texture into the space. I also sprinkled in tons of Amazon finds: faux hydrangeas and red leaf stems, cute apothecary jars for Q-tips, soap dispensers, and pump bottles for the shower.
Without changing the cabinets or layout, the room now feels aligned with the rest of our home: moody, vintage-inspired, and full of soul. A few vintage touches like a silver mirror, a green clock, and a wood shelf in the water closet really finished it off. I’m officially done with all-white bathrooms.
Links At A Glance
If you liked this you might be interested in my primary bedroom makeover!

The Proven Benefits of Using a Sauna
For the longest time, saunas were something we associated with gyms and spas. Something you used occasionally, usually after a workout, and then went on with your day. Once we added one at home though, it became clear why so many people are committed to using a sauna regularly, especially my husband, who is by far the main user in our house.
Having one at home makes it easy to be consistent, and consistency is where the real benefits show up. Beyond feeling relaxing, regular sauna use is linked to some pretty solid wellness benefits that add up over time. Here is the link for the sauna we have in our home!
It’s great for circulation and heart health
When you sit in a sauna, your heart rate increases and your blood vessels open up, which helps improve circulation. It is similar to light cardio, even though you are just sitting there.
Over time, this can support heart health and help with things like blood pressure. It feels relaxing, but your body is still getting something out of it.
Your muscles will thank you
Heat helps muscles relax and increases blood flow, which makes saunas especially helpful if you are sore or tight. This is why so many people use them after workouts, but it is just as nice after a long day on your feet.
If you deal with tension in your neck, shoulders, or back, sauna time can make a noticeable difference.
Built-in stress relief
One of my favorite parts of using a sauna is how calm it makes you feel. The heat encourages your body to slow down and relax, which helps lower stress levels.
It is also one of the few places where you are kind of forced to unplug. No phone, no distractions, just quiet time to reset.

It can help you sleep better
A lot of people notice better sleep when they use a sauna regularly. The warm-up followed by cooling down helps signal to your body that it is time to rest.
If you have trouble winding down at night, this can be a really helpful addition to your evening routine.
That post-sauna refreshed feeling
Sauna sessions encourage deep sweating, which helps your body release certain toxins. Staying hydrated is important, but there is nothing like that clean, refreshed feeling afterward.
It is the kind of reset that makes you feel lighter and more clear-headed.
Even your skin can benefit
Improved circulation and sweating can help support healthier looking skin. Increased blood flow helps nourish skin cells, and sweating can help clear pores.
Over time, many people notice their skin looks brighter and more refreshed.
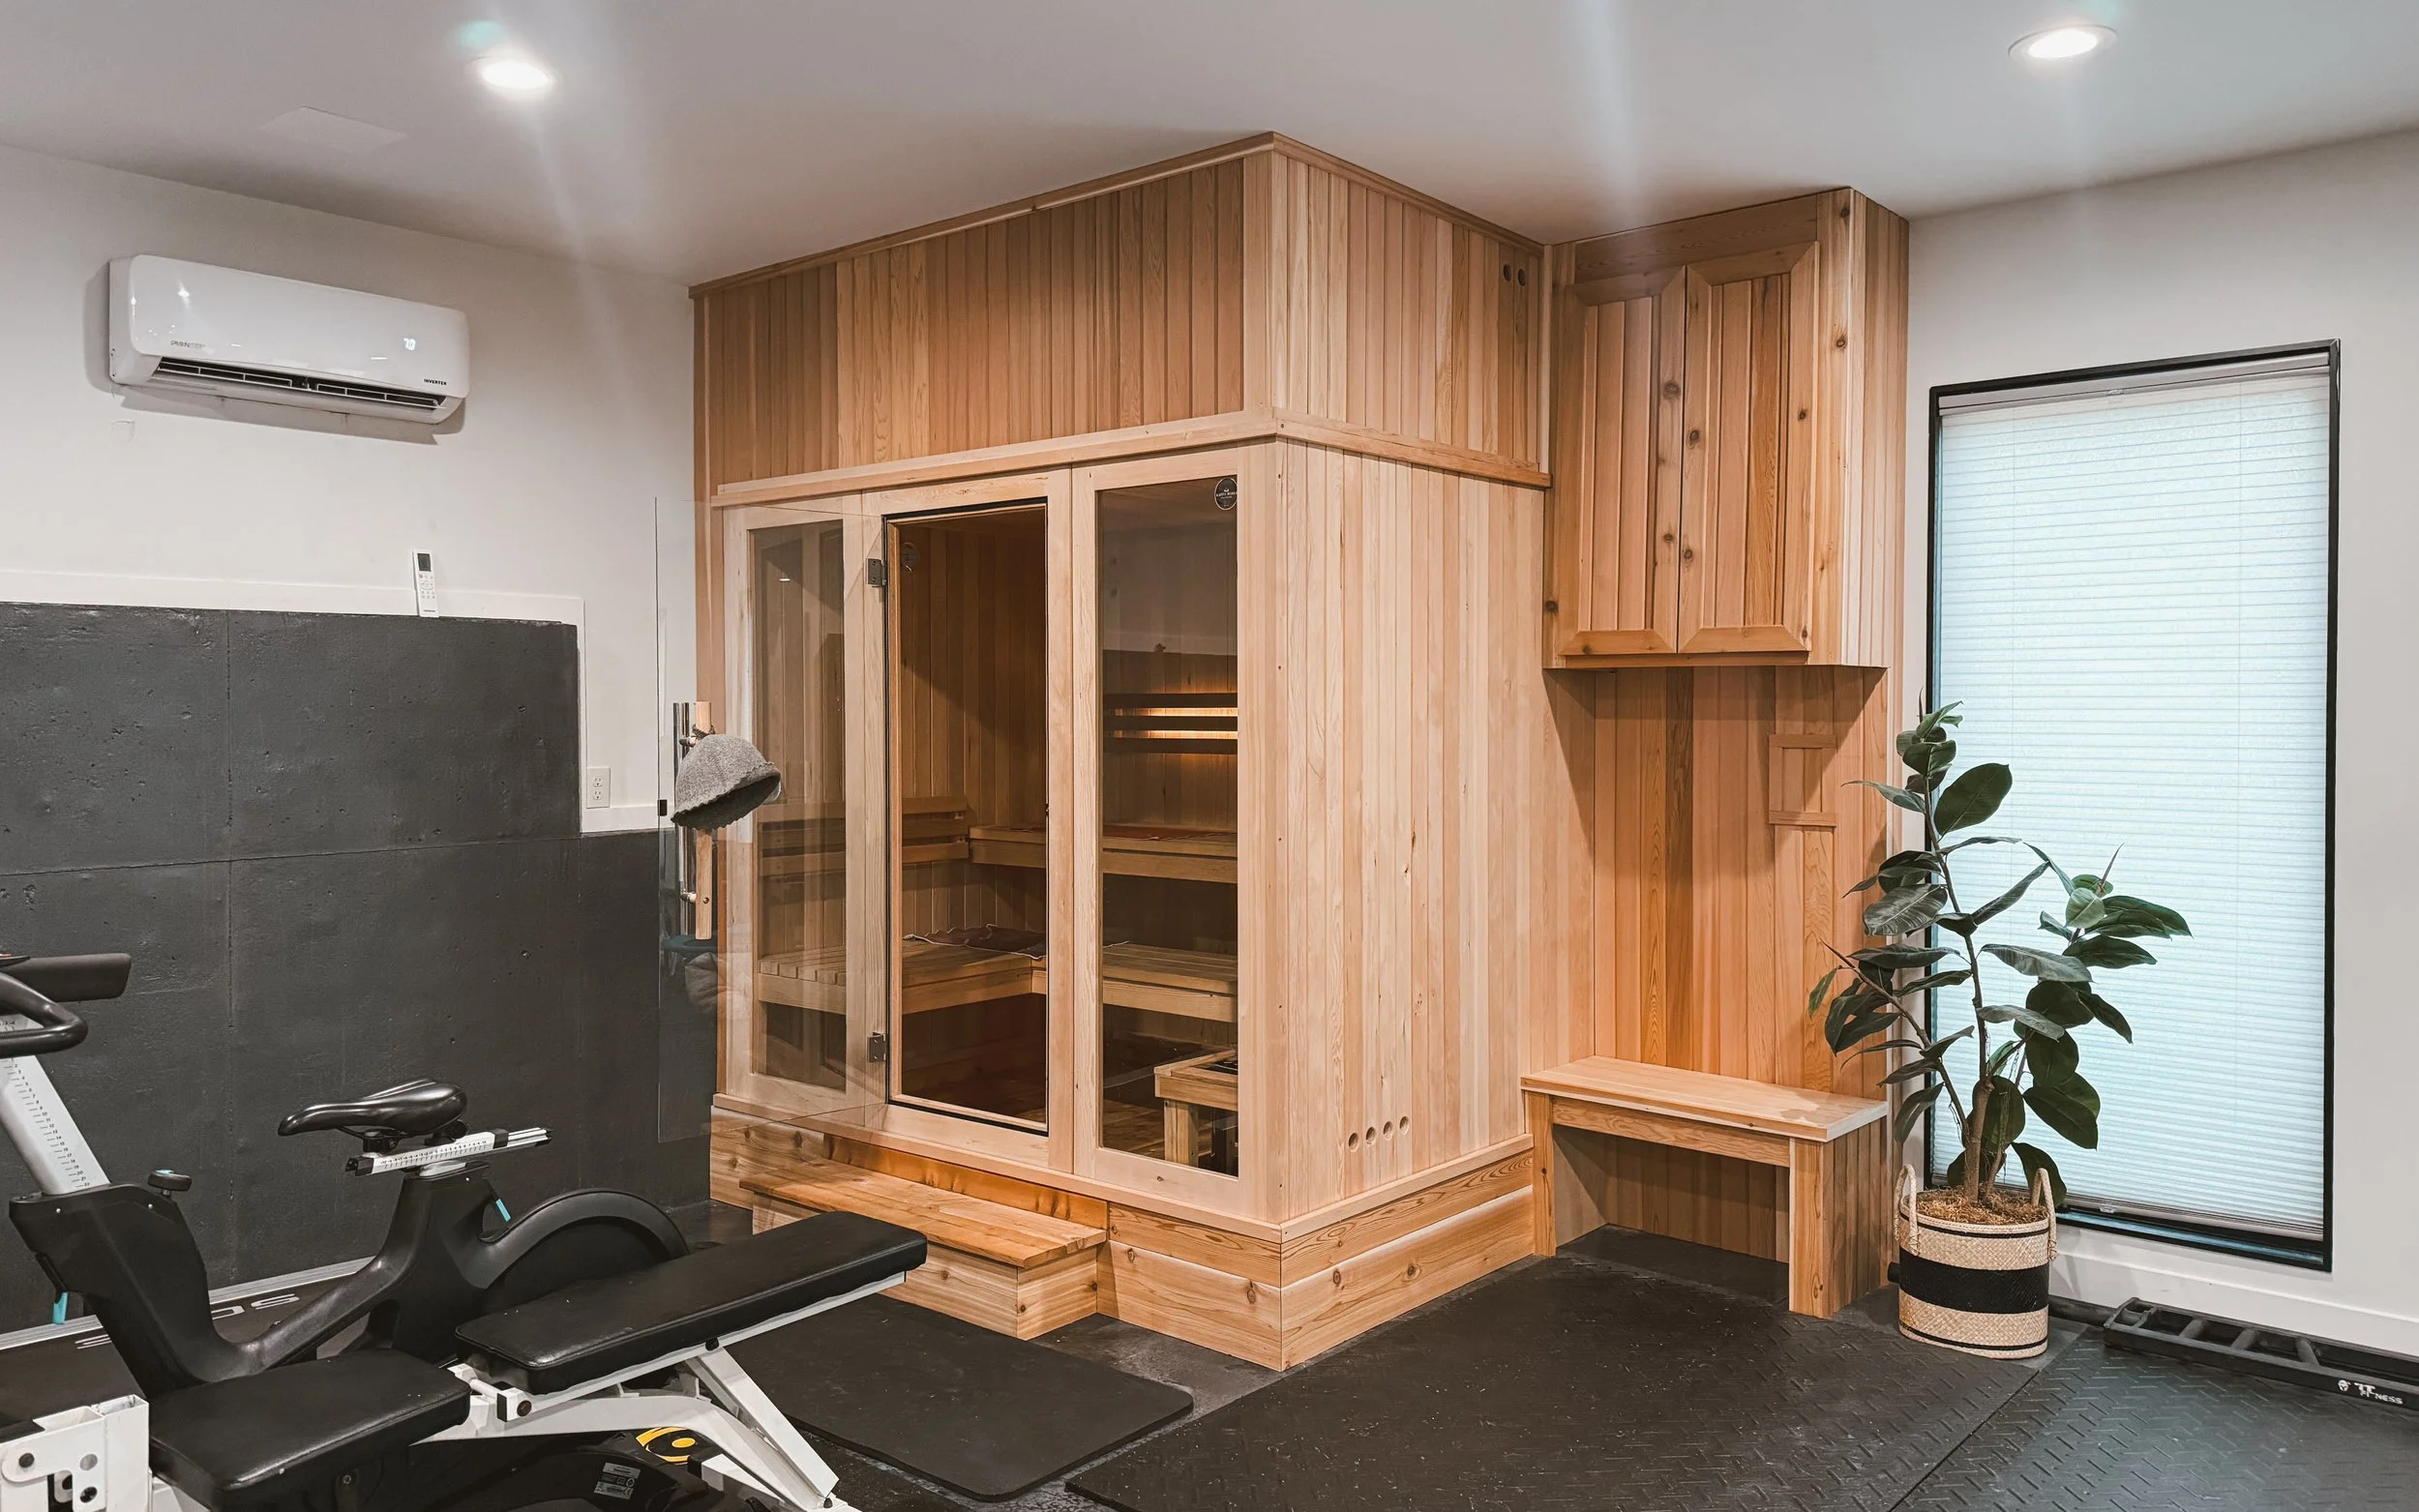
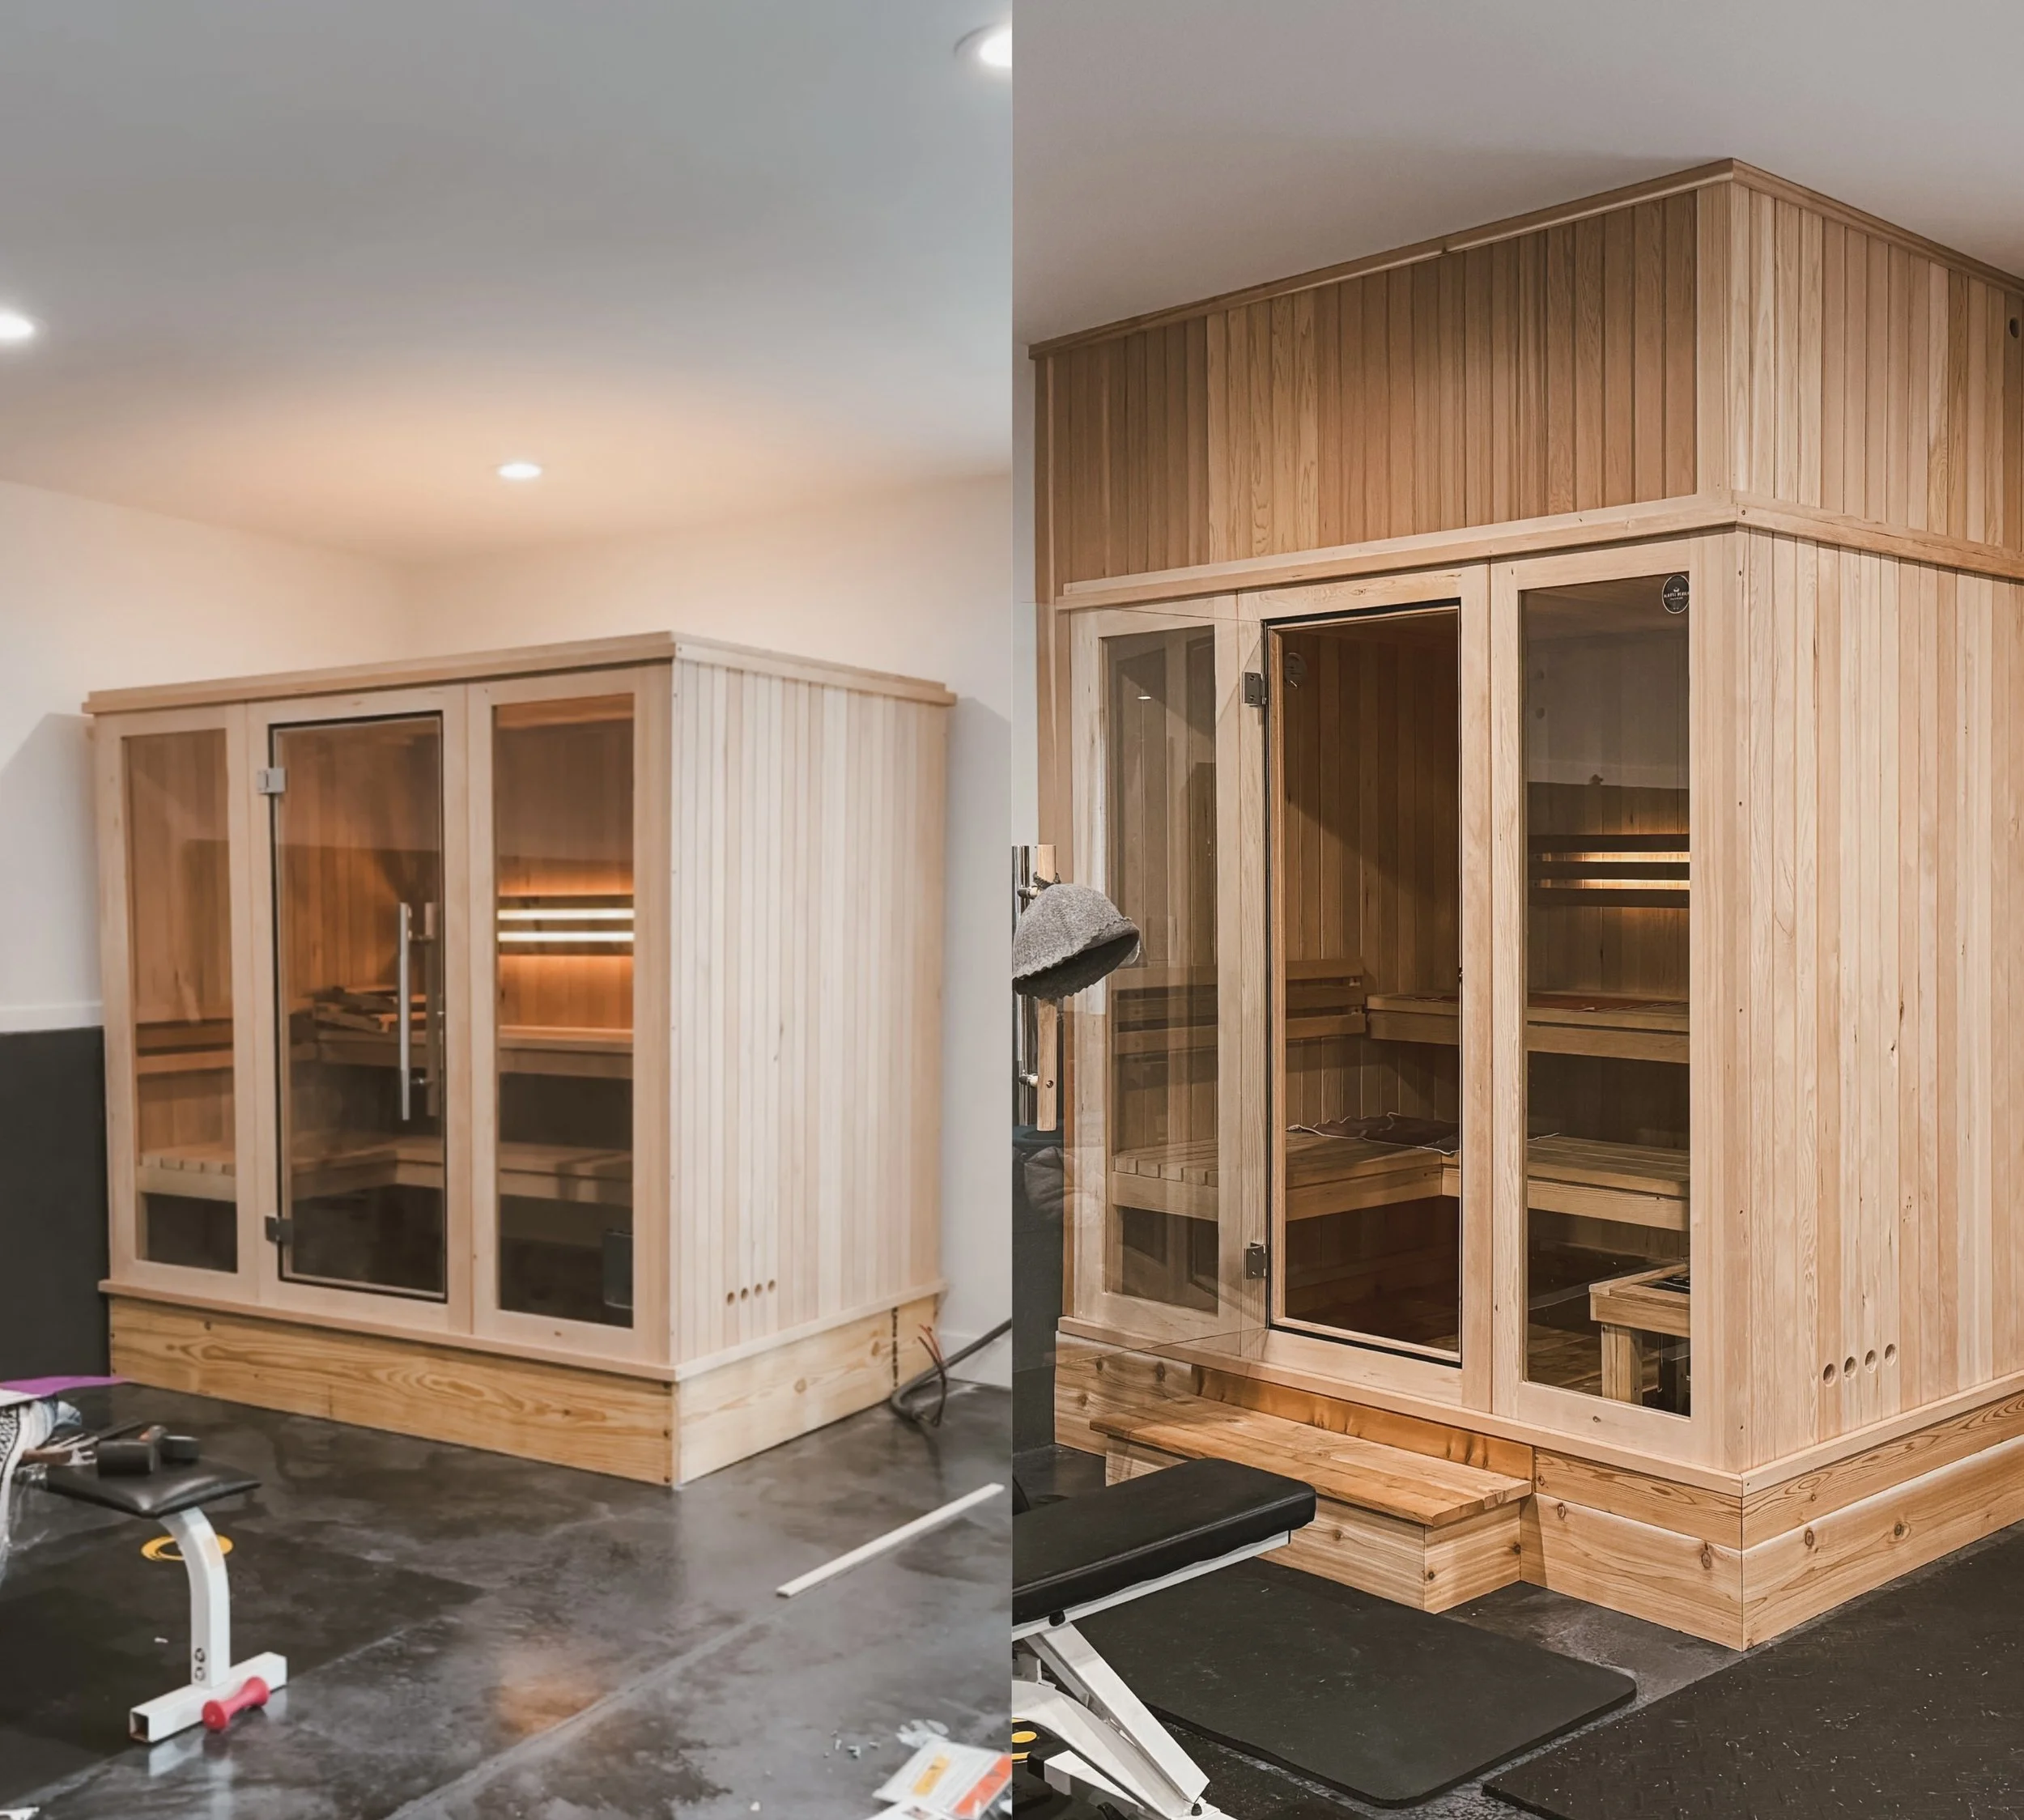
A quick note on how we built it out
Since this always comes up, I wanted to share a little about how we built out the sauna. None of this is required, but we chose to customize it so it felt permanent and fully integrated into the gym.
We started by placing the sauna on 2x12s to lift it slightly off the ground. From the beginning, he knew he wanted to add a step and a finished floor, so elevating it early made that easier. In the earlier photos, you can see there was no floor yet, just the existing gym flooring underneath.
We had an electrician come out to handle all of the wiring, which is definitely something we recommend. After that, our trim guy came in and built the sauna up to the ceiling, added the floor and step, and built a side seat and cabinet so it truly felt built in rather than just placed in the room.
Everything was finished with cedar tongue and groove, which gave it that classic sauna look and helped it blend seamlessly with the rest of the gym. Again, none of these upgrades are necessary to enjoy a sauna. They were simply optional choices we made to customize the space around how he actually uses it.
Why it’s been worth it for us
Having a sauna at home has turned something that used to be occasional into a regular habit. Instead of squeezing it in at a gym or spa, it is now something my husband can use whenever he needs it.
It has become a simple, reliable way for him to relax, recover, and take care of his body, which is ultimately why it has felt so worth it for our family.
Quick note: staying hydrated is important when using a sauna. And if you have any medical conditions or health concerns, it’s always a good idea to check with your healthcare provider to make sure sauna use is right for you.
Here is the link for our sauna!
If you like this, you might be interested in my HEALTHIER NO-BAKE LEMON “CAKE POPS”!

How to Think Outside the Box When Creating a Gallery Wall

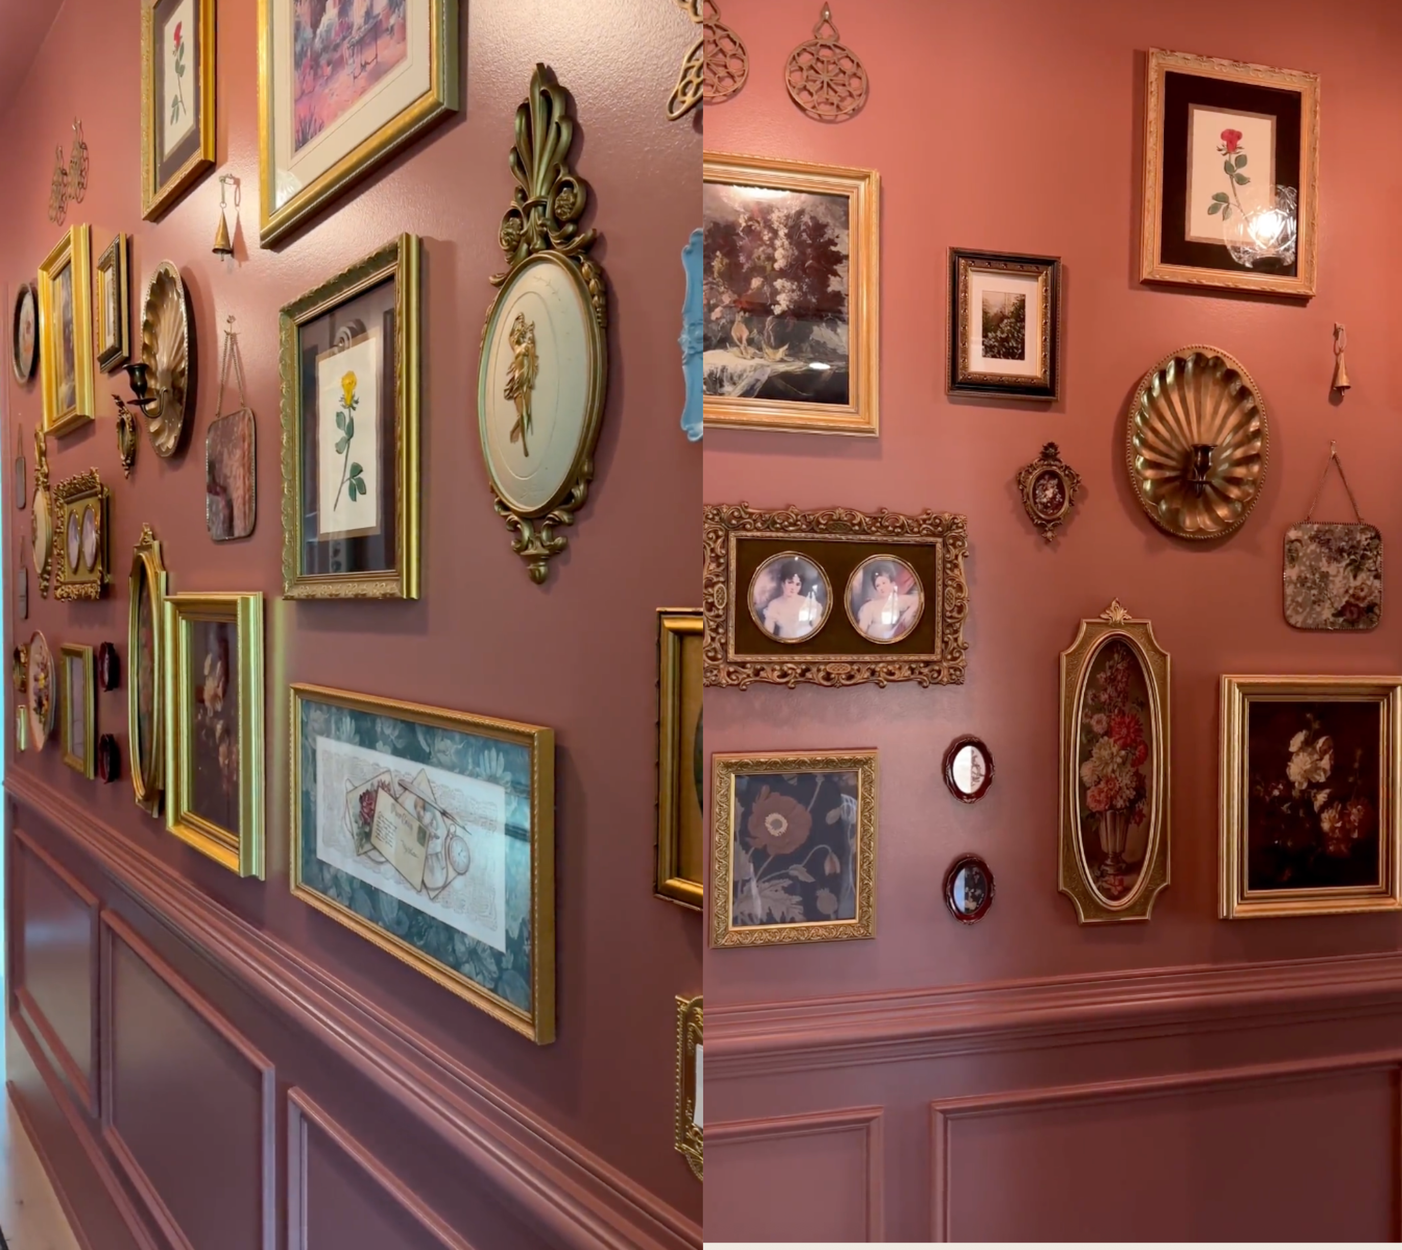
When most people imagine a gallery wall, they picture rows of framed art and photographs. Beautiful, yes, but also a little limiting. Some of the most charming gallery walls are the ones that mix in unexpected pieces. Think texture. Think dimension. Think objects that tell a story.
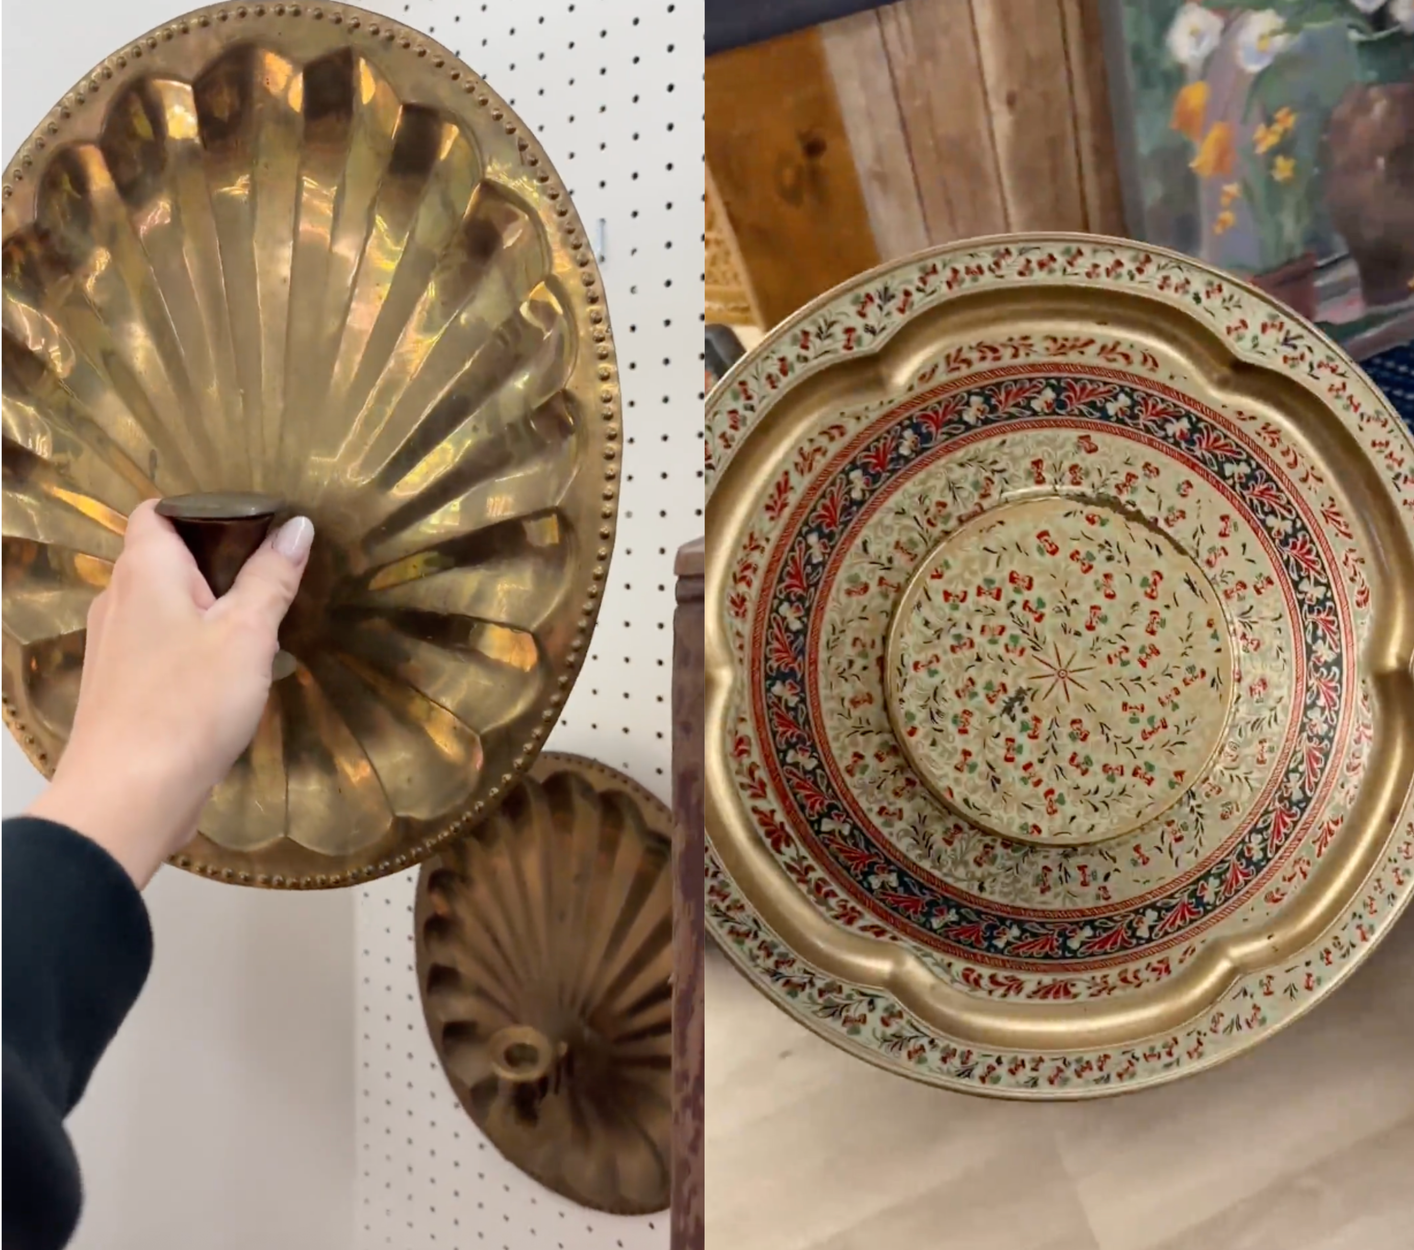
When I created my gallery wall, I thrifted for months and still felt like something was missing. It was not until I wandered through my favorite antique shop, Queen of Hearts Antiques, that it clicked. A gallery wall does not have to be only frames.
The moment I started looking beyond artwork, everything opened up. Suddenly the aisles of the shop felt full of possibilities. I grabbed vintage trivets, small decorative trays, mirrors, old keys, and even a couple of charming bells. None of them were traditional gallery wall pieces, but that is exactly why they worked.
Why Mix in Objects?
Adding dimensional pieces instantly gives a gallery wall more personality. A flat wall becomes layered. A collection becomes a story. Those small, unexpected items break up the repetition of frames and help your eye move around the display.
Objects also bring in:
Texture like metal, wood, woven pieces, or ceramic
Soft curves that balance all the straight frame edges
Unique shapes that fill odd gaps beautifully
Vintage character that feels warm and collected
What to Look For When You Are Thrifting or Antiquing
Next time you are out hunting for pieces, do not just scan for frames. Keep an eye out for:
Trivets in cast iron, brass, or ceramic
Small trays or shallow dishes
Mirrors in interesting shapes or finishes
Keys or key bundles
Bells with a great patina
Handheld tools with beautiful wear
Woven pieces
If it is lightweight and has a flat back, you can probably hang it.
The Secret to Making It All Look Cohesive
The trick is not matching items. The trick is balancing them.
Mix textures and tones so nothing feels too heavy in one spot. Scatter the dimensional pieces throughout instead of grouping them together. Do not worry about perfect symmetry. A collected wall should feel organic, like it naturally evolved over time.
Give Yourself Permission to Play
The best gallery walls are not curated in a day. They are gathered. Tweaked. Added to. Rearranged. The beauty comes from the mix. Frames and the unexpected.
So the next time you are building a gallery wall, think outside the box. Look beyond the frame aisle. Pick up that quirky little object you love but do not know where to put.
It might be the perfect piece to finish your wall.

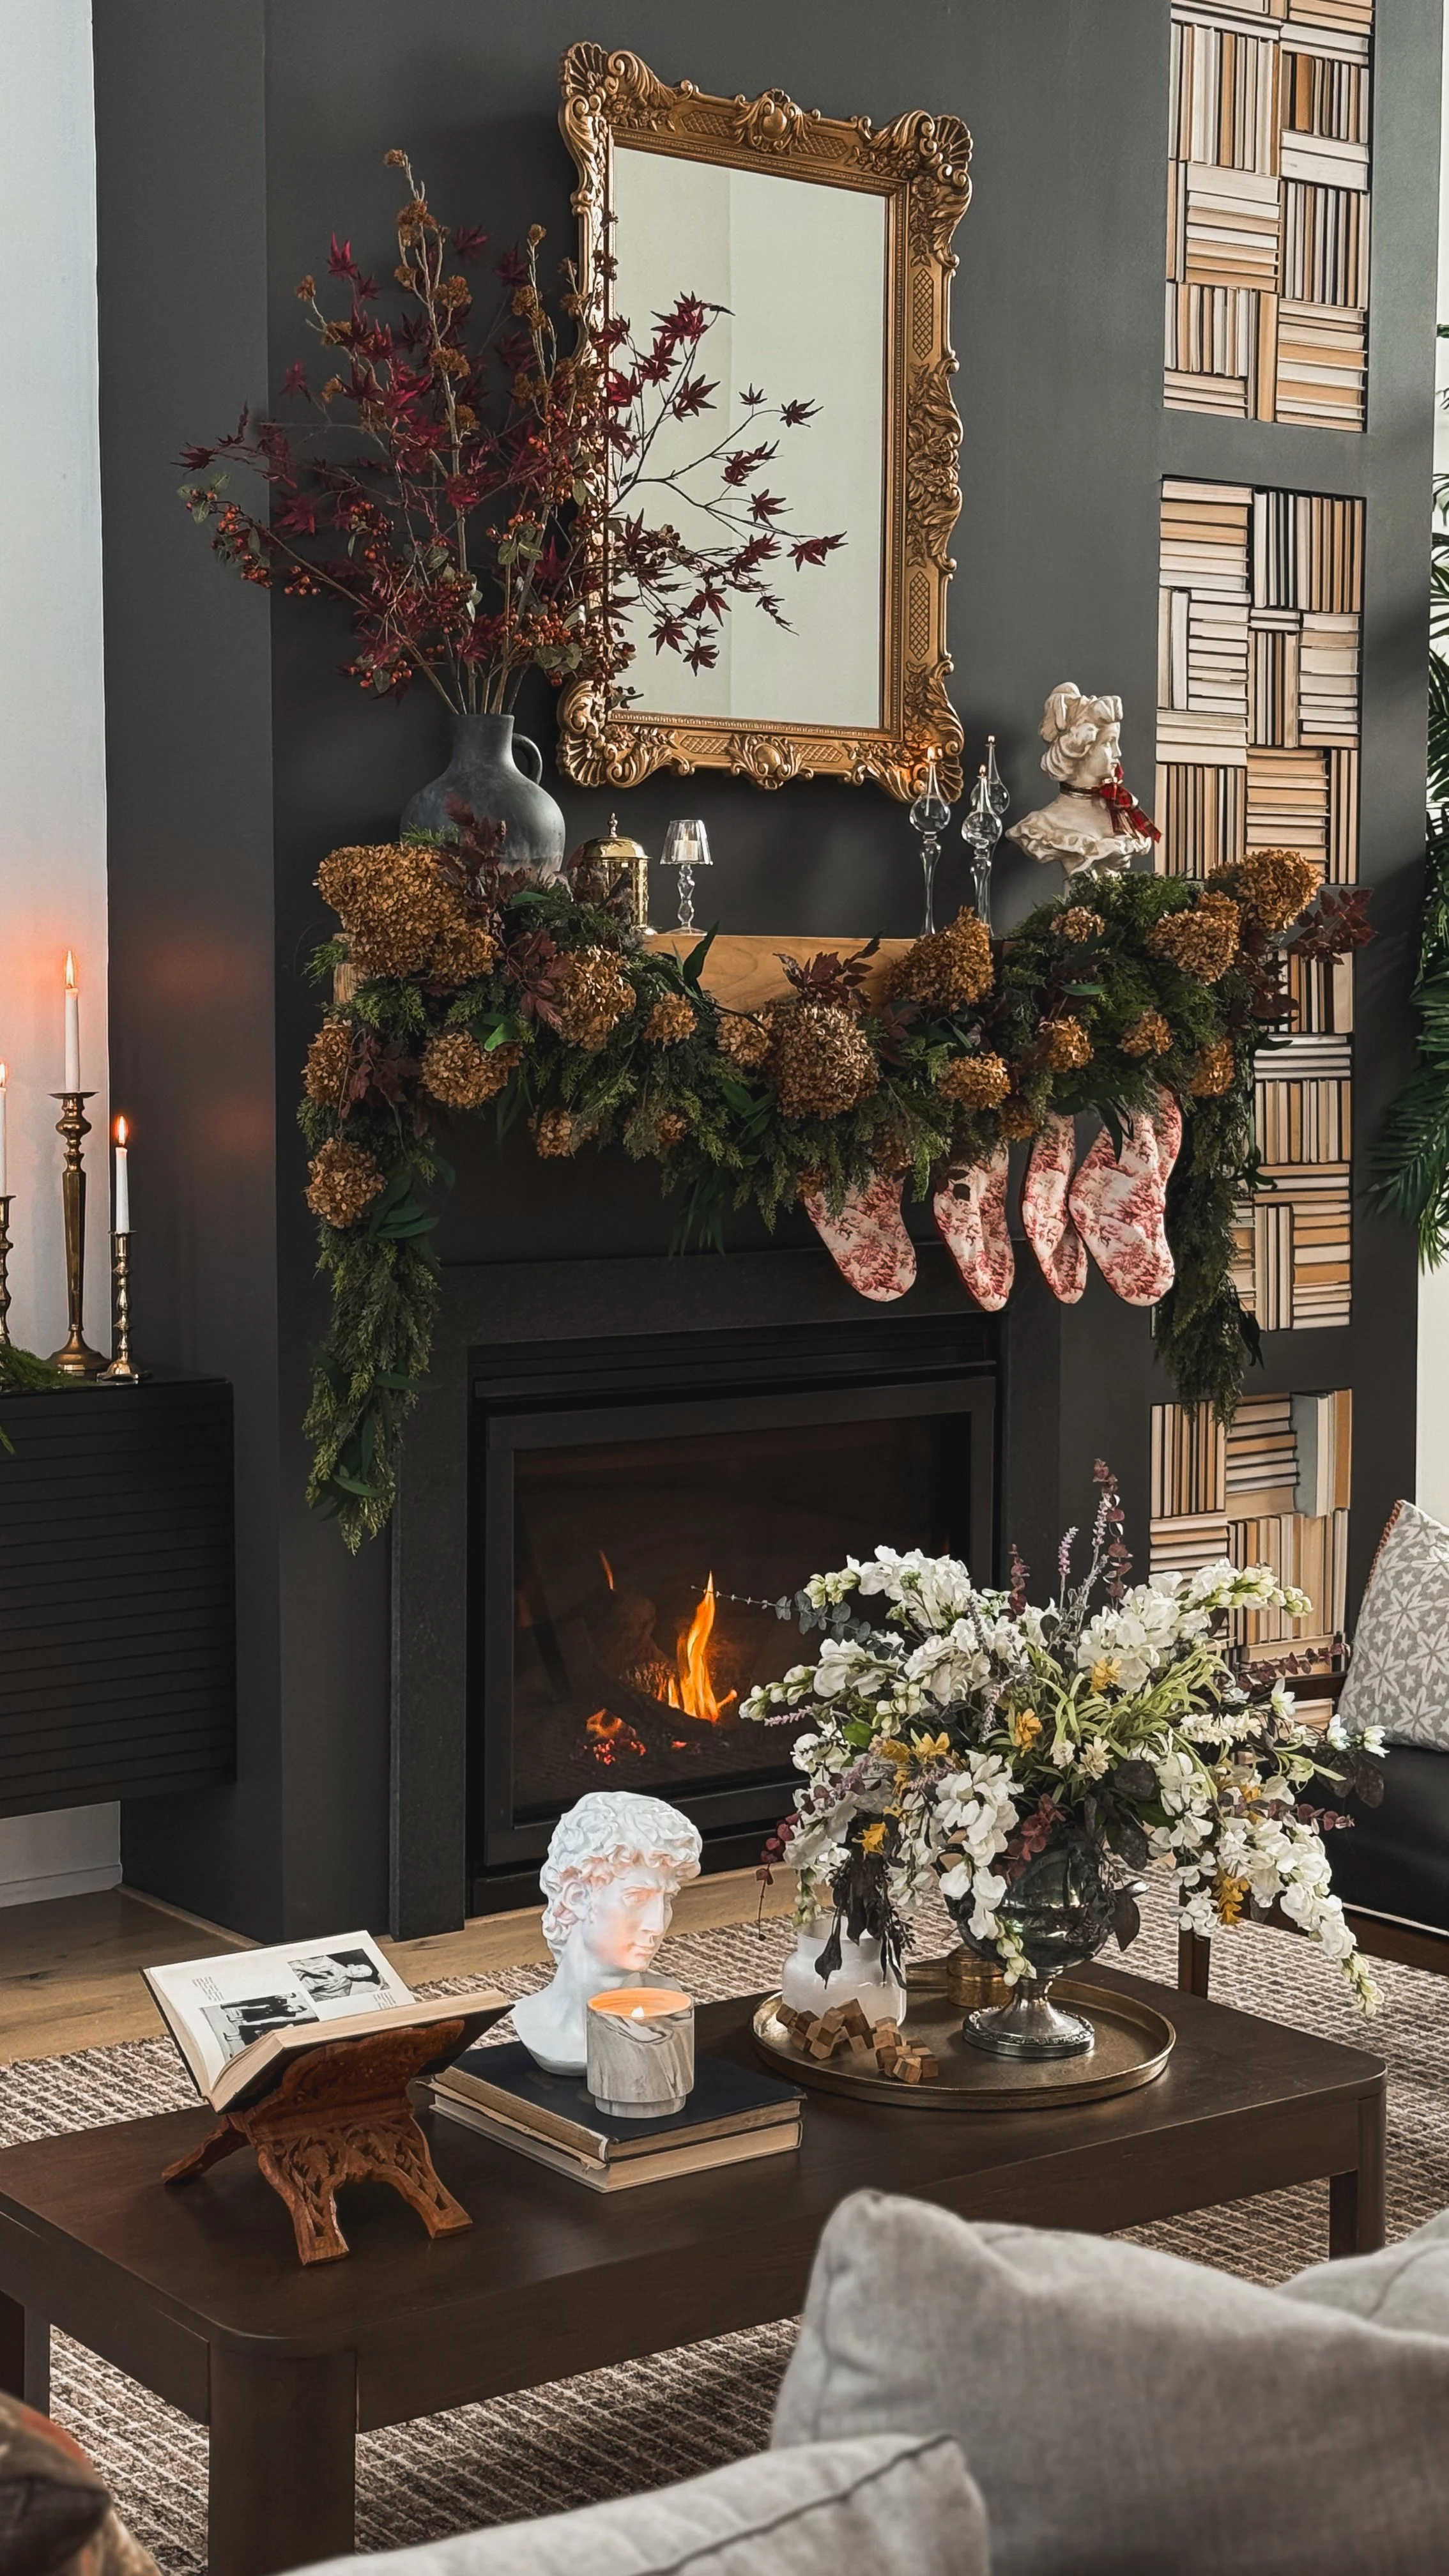
Decorating for Christmas with Dried Hydrangeas

This year I really wanted my Christmas decor to feel warm, collected, and full of texture, so I decided to build my mantel around one of my favorite end-of-season treasures, dried hydrangeas. They have the prettiest antique color once they dry on the bush and they blend beautifully with Christmas greenery. I loved the idea of using them to create a lush, old world garland and it turned out even better than I imagined.
If you want to try this look in your own home, here’s exactly how I did it.

Step 1: Let the Hydrangeas Dry on the Plant
At the end of the season I leave my hydrangea blooms on the bush until they naturally dry out. Once they feel papery and the color shifts to that warm golden brown, I clip them off and bring them inside. There’s no special prep. They’re ready to use as soon as they’re fully dry.

Step 2: Build a Full Greenery Base
To get that really full, drapey look, I layered several different garlands together.
I started with one thick, super realistic greenery garland I bought years ago from a website that sadly doesn’t sell them anymore.
Then I added two Amazon garlands to each side to extend the shape and give it more length and movement.
I also tucked in a few leftover sprigs of greenery, I had lying around, to add more layers and texture.
This combination creates the perfect base for dried hydrangeas because the branches give them lots of places to nestle in without any wiring.
Step 3: Add Your Dried Hydrangeas
Once the greenery was in place, I tucked the hydrangeas throughout the garland, concentrating on spots that needed a little more fullness or color. They add so much volume and richness, and because every bloom dries a little differently, the whole garland takes on that perfectly layered, collected look.

Step 4: Style the Mantel with Collected Pieces
Once the hydrangeas were in place, I layered in the rest of my decor. Almost everything on this mantel is secondhand, which is exactly why I love it. I go to estate sales and vintage shops any chance I get, and those pieces always bring so much character to a space.
Why Hydrangeas Work So Well for Christmas
They’re free, they’re beautiful, and they last all season. The dried texture pairs perfectly with classic Christmas greenery and adds dimension you just can’t get from store bought florals. If you want a mantel that feels curated and timeless, hydrangeas are the perfect addition.
This ended up being one of my favorite Christmas projects this year. It’s simple, it’s natural, and it makes the whole room feel warm and collected. If you have hydrangeas in your yard, definitely save them at the end of the season. They make the most stunning holiday decor.
Links at a Glance
Mantle Statue - Estate Sale
Oil Candles - Estate Sale
Mirror - Goodwill
Gold Canister on Mantle - Estate Sale
If you liked this, you might be interested in my blog all about my estate sale tips!

How To Make A Dried Orange Garland

If you’ve ever wanted that cozy, old-fashioned Christmas look without spending a ton, dried orange garland is so easy to make at home. It’s one of those simple little projects that makes your whole house feel warm and festive, and the best part is, you only need oranges, an air fryer, and a bit of fishing line.
Here’s exactly how I make mine:
1. Slice your oranges as thin as you can.
The thinner they are, the faster and more evenly they dry.

2. Place the slices on a tiered metal shelf inside your air fryer.
This keeps them separated so the air can circulate around each slice.
3. Cook at 195°F for about three hours.
Make sure you check on them here and there.

4. Thread them onto fishing line using a big needle.
Just poke through the top edge of each slice and slide them down the line.
And that’s it. Sweet, simple, and so pretty. This year I hung mine across my mantle, and I love how the warm orange tones mix with the greenery . It really does add that perfect handmade touch.

Links at a glance
Garland - Sadly, no longer available
If you like this, you might be interested in how I decorated my bedroom for Christmas!

Vegan Artichoke Dip

My go-to potluck dish? This vegan artichoke dip. It’s perfect for my vegan husband, completely dairy-free, and always a hit with everyone at the table. Serve with tortilla or pita chips and watch it disappear.
INGREDIENTS
1 (10 ounce) package of frozen spinach, thawed and well-drained
1 (14 ounce) can of artichoke hearts, drained and chopped
½ cup vegan sour cream (roughly 7oz)
4 cloves garlic, minced
8 ounces vegan cream cheese
¾ cup vegan parmesan + more to sprinkle on top (4oz)
¼ teaspoon pepper
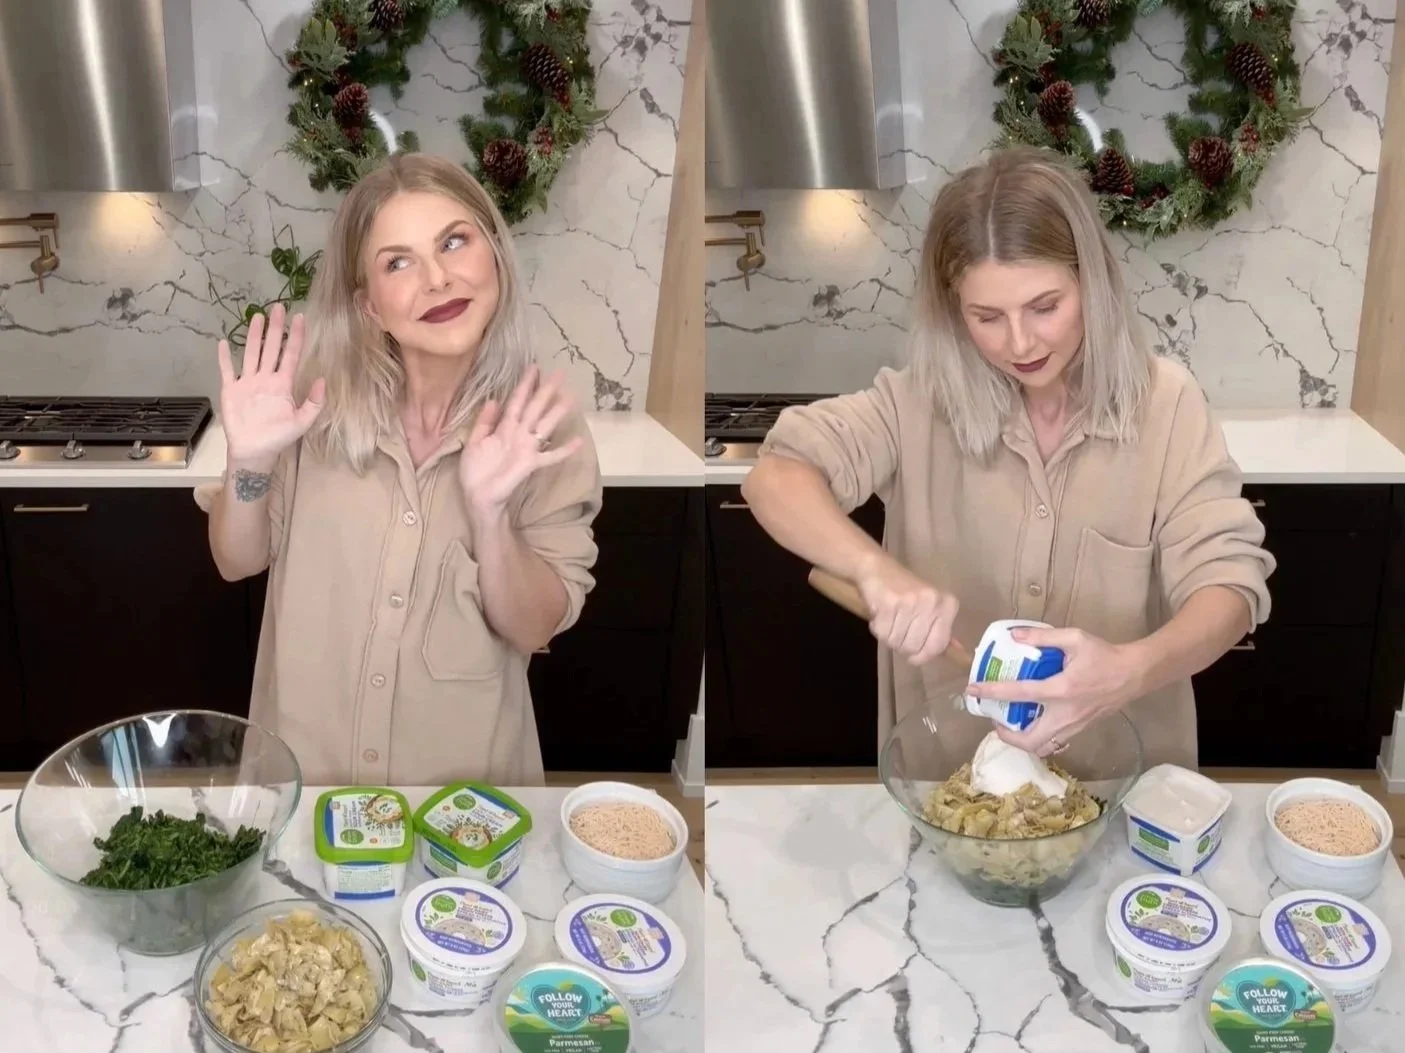
INSTRUCTIONS
Preheat the oven to 375.
Drain all the excess water out of the thawed spinach and place in a large bowl with the vegan sour cream, artichoke hearts, and garlic.
Stir to combine.
Add vegan cream cheese, ¾ cup vegan parmesan, and pepper. Stir again until all the ingredients are evenly distributed.
Transfer the dip into a baking dish. Bake for 25 minutes until light brown.
Turn oven to broil and broil for 2-3 minutes to get the top a slightly darker brown.
Remove from oven and serve with pita chips or a fresh baguette.

If you like this, then you might be interested in my Vegan Thanksgiving Recipes!

Vintage Inspired Gifts Under $100
If you love giving gifts that feel thoughtful, cozy and collected, this list is for you. Every pick is under $100 and has that vintage inspired charm that makes a home feel warm and personal. Easy to wrap, easy to love and perfect for anyone who appreciates beautiful details. All gifts and more are linked here.

If you like this, you might be interested in TOTO Bidet!

The Gift You Didn’t Know You Needed: My TOTO Bidet
Okay, hear me out, I am officially a bidet girl. And not just any bidet, the TOTO Washlet S2 elongated bidet seat. If you’ve ever wondered whether one of these is actually worth the hype, let me just say: yes. A thousand times yes.
This is one of those gifts that feels unexpected in the best way. Something you wouldn’t think to get for yourself, but once you do, you wonder how you ever lived without it. And honestly? It’s the perfect Christmas gift for someone you love (or for yourself, because sometimes we deserve a little everyday luxury).

Why I’m obsessed:
Cozy heated seat
Gentle warm air dryer
Instant warm water
Soft night light
Self-cleaning
And so much more

It makes you feel so clean, and so comfortable. It elevates something that every single person uses every single day, turning it from ordinary into a small moment of luxury.
If you’re looking for a gift that will surprise someone in the absolute best way, something practical, elevated, and genuinely life-enhancing, this is it. Everyone needs one.
Treat someone you love. Treat yourself. You’ll thank me later.