
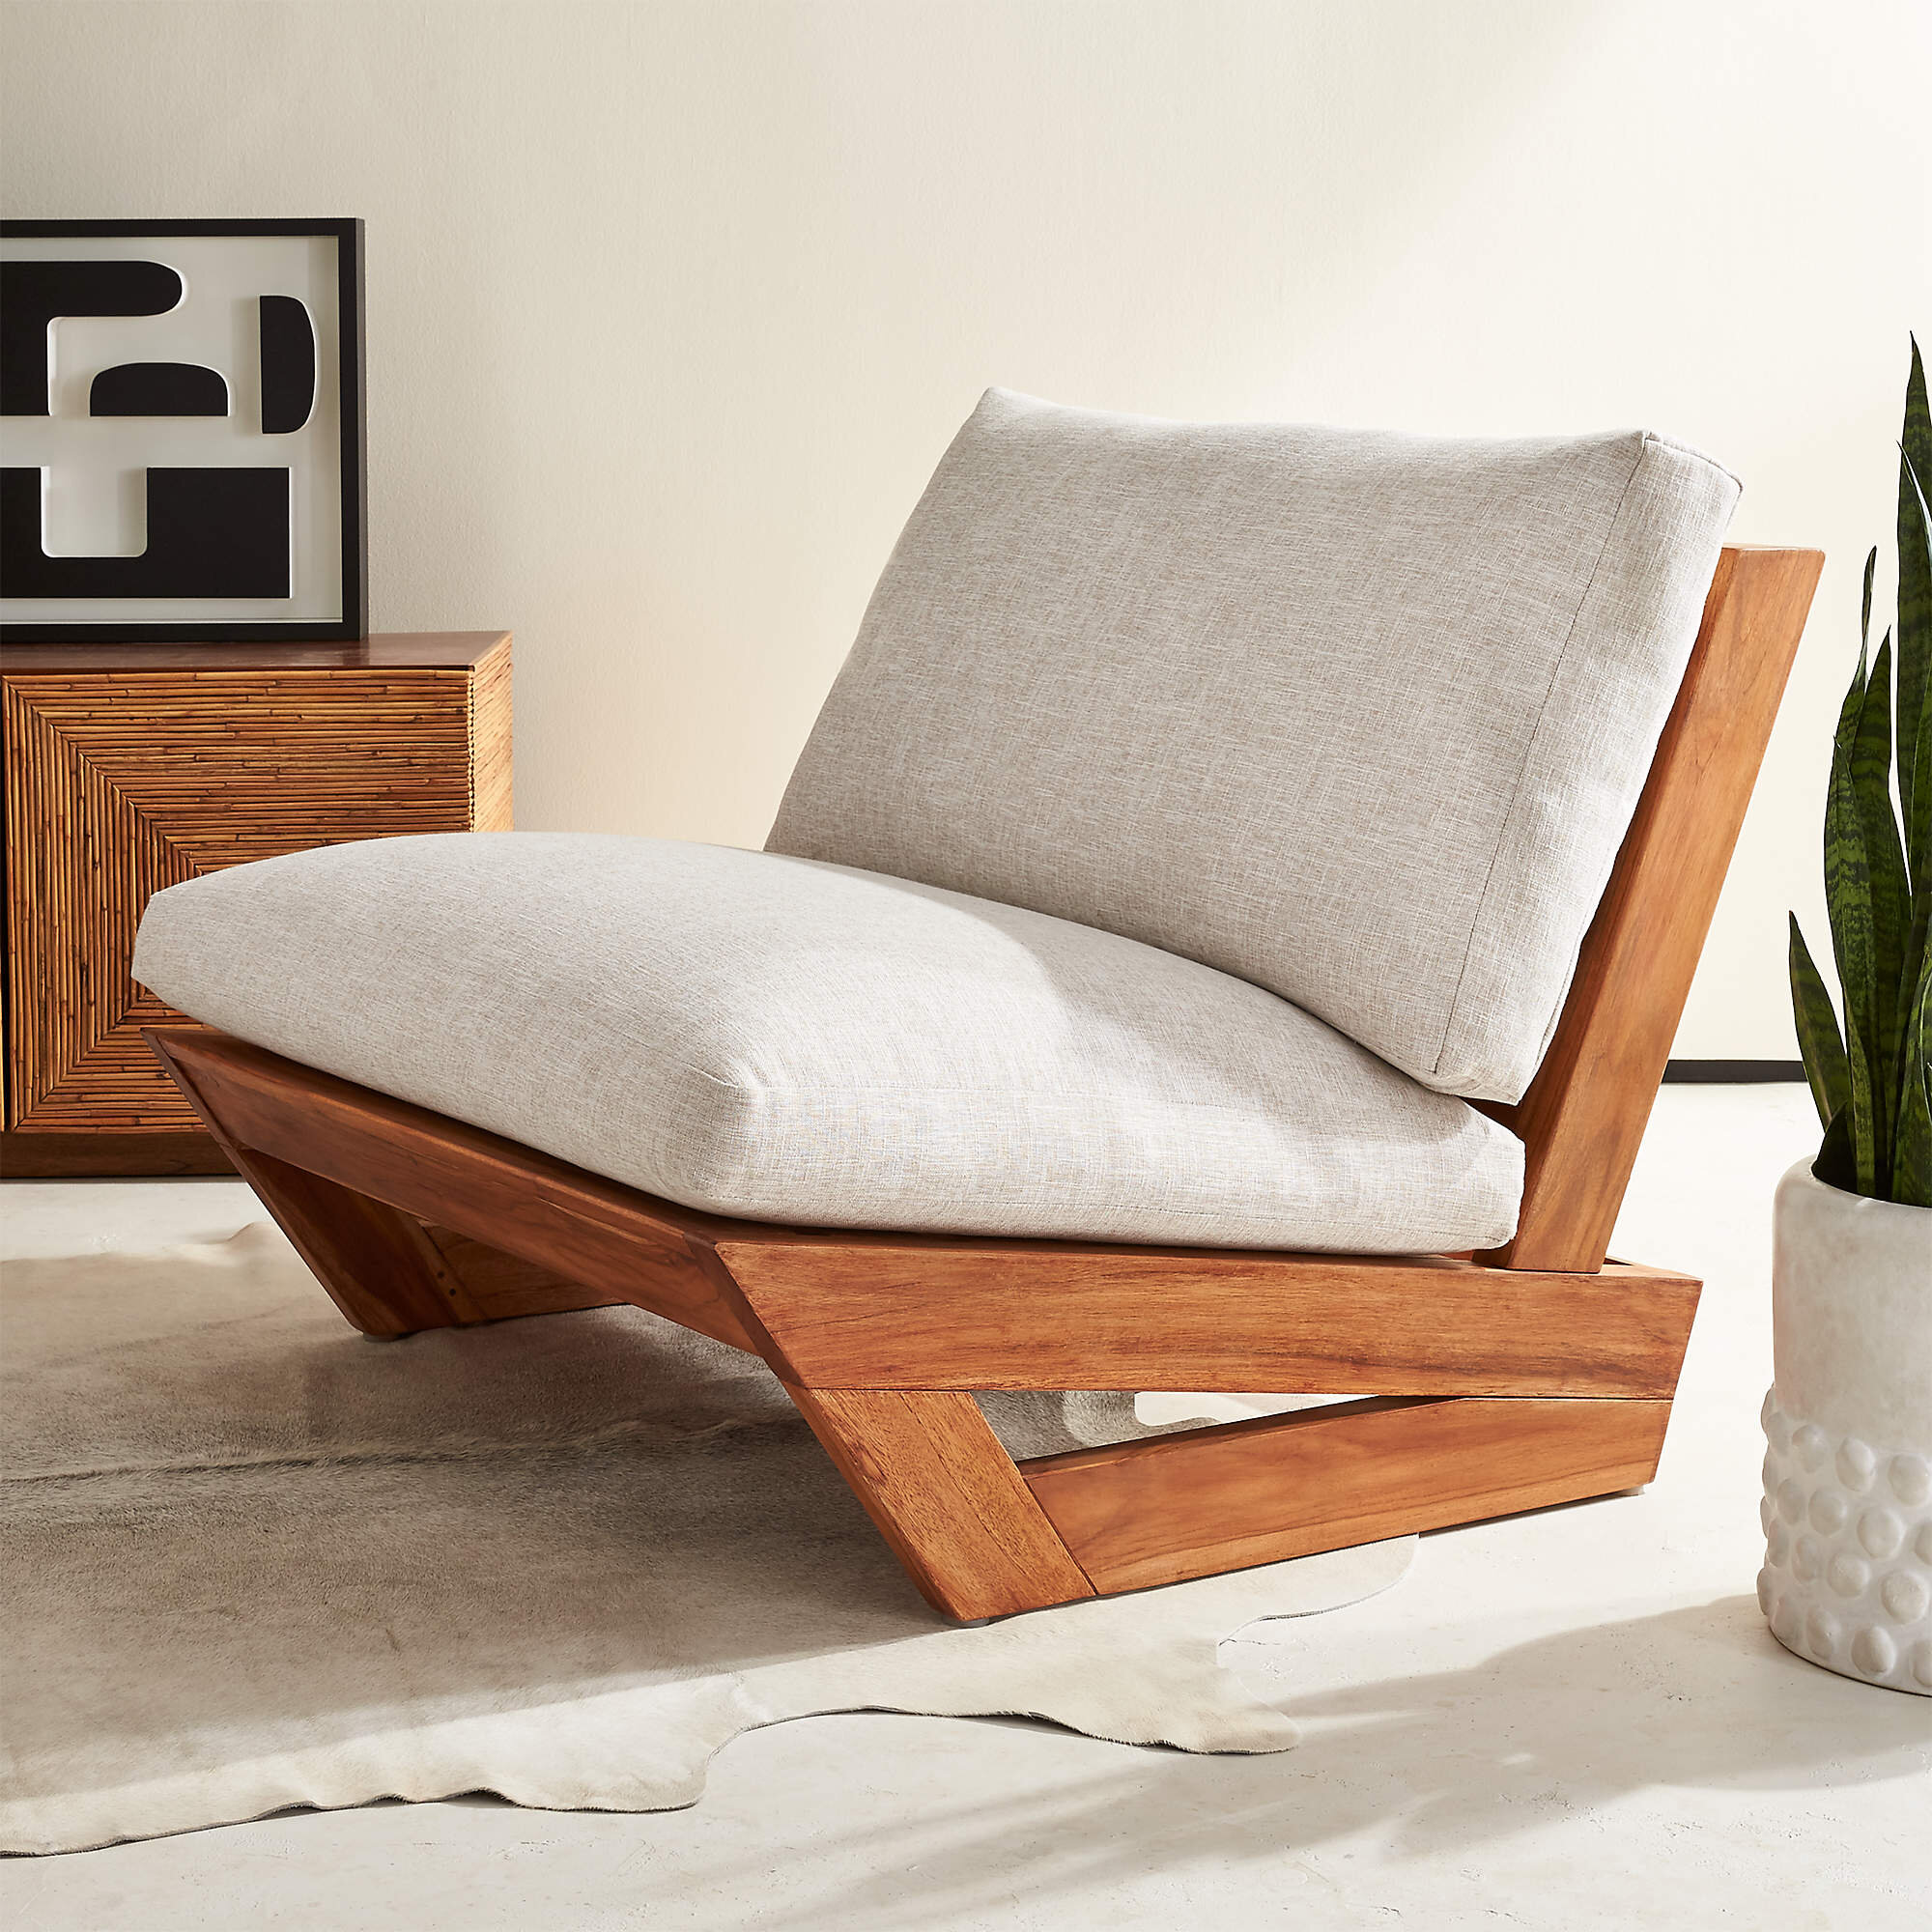
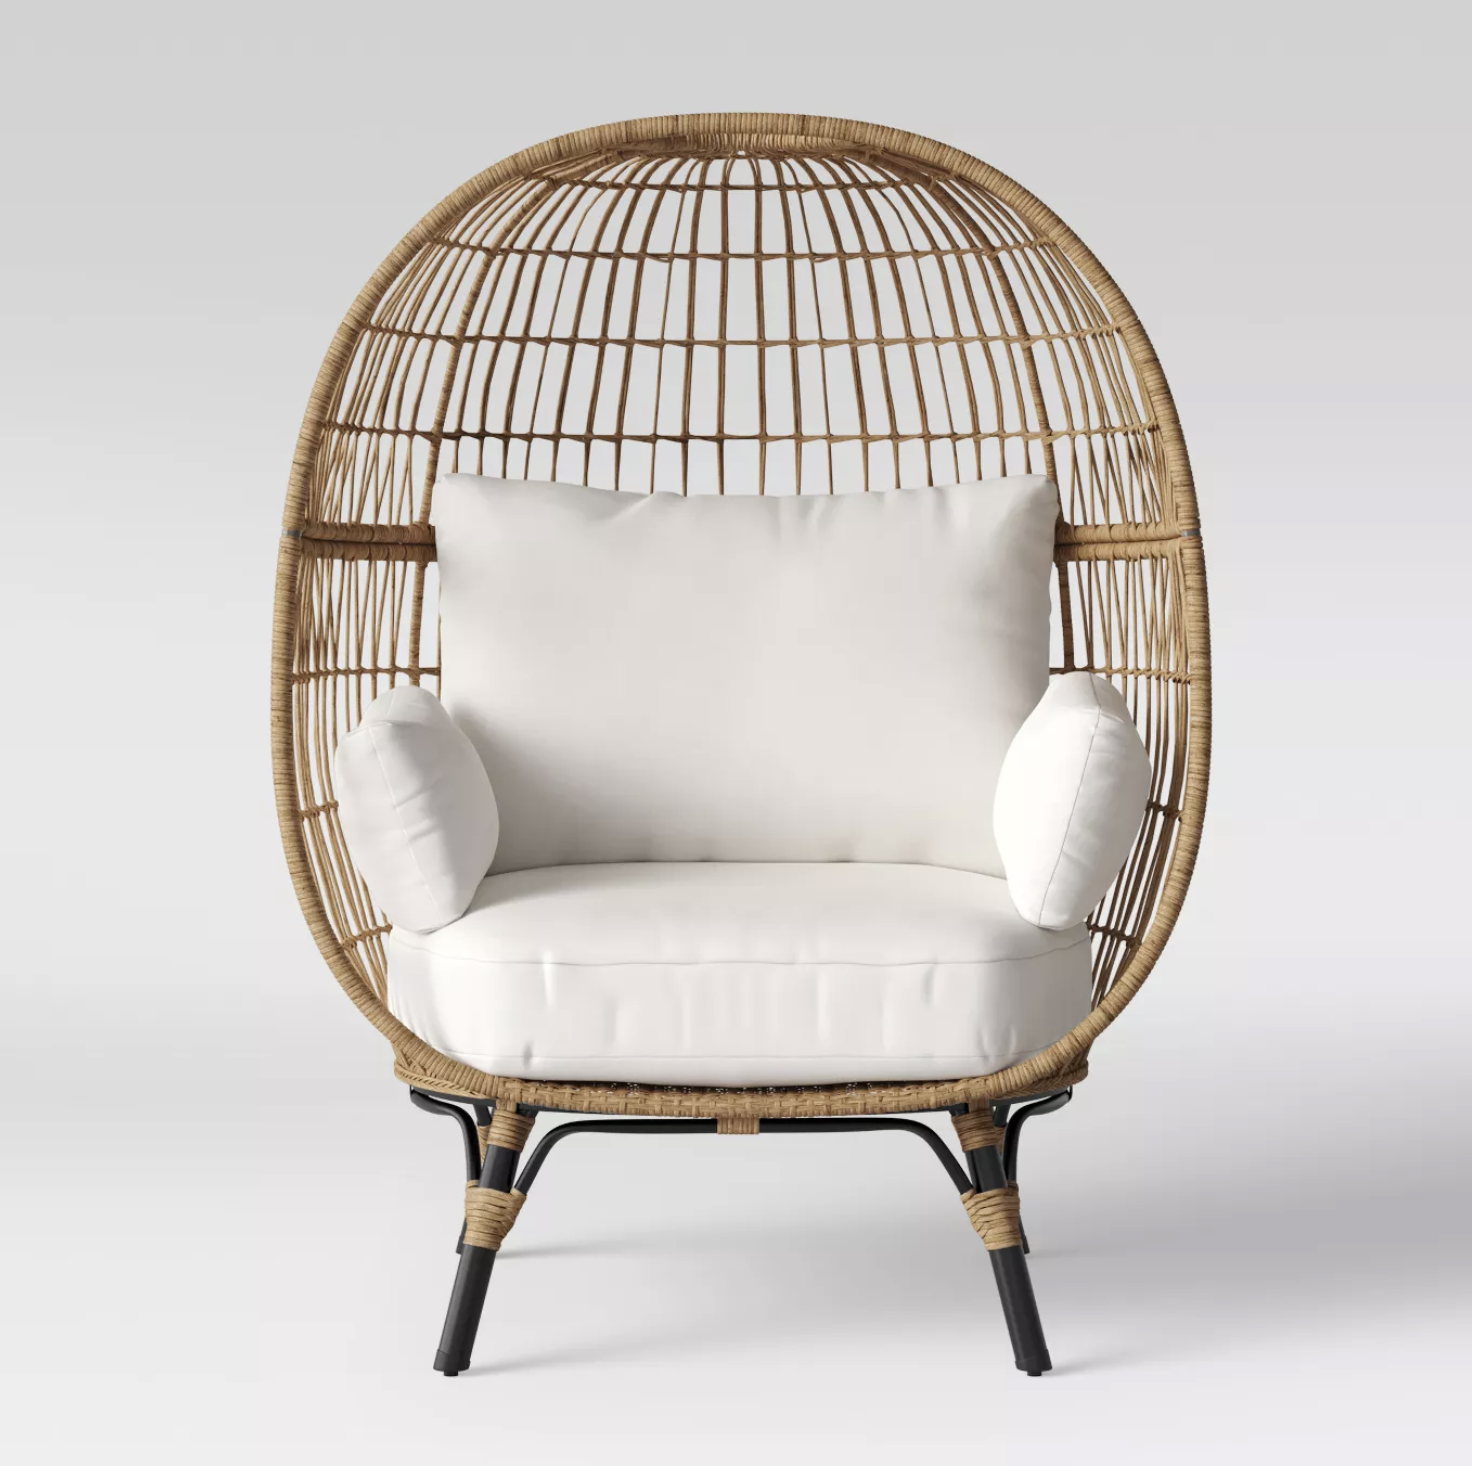
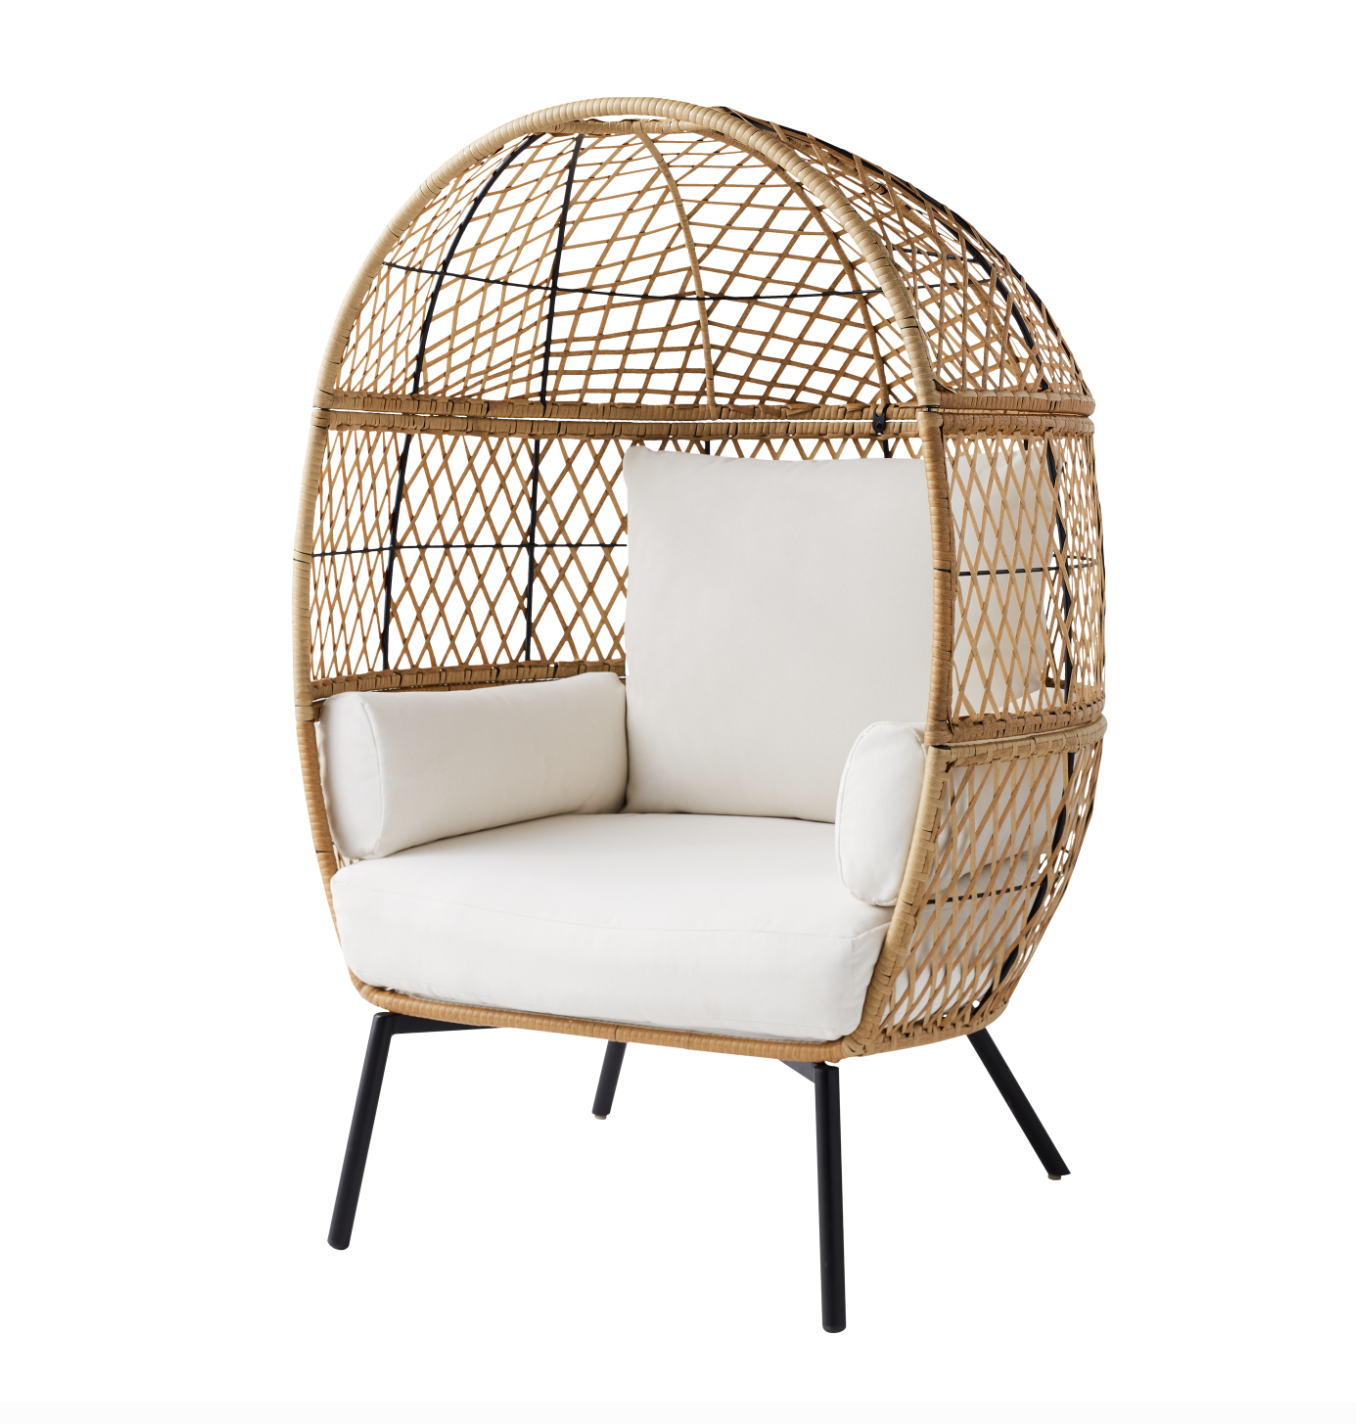
Ikea Duktig Play Kitchen Makeover
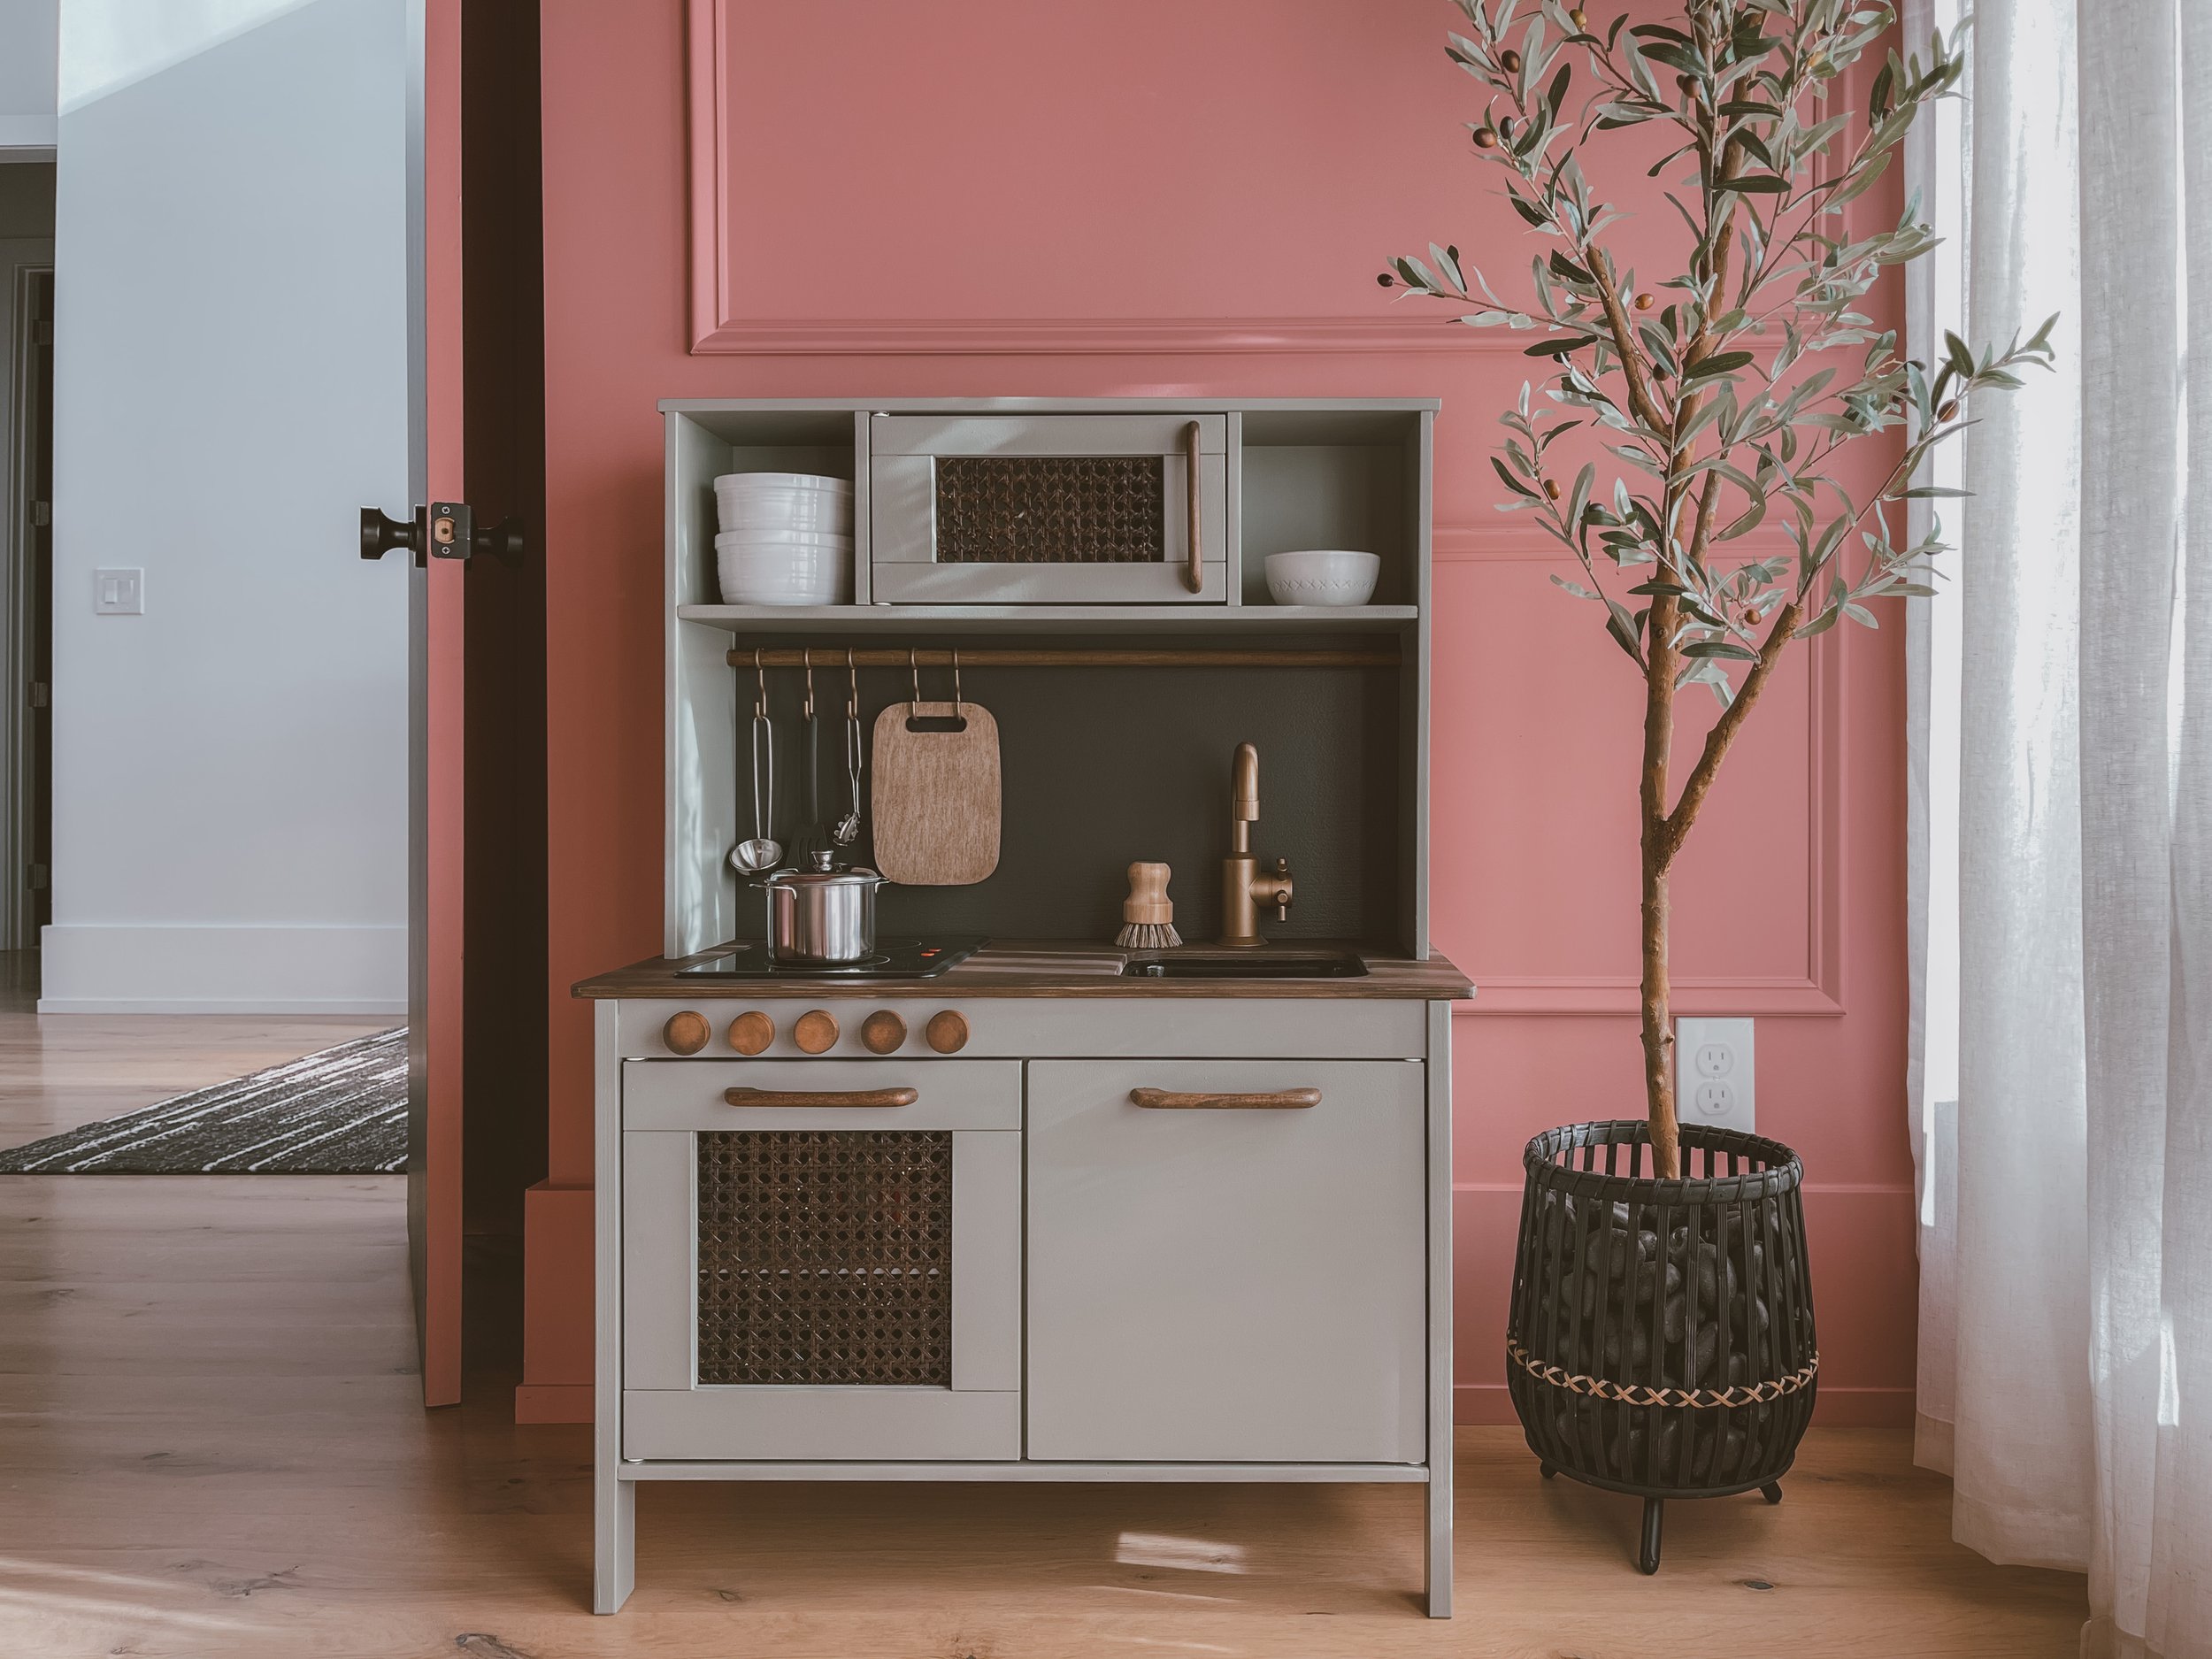
I stressed over this project before I started and let me say, it was SO fun to do. The Ikea Duktig Play Kitchen is $99. It’s a very simplistic design so the options to change it up are endless! You could spend as little or as much money as you want to customize it. I bought all of my materials at Home Depot, Amazon, and my enemy - Spray Polycrylic from Lowes. 😅
I tried to be as detailed as possible about each step, but if you have any questions you can comment below or DM me on Instagram.
MATERIALS:
80 Grit and 320 Grit Sandpaper that I used both by hand and with my Orbital Sander
Zinsser BIN White Shellac Spray - I used 2 1/2 cans
Rustoleum Spray Paint in Champagne Bronze - 1 can
Minwax Polycrylic Spray 1-2 cans in Clear Matte and the regular can half-pint in Satin (they didn’t have matte)
Behr Chalk Paint 1 qt tinted in Dusty Laurel. (This chalk paint can only be tinted in certain colors).
Optional : Polyshades in Mission Oak for the cane webbing. It will NOT work on the countertop. I don’t think you need this product but it’s what I used before I discovered the above stain.
Staining Cloth (I also tried a staining sponge but much prefer the cloths. I just used a glove with the cloths).
6” paint roller, with a 6” roller frame, and a 7” roller tray.
Paint brush - this one that I had on hand.
Wooden dowel in 1/2” cut to 26” long.
Thin piece of 1/4” 2’x4’ plywood for backsplash (or foam board that you could use peel and stick tiles)
Painters tape
24” Cane Webbing (2 feet) from Amazon
Gorilla Glue Construction Adhesive
INSTRUCTIONS FOR THE VENEER PIECES (EXCEPT COUNTERTOP):
Do NOT assemble the kitchen until the end. This makes sanding, painting, and sealing A BREEZE.
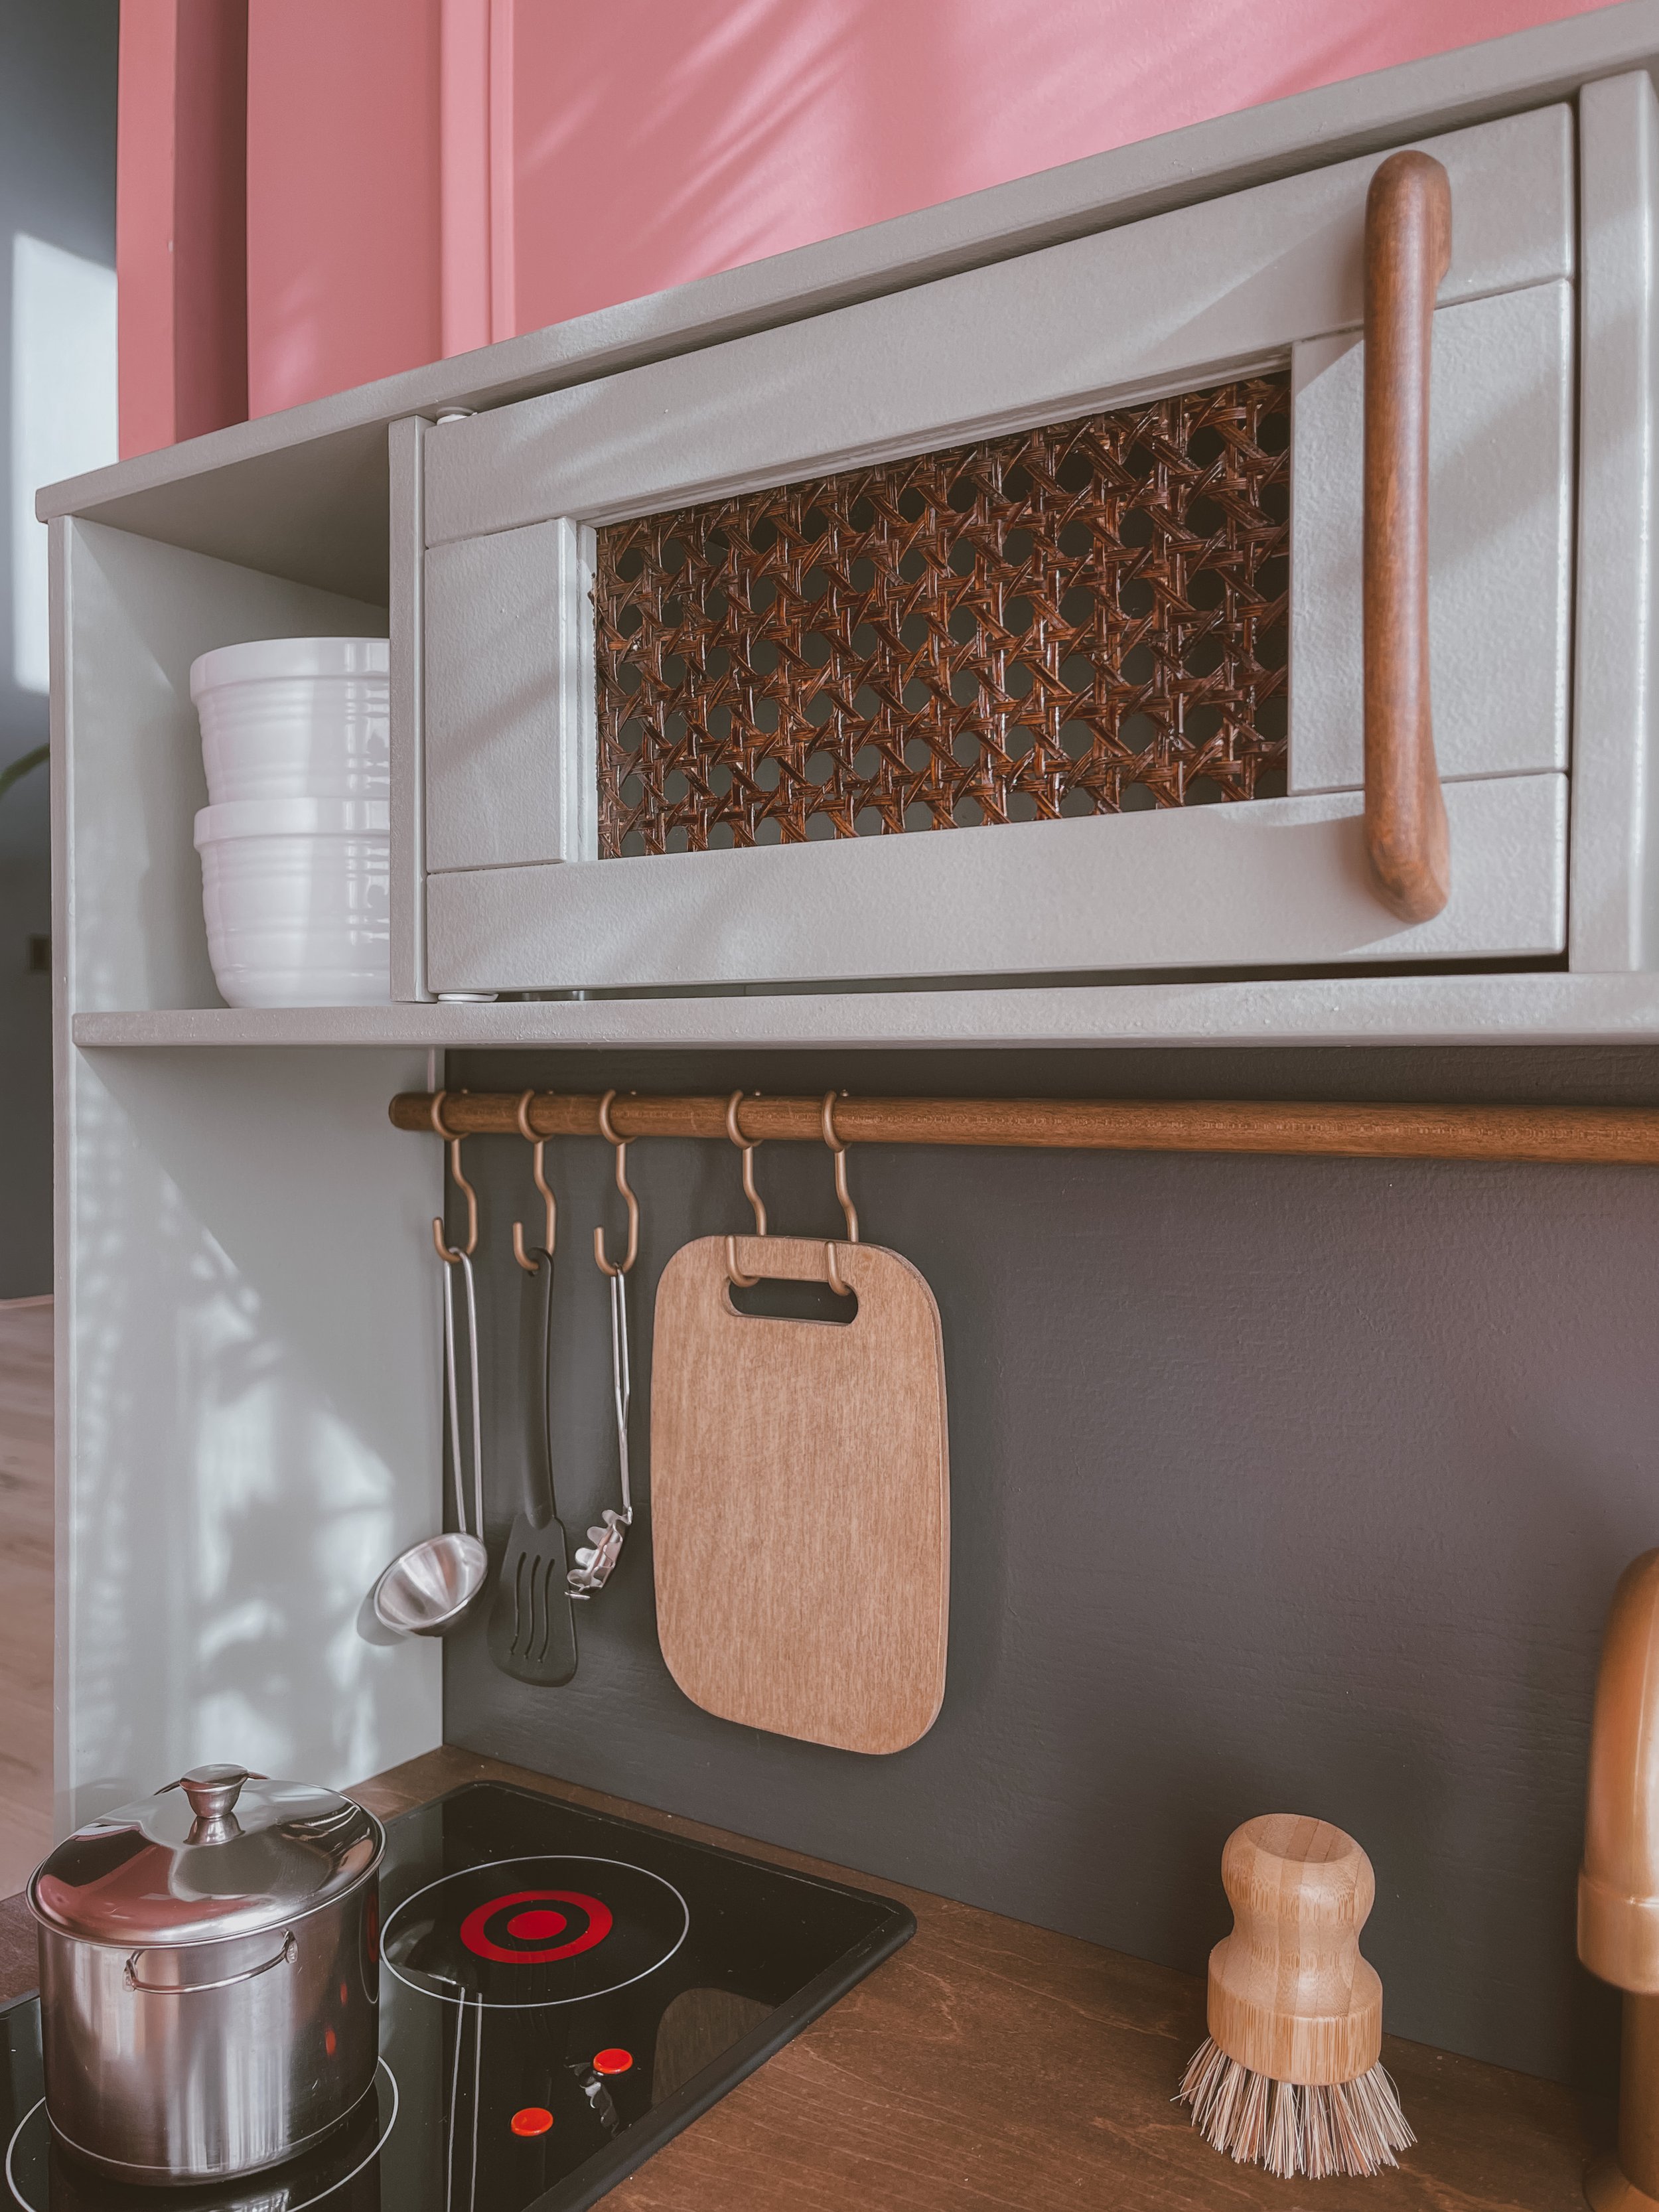
Remove the acrylic plastic from the microwave and oven piece. I banged it out with a hammer in the grass.
Lightly sand all of the flat wood/veneer pieces with 80 grit sandpaper. Remove dust.
Lightly spray all of your wood/veneer pieces (except the countertop) with the BIN shellac spray. Let dry, flip over, spray the other side.
Roll the chalk paint on to the pieces. Two coats each side. Let dry and flip and do two coats on the other side. Don’t forget about the edges.
Seal with Polycrylic. I brushed on and used the spray to see which I liked better. I think the spray quickly followed by a dry roller brush is my fav.
INSTRUCTIONS FOR THE COUNTERTOP:
Sand the countertop with 80 grit sandpaper until you remove the finish. If you tilt your head in the light you should see it dulling until there is no more shiny coating. Sand again with 320 grit until you get a smooth finish. Remove dust.
Shake you stain well. Dip your staining cloth and apply the stain in the direction of the grain (side to side). I lightly sanded it again with 320 grit, dusted it off, and applied one more coat of stain.
This part was so easy and I think it looks BEAUTIFUL!!
INSTRUCTIONS FOR HANDLES, KNOBS, AND DOWEL RAIL:
I ended up buying new handles, knobs for below the stove, and replacing the metal rod with a wooden dowel.
Sand all of these pieces with 80 grit by hand to remove the shine. Sand again with 320 grit to smooth down. I just used two of the sanding sheets for my orbital sanded and used it by hand. Remove dust.
Apply the stain with your staining cloth. 1-2 coats. It should be dry within minutes.
Spray with LIGHT sprays of Polycrylic. The spray is INCREDIBLY spitty. You must also do VERY light coats to avoid drips. I just set them up and would walk by every now and then to do another light coat of Polycrylic.
INSTRUCTIONS FOR THE CANE WEBBING:
Stain the cane with the staining cloth and liquid stain. Let dry.
Soak in luke-warm water for at least 30 minutes.
Apply with staple gun and 1/4” staples.
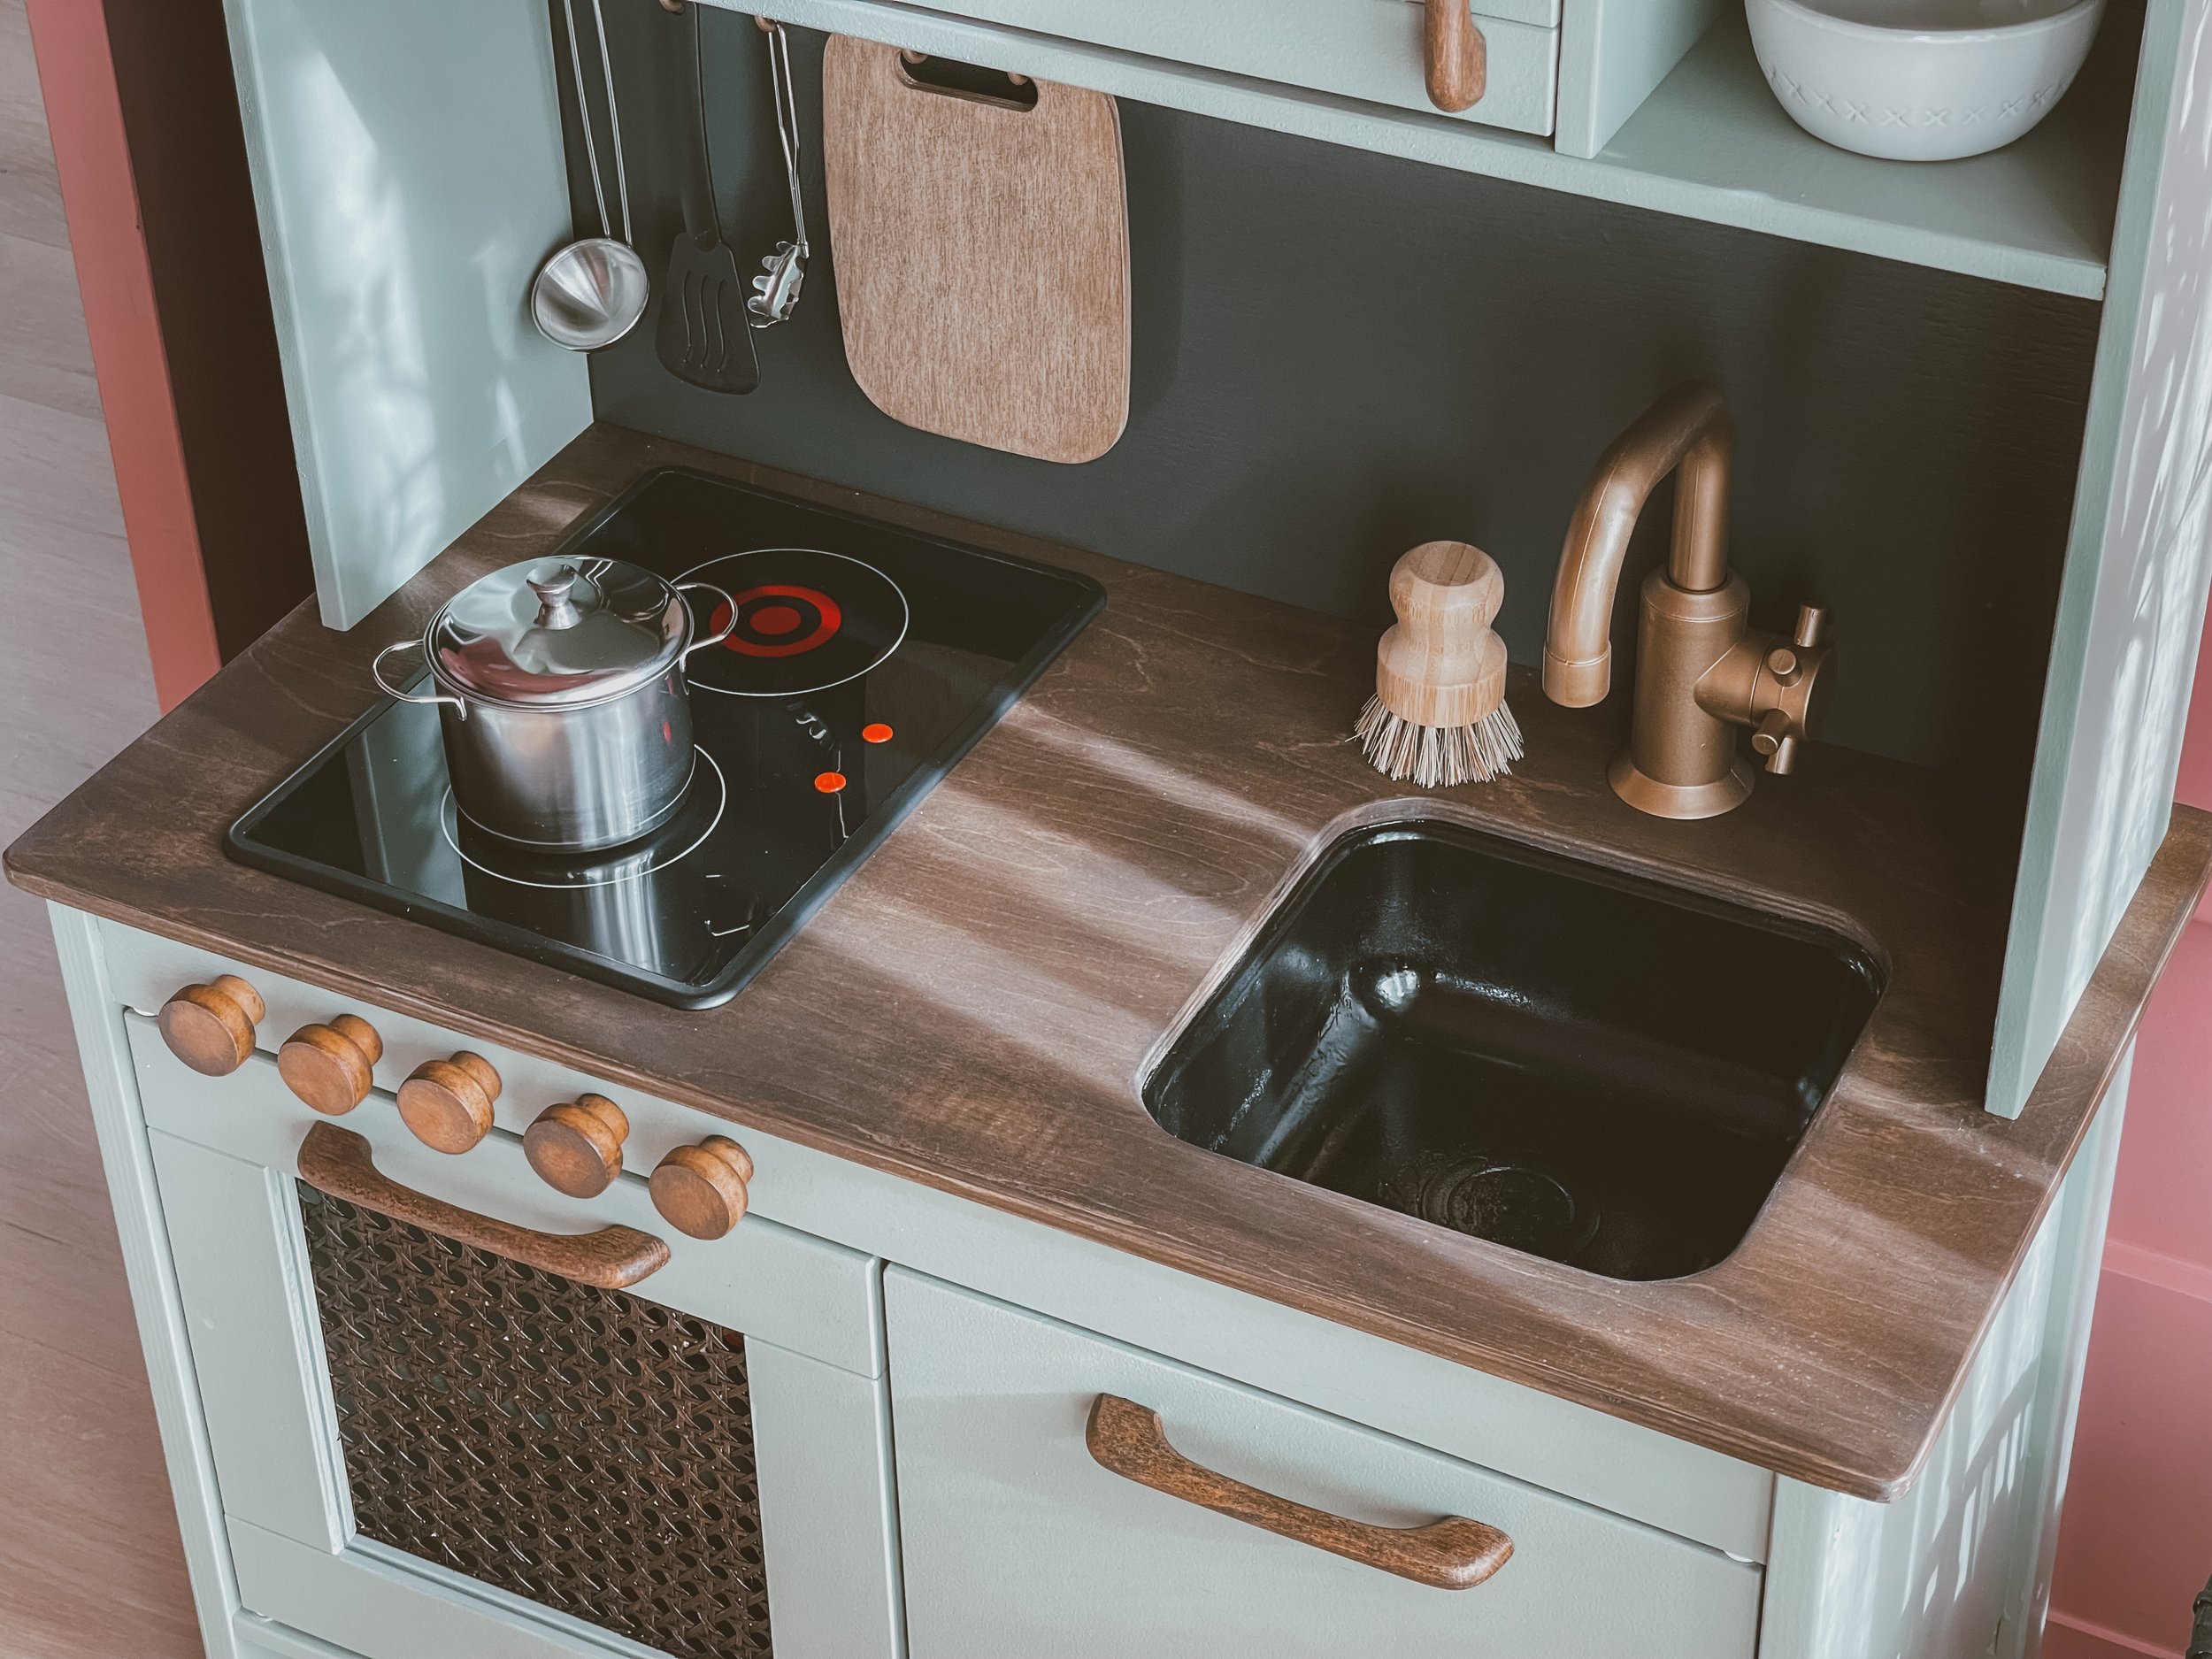
INSTRUCTIONS FOR STOVE:
Use painters tape to tape off the top area that you don’t want touched, leaving the grey edge exposed.
Spray grey edge with black spray paint. Let dry.
Spray with Polycrylic.
Remove painters tape.
INSTRUCTIONS FOR THE HOOKS, PLASTIC LEGS, AND FAUCET:
I’m not sure if I should have used the BIN primer first, but I didn’t. I just sprayed them with two coats of the Champagne Gold Spray Paint.
I did several LIGHT coats of the Spray Polycrylic letting it dry in-between coats.
INSTRUCTIONS FOR THE BACKSPLASH:
Cut a piece of thin wood or foam board into 26 5/8” x 12 3/8”
I used a thin piece of wood I found in the clearance section at Home Depot and painted it with some leftover Iron Ore Matte paint and sealed it with the Polycrylic.
Nail the backsplash onto the kitchen with 3/4” brad nails.
INSTRUCTIONS FOR THE SINK ( a disaster!) :
Well, this is where I made my one and only big mistake. I sprayed the sink with black appliance epoxy spray paint and as I was walking outside to see it in the daylight after it dried and I BARELY scratched it on the door. No big deal since I planned to undermount the sink. I proceeded to sprayed it with Polycrylic and THIS was the first time I was using the spray and realizing how spitty it was. First, you need SUPER light coats. Well, I didn’t know that yet, so I sprayed it on like spray paint and it started to puddle inside of the sink. This is also when I realized the spray was SO spitty. I ended up trying to sand the paint off and I gouged the HECK out of the sink. I tried so hard to save it. The gouges I made while trying to remove that spray paint and polycrylic are obviously still there but oh well!
MY SOLUTION: Well, turns out you can’t buy a replacement sink so someone on reddit recommend using an 8 inch pan so that’s what I did but didn’t love how it looked. Remember, there is always a solution and DIYs don’t always go as planned. I ended up painting the original sink one more time with the black Appliance Epoxy spray paint.
If under-mounting, attach the original sink with Gorilla construction adhesive. You don’t need much!
Once you have prepped all of the above it’s time to assemble it!!
Drill holes for your “stove knobs”. We covered the area with painters tape to mark where we wanted the knobs to go. Drilled using 5/32” drill bit. Use screws that came with the knobs.
Attach the cane webbing with a staple gun and 1/4” long staples to the back of the microwave and stove pieces. I added some left over thin wood that I bought for the backsplash to cover the back of the cane in hopes of stopping my toddler from poking right through the holes. You could also use a sheet of acrylic.
Follow the Ikea directions to assemble the kitchen.
To under-mount the sink you can glue it or screw it in. We glued it using Gorilla Glue Construction Adhesive.
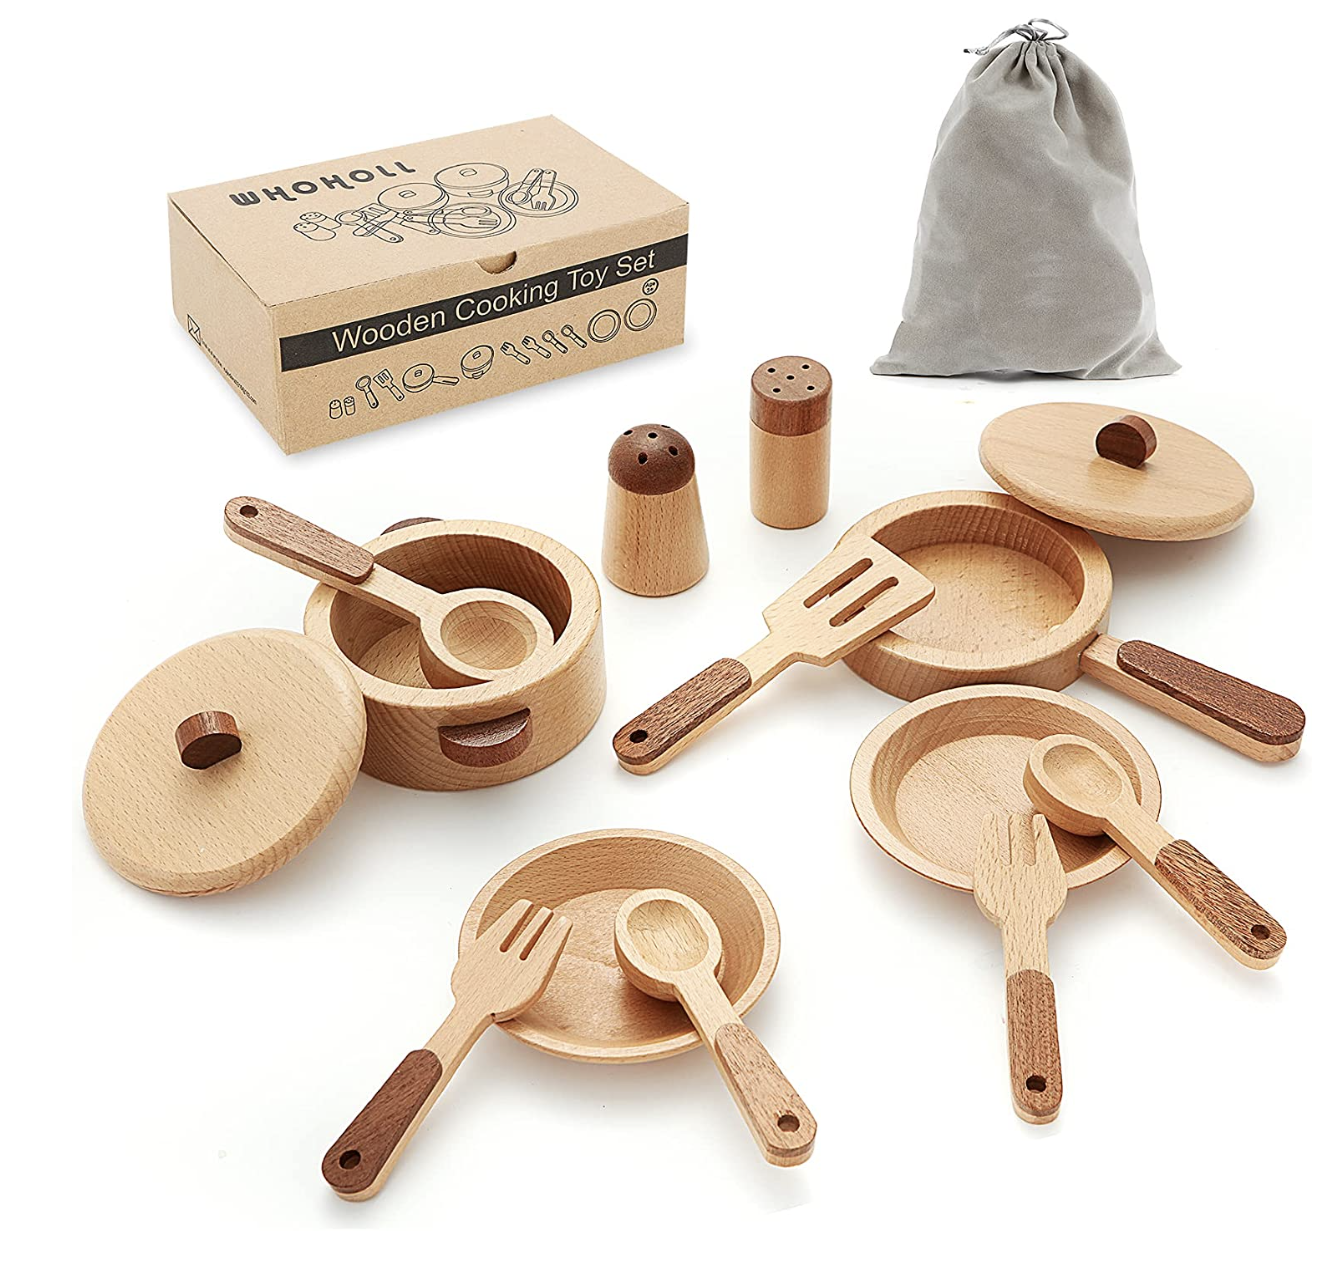
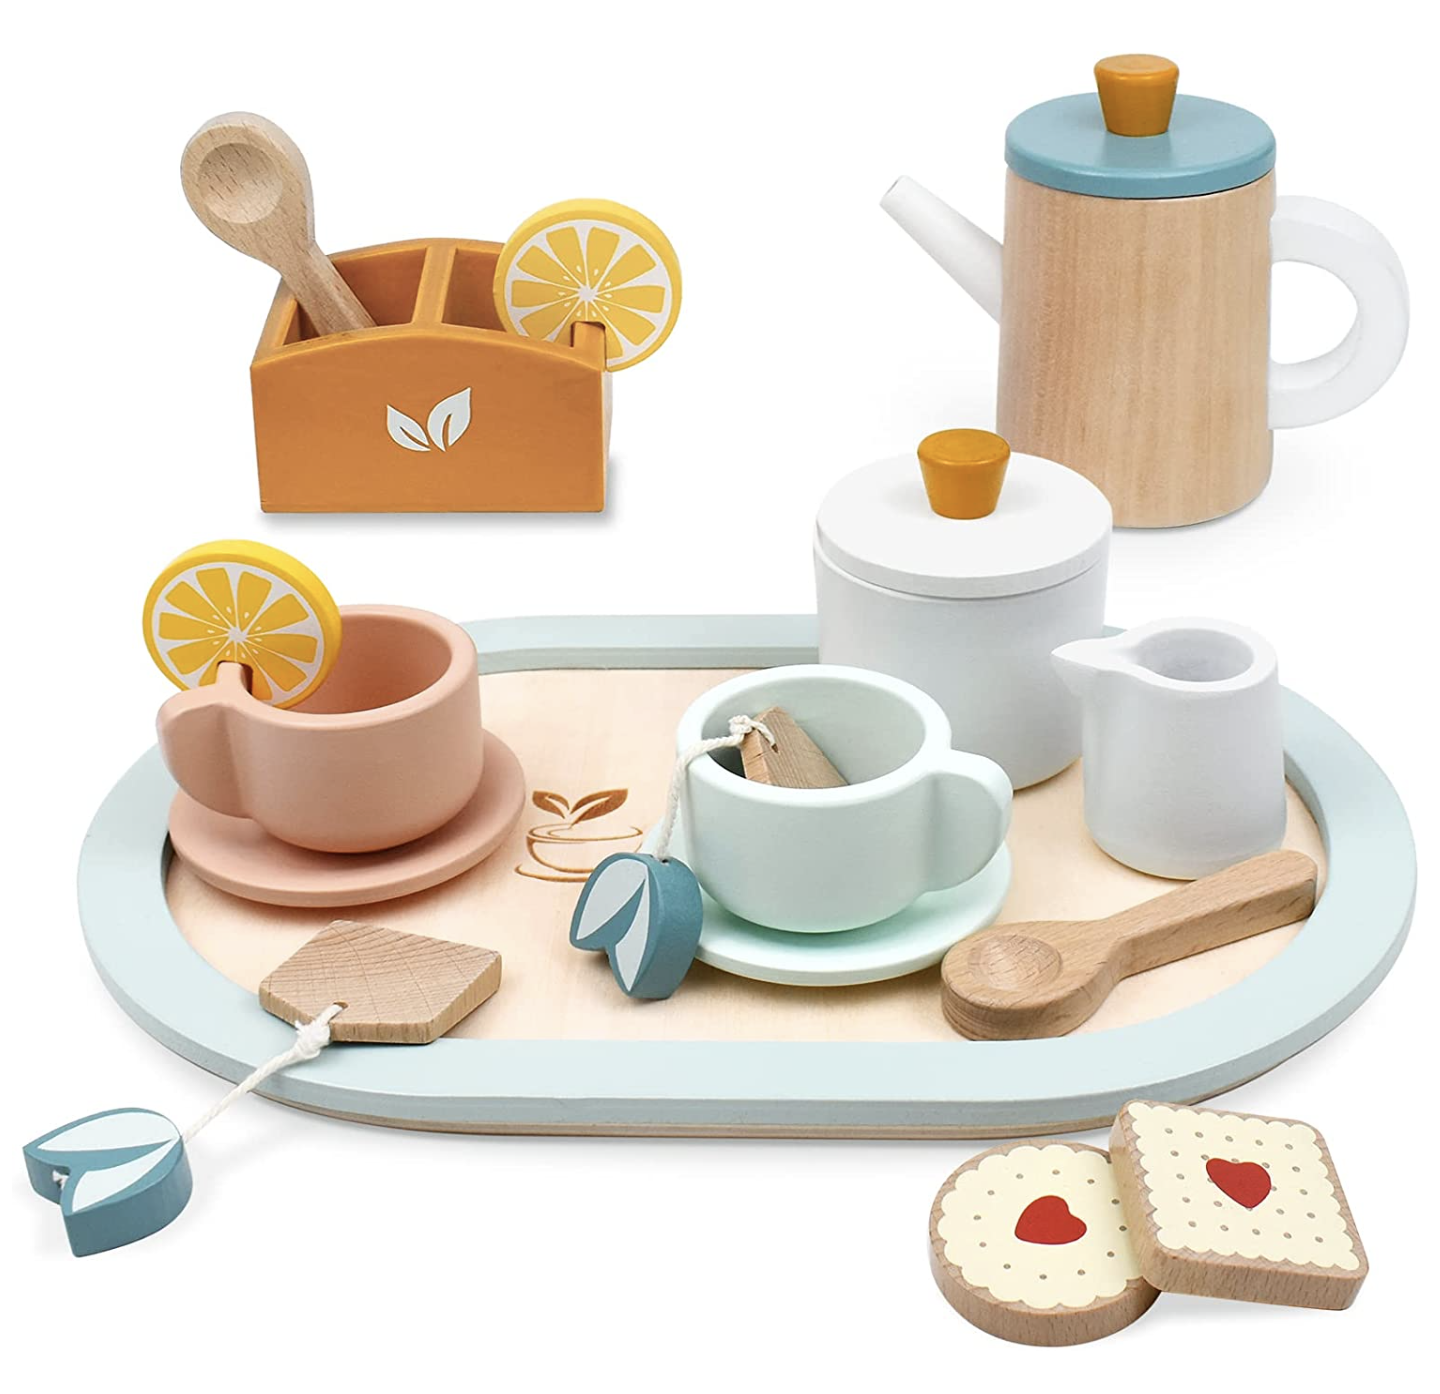
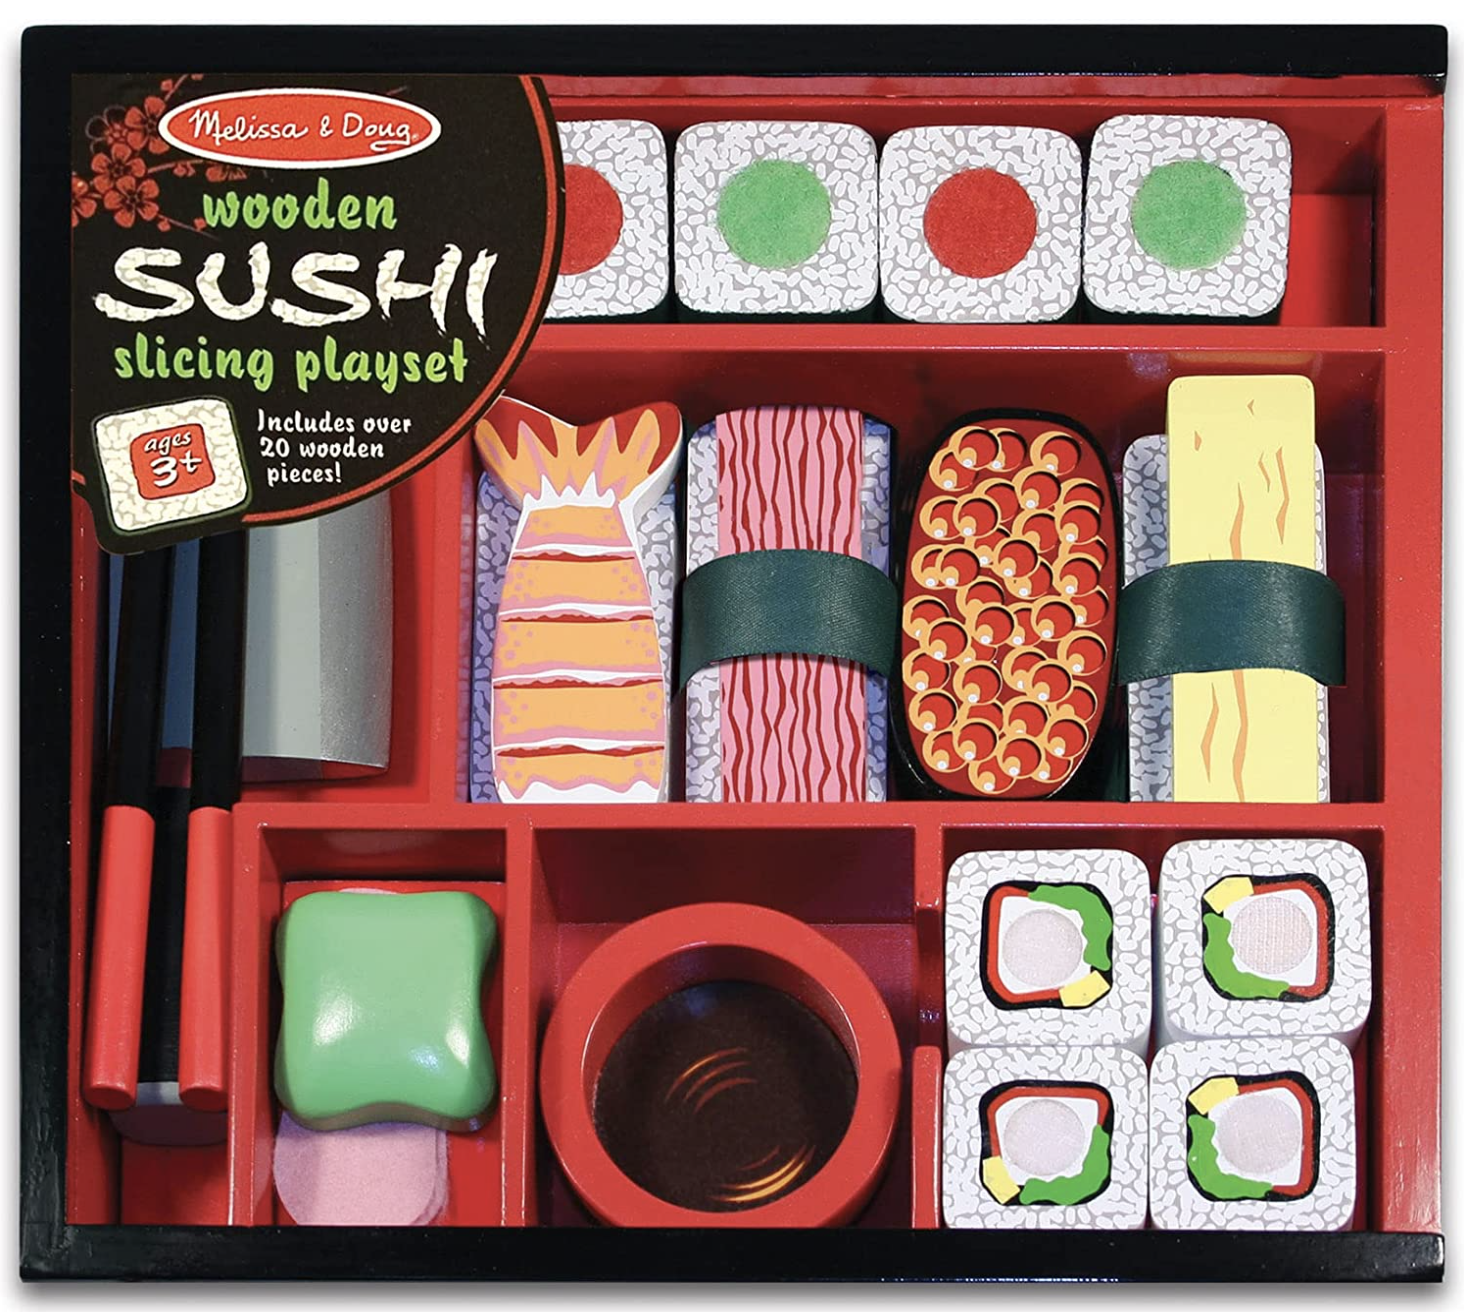
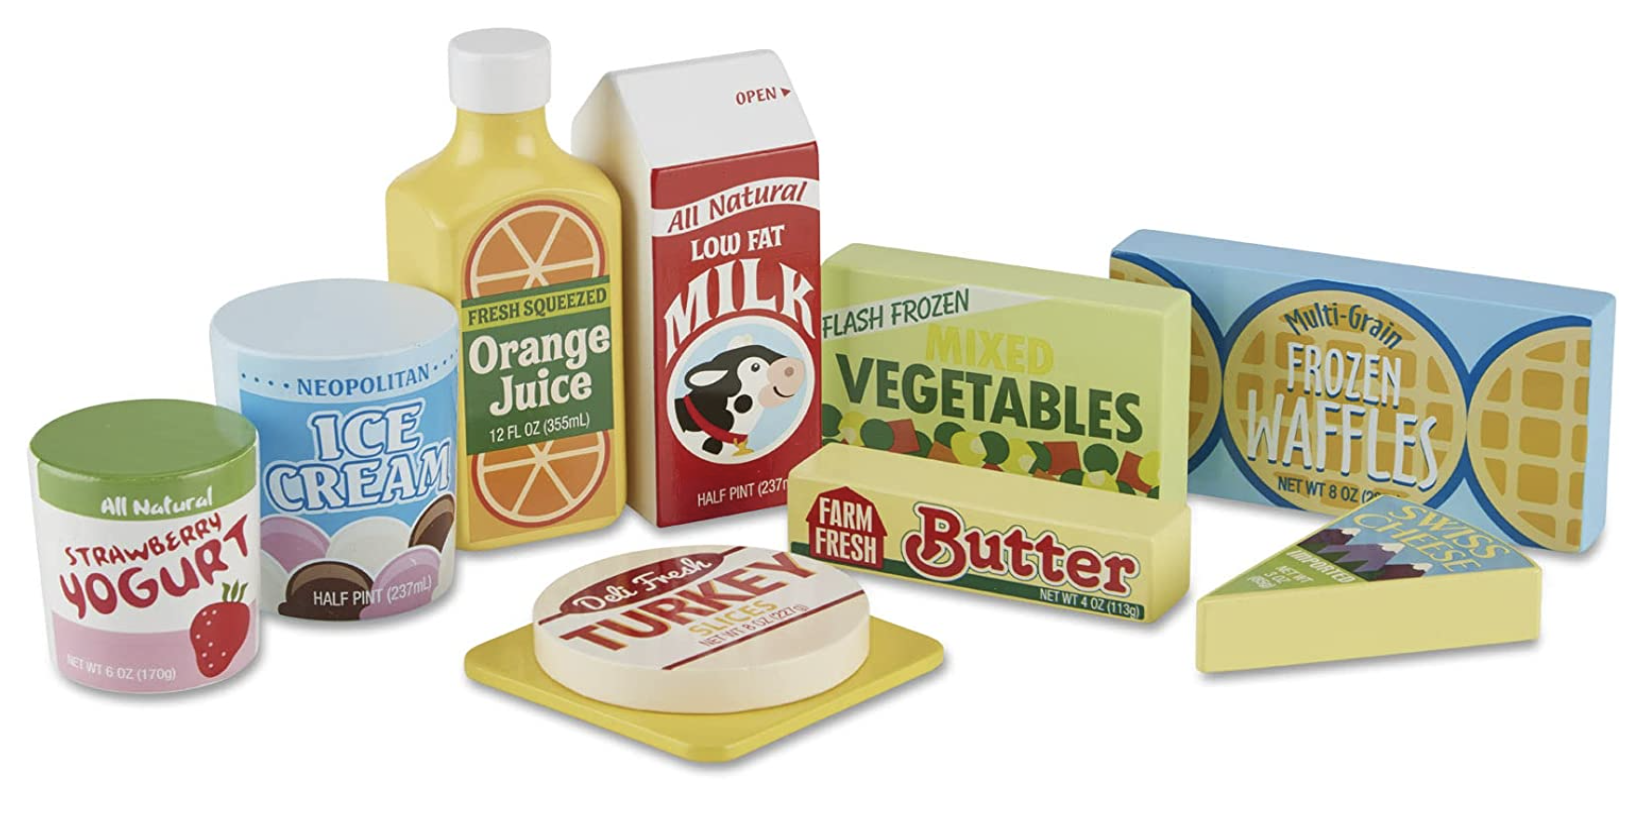
Now you can accessorize with adorable kitchen items!


Our modern kitchen
Drumroll please! Welcome to our new modern kitchen in the @lutzgohome house! We have lived here for a month and a half now and the kitchen is by far the most finished space currently. All of the companies we worked with, decor items, and appliances are all linked at the bottom of the post.


Companies Involved:
Kitchen Cabinets and Gold Hardware: Leicht from German Kitchen Design in Atlanta
Quartz Countertops: Atlantis in Atlanta
Hardwood Floors: 7” White Oak Hardwoods from Southern Woods Flooring
Fixtures:
Sink in Island:
https://rstyle.me/+Yz2HwhuwM0DrVJe_RB2jEQ
Faucet in Island:
https://rstyle.me/+OltMxIKhdQGjKOzmbzC6xg
Soap Dispenser in Island:
https://rstyle.me/+BP9egpyZ1kLPOvjhSKnUZg
Garbage Disposal button:
https://rstyle.me/+ab0f729UTI1kJ4TEt2dMHw
Insinkerator Disposal:
https://rstyle.me/+mPu5lp7P8hiqodiPMpbrFw
Cooktop:
https://rstyle.me/+QM3Y_wQCO_wb5erCYPEWYw
Pot FIller:
https://rstyle.me/+Q39Zv95T7O-FSal4UBxkzQ
Pendants:
https://rstyle.me/+z6JvqUbssuA6mJ1XpCLAdg
DECOR:
Paper Towel Holder:
https://rstyle.me/+u7i1xVZOiwn3p4zN9YNOQg
Stools:
https://rstyle.me/+_EVJlXeMkgOp2a7xnPIUOg
Rotating Utensil Holder:
https://amzn.to/35AqvVi
Google Home Mini:
https://rstyle.me/+gW2Ba3tlGy4opImJlRY0ow
Cake Display Stand: Purchased from Home Goods and I can’t find anything similar - I’m sorry!
Blue/Orange vase: It was a gift so I’m not sure- I’m sorry!
Faux Plant: Old from At Home, but see more faux floor plants here:
https://www.athome.com/floor-plants-trees/
Pendants:
https://rstyle.me/+z6JvqUbssuA6mJ1XpCLAdg
Appliances:
Double Oven:
https://rstyle.me/+uYb3bNczE1pPz0n7EuR40w
Dishwasher:
https://rstyle.me/+i3Dg7GbrGmXoBO4cwTaI8w
Refrigerator:
https://rstyle.me/+vAuW6Wk7nSAoT_GrW2iBiA
Gas Cooktop:
https://rstyle.me/+MAGR6K-pnFNqBg0YfbY8AQ
Range Hood:
https://futurofuturo.com/36-amalfi-wall-range-hood/
Espresso Machine:
https://amzn.to/39vjaYg
Electric Kettle (they don’t make our version anymore, linked is the newer model:
https://amzn.to/2N1058T
Follow the @lutzgohome Instagram account for real time updates as we continue to decorate the new house!

New House Interior Design Plan
Hi guys! I thought it would be fun to show you what is currently in my head and on my mood boards for each room of the new house. If you want to see ALL of my Pinterest boards, click here.
LIVING ROOM
The living room, kitchen, and dining room are all open concept and we are keeping the design in those three areas very modern. To the left of the fireplace area is a large 18’x18’ window so this area will get a lot of light.

I made this design to scale for the living room.


KITCHEN
I've already shared our full kitchen design on the blog, but here it is again.


DINING ROOM
I would love for the dining room to have a raw edge table, cool band posters nicely framed on the wall to show our personality, and a neon light in the space. I’m still undecided about a rug, light fixture, and chairs.


SUNROOM
The sunroom is one of my favorite rooms of the new build! I’ve had it planned since the beginning and I can’t wait to fill it with plants! The window are very similar to the photo below and the tile on the bottom right is what I’ve picked out!

MY OFFICE
I love pink and green together and I think this is the direction I’ll go in for my office. I prefer the pink shade in the middle photo and love the wall trim for an added sophisticated look.

MASTER BEDROOM
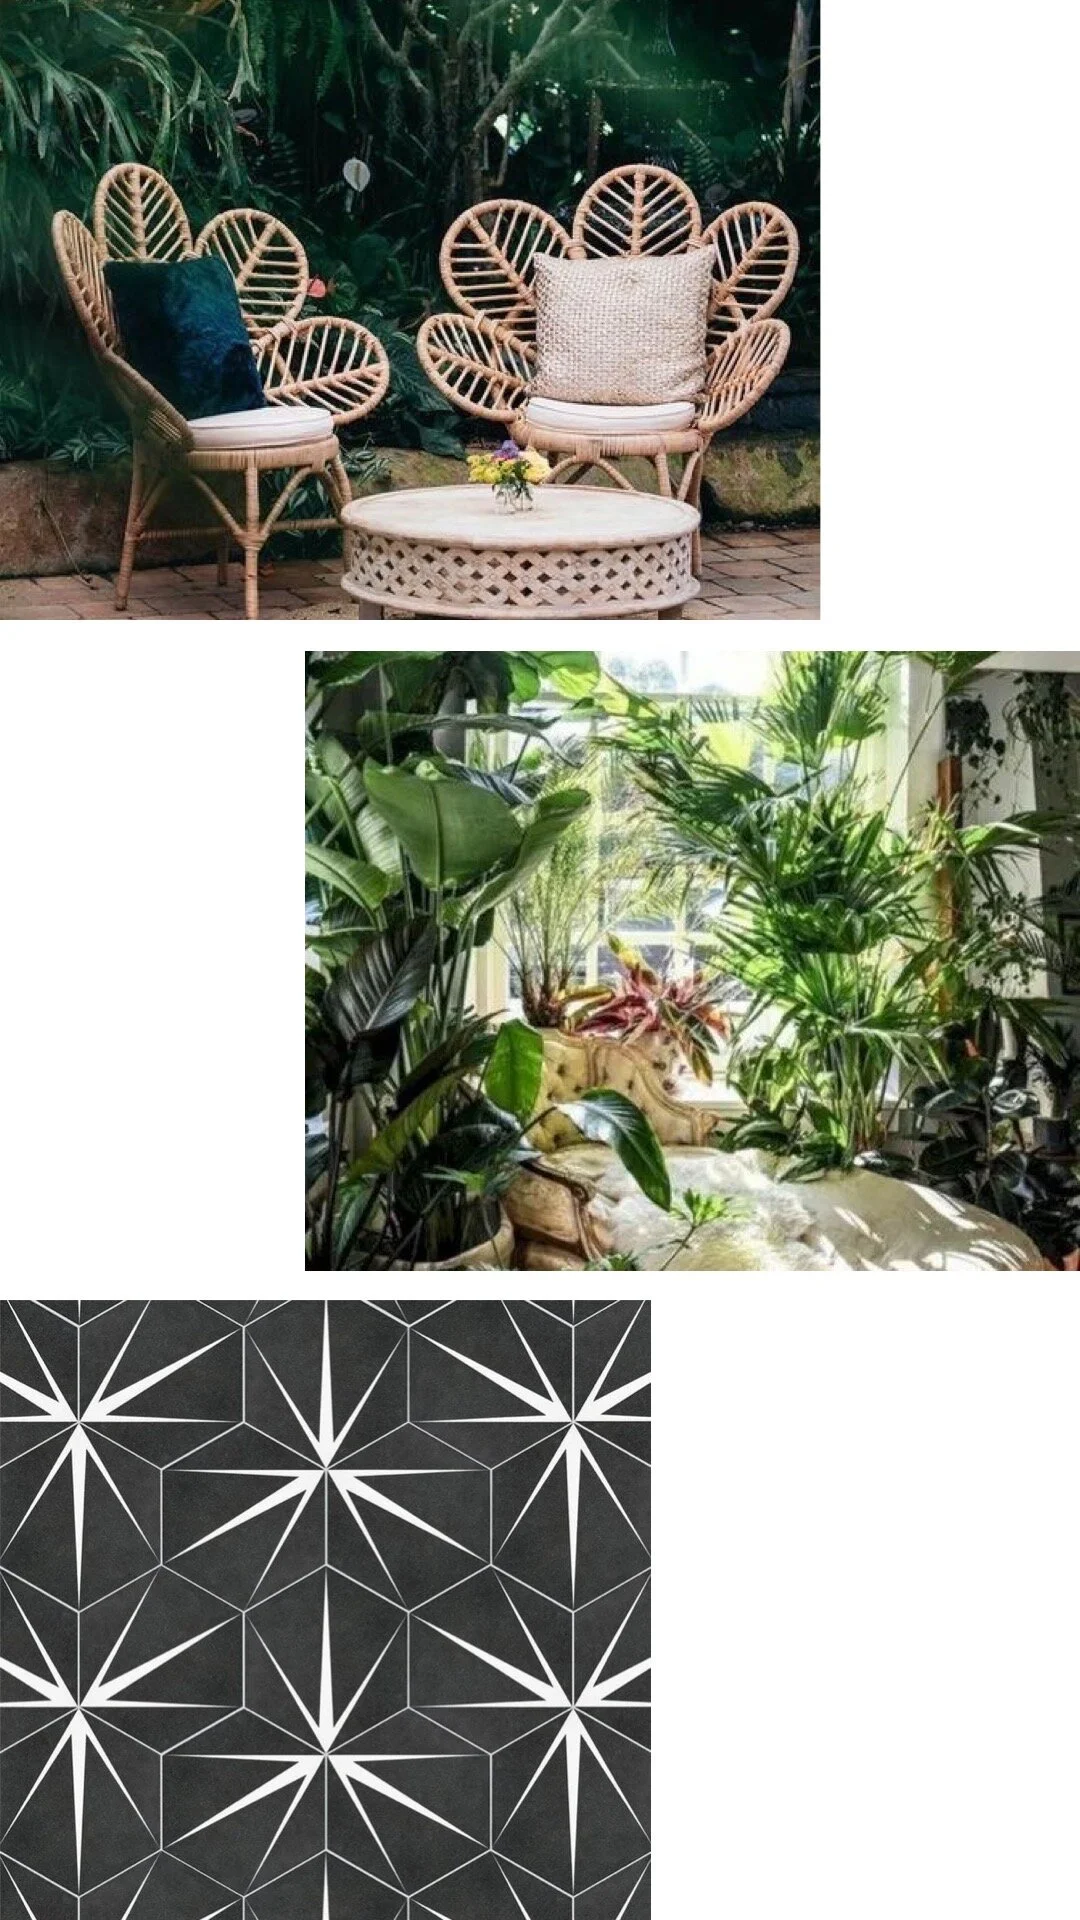
The rest of the house is so modern and/or bold that I thought making the master bedroom more calm and earthy would make for a relaxing space. I love the bali vibes, rattan furniture, pampas grass, neutral tones, and natural textures.

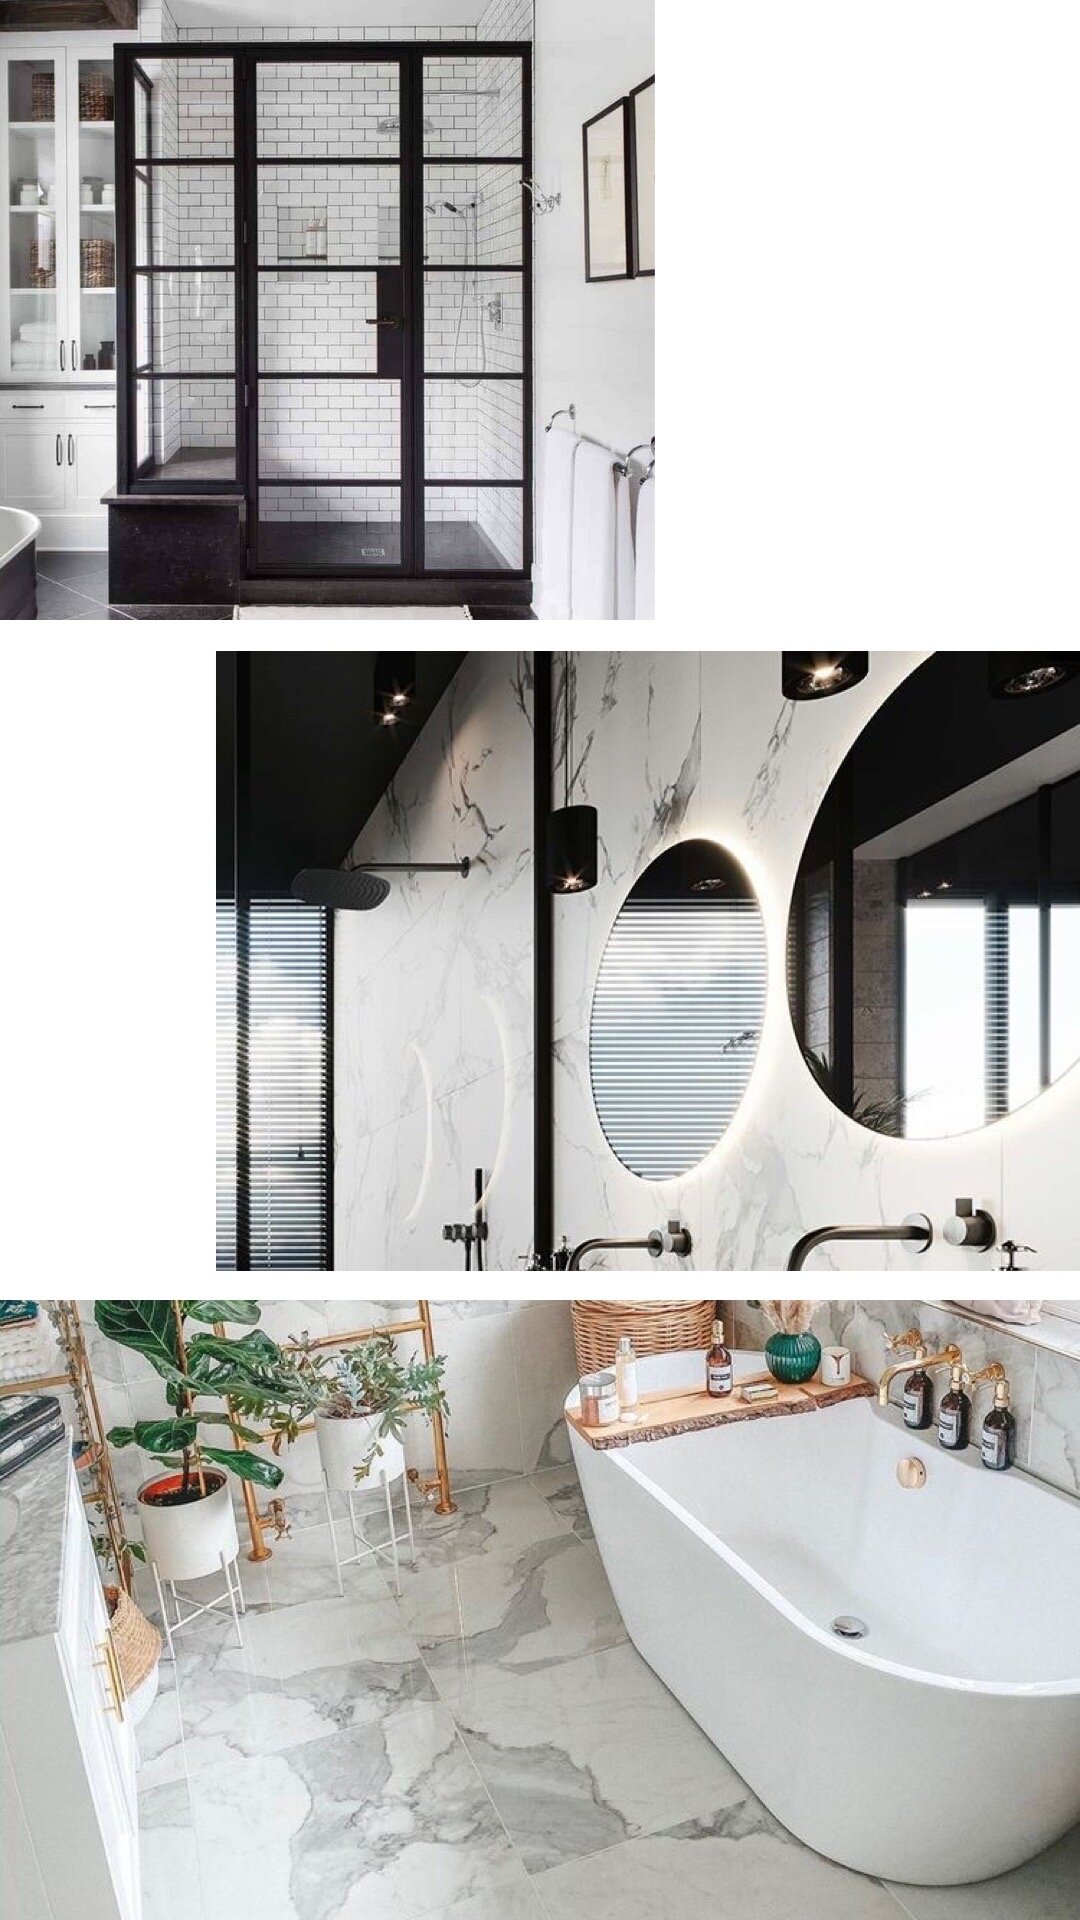
MASTER BATHROOM
The master bathroom is still undecided except I know I want the black grid shower, free standing bathtub, marble-look tile, and mirrors with lights around them. Everything else is still being decided on.
HALF BATHROOM
Who knew I could be so excited about a half bathroom? I love the idea of going REALLY bold in a small space because it’s low risk. I imagine a really bold wall paper, a funky mirror, and fun TP/hand towel holders.


Want to see even more? Check out my Pinterest where I have a board for each room of the house!

Our Modern Kitchen Design (Leicht)

Hi guys! Today I’m showing you our kitchen cabinet design - woohoo! We are working with Trey at German Kitchen Center here in Atlanta and our kitchen cabinets and handles are all from Leicht. I LOVE how sleek and modern the frameless cabinets are, the three tone design, and the diagonal cut on the waterfall island. We went with gold hardware on most of the cabinets and the rest are the handless design. The hood will be custom made by a metal fabricator since I can’t find a hood with the exact dimensions that we need for the stainless steel restaurant style hood that we want.
A few things will be different than the photos like the HUGE 36” sink, black Kohler faucet, and added gold Delta pot filler. We also think we might use either subway tile on the backsplash or hexagon tile if the cost of a matching stone backsplash is out of the budget. Lastly there will be lights installed on either side of the hood similar to what you see over the counter next to the fridge.

Our appliances are stainless steel and mostly from Samsung minus the dishwasher from Bosch that will have a custom panel over it. We almost went with all Bosch appliances but we currently have a Samsung refrigerator and I LOVE it. I know that sounds silly, but I need to have an external water filler and the flex drawer on the outside and Bosch doesn’t make that design. Because you get such a great deal when you bundle large appliances together we decided that Samsung was the way to go for everything minus the Bosch dishwasher since we need something that allows for a custom panel.
The door that you see mocked up leads into our pantry where we will put the microwave, food, another prep counter, more cabinets, etc. We don’t even have a pantry at our current house so this will be a whole new world for us!
Now we get to start looking for countertops, backsplash, barstools and lights to go over the island - yay!


WE ARE BUILDING A HOUSE

WE ARE BUILDING A HOUSE! I’m so excited to share this entire process with you guys! Although I will be showing the highlights on my normal Instagram account, I have also created a home Instagram account (@LutzGoHome) where I will share ALL of the details! The house is modern farmhouse on the outside and eclectic on the inside with a focus on modern design in the kitchen/living room/dining room. So far the house is framed and we should have windows in the next few weeks - woohoo! Below is the tour where I take you through each room and explain what my vision will be! Enjoy!

We got a new mattress and it's kind of a big deal
We got a bed in a box!

Disclaimer: OK look, I had finished this post and was talking to Zach and told him that I felt like people are going to look at this post and be like, "ok cool you got a new mattress." I need you to understand just how much we love it when you see the below write-up and photos.
We got a new mattress and I don't think we have ever loved a product more. I honestly had no clue what to expect with a mattress like this. I have seen bed in a box mattresses all over the internet but had no clue how to choose. Since this one was risk free I said yes when approached about it. We had been sleeping on an old traditional mattress prior and complained constantly about how much it sucked. The idea to upgrade was tossed around quite a bit this year so this Real Sleep by Real Simple mattress opportunity came at a perfect time.
First, let me just remind you that I don't post about things I don't actually love and I certainly don't make entire blog posts about things I don't absolutely love. I am incredibly grateful that Real Simple offered this to me and it has worked out perfectly. When I say we love it, I mean we LOVEEEE IT!

The video above shows Zach using the razor it comes with to release the mattress from the plastic, us laying on it for the first time, and Zach twerking - haha.


Here are a few facts about the Real Sleep by Real Simple mattress from the website and then I'll list my own comments below:
10-inch thick medium-firm memory foam mattress.
Medium-firm
Controls temperature and maximizes air flow so you never get hot.
Supports your entire body for a truly restorative rest.
100% Organic Cotton Cover; easy to clean.
100 Night risk free trial with free shipping and free returns.
What I noticed:It's not bouncy so we never disturb each other.
As soon as we put it down Loki jumped up on it with dirty paws so I was instantly annoyed, but also thankful for the removable cover.
A king size mattress means more room for the doggos.
Since we now have a king that gives us so much extra sleeping space we call our respective sides of the bed our "island." My island is "Dog Island" and Zach's island is called "No Girls Allowed" aka stay on your side.


Zach sent me the above text message one night while I was downstairs editing and he had already went upstairs to go to bed. I knew I had to show it so I saved it for this post.

In conclusion, please ignore how grumpy Loki is. Zach warned me during this little shoot that he had a stink face on the entire time. Also, incase anyone asks, my mom made the blanket and pillows. Lastly, thanks again to Real Sleep by Real Simple for sending this to us!
