
How to Bring the Nancy Meyers Aesthetic to Your Outdoor Space

If you’ve ever watched a Nancy Meyers movie and found yourself swooning over the kitchens, the cozy lighting, the layered neutrals, and the inviting, lived-in feel of every space—then you’re in good company. There’s something effortlessly elevated about the “Nancy Meyers aesthetic,” and the good news is, you don’t have to move to the Hamptons or own a coastal villa to bring a little of that charm home.
I recently gave our back patio a little refresh, and let me tell you—it’s giving Something’s Gotta Give meets It’s Complicated in the best way. Here’s how I leaned into the look:


1. Keep It Classic with Neutrals
A neutral base sets the tone. I already own an inexpensive black furniture set that I’m not willing to replace right now, so I chose a brown rug, soft beige and brown pillows and a textured throw to warm up the black metal furniture. Remember this look is all about timeless comfort, not trends.
2. Add Fresh Flowers (Always)
Nancy’s worlds are always filled with lush hydrangeas, fresh peonies, and plenty of greenery. I went with faux shrubs in concrete planters and real hydrangeas in white pots placed on my side tables to anchor the space and instantly add that soft, romantic charm. Bonus: I ended up planting the hydrangeas in the yard so now I’ll get years of beauty from them.


3. Set the Scene with Simple, Elegant Entertaining
Whether it’s sparkling water, lemonade, or just a bowl of strawberries, a pretty tray and glassware make even the smallest gathering feel special. I set our coffee table with a rattan tray, vintage-style plates, thrifted glass cups, and a thrifted silver pitcher —nothing fancy, but it feels intentional and a little luxurious.
5. Include a Little Personality
The little details bring it all to life. For us, that means letting our dog lounge wherever he pleases and keeping a pair of sandals kicked off nearby. It’s supposed to feel lived-in, after all—not staged.
6. Soft Lighting is a Must
While these photos were taken in the daylight, string lights overhead give off that dreamy glow once the sun goes down. You can’t go wrong with warm-toned bulbs and just enough sparkle to make the space magical. I also used a few battery powered candles on the coffee table.


The result? A patio that feels like a movie set—but still totally livable. Whether you're sipping coffee in the morning or hosting friends for evening drinks, it’s become my favorite place to exhale.
If you're craving a little Nancy Meyers magic, just start with a comfy seat, a hydrangea or two, and something to sip—your outdoor sanctuary is just a few cozy touches away.
Links at a Glance
Here’s everything I used to bring this cozy outdoor vibe to life:
IF YOU ENJOYED THIS POST, YOU MIGHT BE INTERESTED IN how i refreshed my porch to spring!
FOLLOW ME ON MY SOCIALS!

From Nursery to Big Girl: Simple Room Swaps

One of the sweetest (and most emotional) parts of motherhood is watching your baby grow—and along with them, their space grows too. I thought it would be fun to walk you through how we transitioned my daughter’s room from a cozy nursery, to a playful toddler room, and now into her vintage-inspired big girl room—with just a few thoughtful swaps along the way!
Spoiler: It doesn’t have to mean a full-blown makeover every time. A few intentional changes can completely transform a space without losing the heart of it. Let’s take a look:
Stage One: The Nursery (So Many Snuggles!)

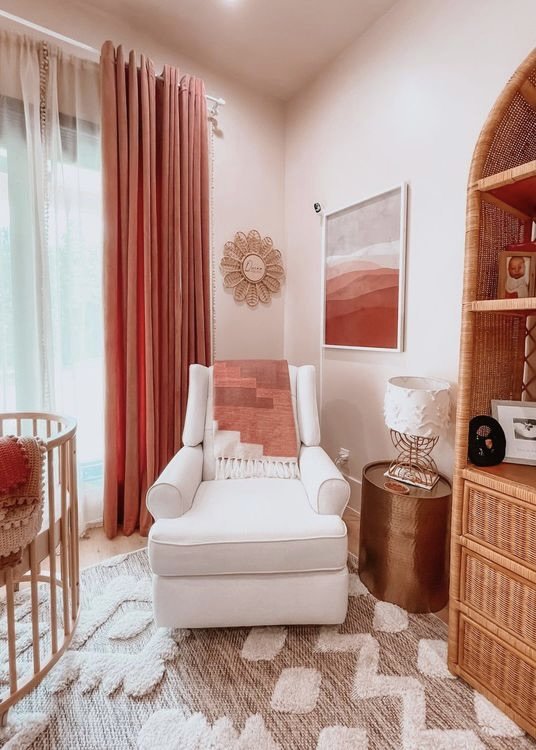
In the beginning, her room was pure sweetness. A soft rug, an oval crib nestled under dreamy curtains, a cozy rocker for all those late-night feedings, and a basket full of stuffed animals. The palette was warm and soft, with muted pinks and natural textures. Everything felt very gentle, very "newborn bubble."
Small Swaps Tip: Focus on softness, comfort, and a calming color palette—you’ll spend lots of time here, so you want it to feel like a hug!
Stage Two: The Toddler Room (Play All Day)


As she grew, so did her need for independence. The crib dropped down to a toddler bed height (big girl vibes, but still safe!) The rug got an upgrade as we went through potty training and I opted for a playmat that looked liked a rug, but was much easier to clean.
The big pieces stayed—the rocker, the curtains, the woven textures—but the room became more about exploration and movement.
Key Swaps:
Lowered the crib or transitioned to a toddler bed
Swapped the rug to a wipeable playmat
More floor-accessible toys and books
Safety first! Make sure you attach all furniture to the wall, hide outlets, and secure cords.
Small Swaps Tip: You don’t have to change everything—just adjust a few pieces to encourage more independence and imagination.
Stage Three: The Big Girl Room (All Grown Up…Almost)

Cue the happy tears: the full-size bed made its debut! Her vintage bed and new side tables gave the room a timeless, classic feel. So much has stayed, but the furniture grew up with her.
Now, the space feels a bit more structured while still cozy for sleeping. We have a separate playroom, so if you’re wondering where all the toys are — that’s where they live!
Key Swaps:
Full-size, vintage bed
Grown-up bedding with layered textures
Matching nightstands with "big girl" lamps
Decorative touches that feel a little more curated, a little less "baby"
Small Swaps Tip: Bring in just a few more "grown-up" pieces, but keep some of the whimsy! It’s still her room, after all.
Links At A Glance
Mobile (Purchased from Etsy but no longer for sale)
Round top rattan shelf - Facebook Marketplace
Blankets - Made by my mom
Lamp (nursery/toddler room)
Wall Art (nursery/toddler room) - TJ Maxx Finds
Dresser - From my childhood
Wipeable play mat (toddler room)
Full size bed - Facebook Marketplace

How it held up: cozy coupe edition

Hey everyone!
A while back, I decided to get crafty and give our Cozy Coupe a little glow-up with some custom paint. If you’ve ever thought about painting one of these iconic ride-ons, you might be wondering—how does it actually hold up over time?
Here’s the honest rundown.


For the makeover, I used Rust-Oleum spray paint—a combination of their plastic-friendly primer and a couple of solid color choices to match the fun but neutral vibe I was going for. I finished it off with a clear protective topcoat to help it stand up to all the toddler adventures ahead.
And at first? It looked amazing. Clean, bold colors, a totally fresh look, and so much more stylish and playful than the classic red.
Fast forward to now, and it’s definitely gotten lots of love (and a good amount of use)!

The paint has held up decently, considering the amount of climbing, scooting, and driveway races it’s survived. There’s some wear in the high-touch spots—the edges, horn, and anywhere it gets ram into walls (lol)—but overall, it’s still going strong. Sure it has a few chips, which just add to its "well-loved" charm, but it’s paint on a flexible plastic toy so it’s to be expected.
Would I recommend painting a Cozy Coupe? Absolutely—especially if you’re looking to customize it for a more personal or aesthetic touch! Just keep in mind, if you have a high-energy kiddo who treats it like a monster truck (like mine does!), you’ll probably see some signs of wear over time. But honestly? Watching them enjoy it so much makes every little paint chip totally worth it.
If you’re set on customizing one, I do a complete breakdown in this blog post.
All in all, it was a fun DIY project!

My best selling chandelier

This Chandelier Is in My Office — and It’s Also My Best Seller (for Good Reason)
Okay, I have to brag on this chandelier for a second — not only is it living its best life in my office, but it also happens to be my best-selling chandelier. And honestly? I get it. The hype is 100% deserved.
Let’s start with the look — it's modern, luxe, and just the right amount of sparkle. The gold finish isn’t too warm or too brassy, and the crystals give off the most beautiful light. It makes my office feel like a high-end design studio instead of just a workspace, which honestly boosts my mood (and my productivity).


I’m pretty handy with DIY, but electrical isn’t my thing. Although my husband got it put up with no problems - and I helped! If you’re into those instant gratification upgrades, this is it.
And judging by how many people have added it to their own homes, I’m not the only one who’s obsessed. Whether it’s going in an office, dining area, hallway, or even a luxe little closet setup, this piece just works. It’s bold but not overwhelming, glam but still approachable.
So yes — I’m absolutely that person working under a chandelier, and I wouldn't have it any other way. You can snag it here if you’re ready for a space glow-up.
Curious about the wallpaper? Check out this blog post.
Curious about the paint colors? They are custom, read more about them here!

Refresh your porch for spring
Spring Porch Refresh: Cozy Vibes with Faux Greenery and Rocking Chairs
Spring is finally here, and if you’re anything like me, you’ve probably been itching to give your porch a little love. After months of cold weather and gray skies, it’s time to bring some life (and color!) back to our outdoor spaces. The good news? You don’t need a full renovation—just a few simple updates can totally transform your porch into the perfect springtime hangout.
Let’s talk about a few easy ways to refresh your porch and make it feel warm and welcoming.


1. Faux Plants for the Win
Look, I love real plants as much as the next person, but I also love not watering things. Faux plants have come a long way and can seriously pass for the real deal. Try adding a couple of faux ferns or trailing ivy in cute planters. You get all the green without the upkeep. Win-win.
2. Wreath It Up
A spring wreath is like a smile for your front door. Whether you go with something floral, leafy, or even a combo of both, it sets the tone and adds a pop of color right at eye level.
3. Black Rocking Chairs = Instant Charm
There’s something timeless about a pair of black rocking chairs on the porch. They add that classic look but still feel fresh and modern. Throw a patterned pillow or a soft throw on them and boom—instant cozy corner. Perfect for sipping coffee in the morning or winding down with a book in the evening.
4. Layer in Some Textures
Think outdoor rugs, woven baskets, maybe even a lantern or two. Layering different textures makes your space feel lived-in and inviting without going over the top.
5. Keep It Chill
You don’t have to go overboard. A few thoughtful pieces can totally shift the vibe. Focus on what makes you feel relaxed and happy—that’s what spring is all about anyway.


So there you have it. A mini porch makeover that’s low stress but high on charm. Grab a glass of lemonade, kick back in your new favorite rocking chair, and enjoy those longer days.
Shop this post!
IF YOU ENJOYED THIS POST, YOU MIGHT BE INTERESTED IN My Outdoor pizza night!
FOLLOW ME ON MY SOCIALS!

Outdoor Pizza Night
Family Pizza Night: Outdoor Dining Done Right!
I love any excuse to create a beautiful tablescape, and what better occasion than a family pizza night? With the warm weather calling, I decided to set up a cozy outdoor dinner on our back patio furniture. It was the perfect way to get everyone involved and enjoy good food and a relaxed evening outdoors.


Setting the Table
I started by setting the outdoor table with some of my absolute favorite pieces:
Adorable floral napkin rings
The exact versions of some of the items I used are currently out of stock, but I’ve curated plenty of similar inspiration on my Amazon Storefront! Be sure to check it out for more great finds.
Of course, in a last-minute mom moment, I swapped out the napkins because let’s be real—pizza, a three-year-old, and white napkins don’t exactly mix!
Pizza Making Fun
Once the table was set, it was time to make our pizzas! We started by prepping everything on my favorite thick, large cutting board. Then, we transferred our handmade pizzas onto our pizza paddle and placed them into our outdoor pizza oven .


This setup made the whole night feel extra special and interactive. There’s something so fun about watching the pizza cook right before your eyes! We all had a blast crafting our perfect pies, and we’re already looking forward to the next pizza night.
Have you ever hosted an outdoor pizza night? Let me know your favorite pizza toppings in the comments!


IF YOU ENJOYED THIS POST, YOU MIGHT BE INTERESTED IN MY charm necklace party post.
FOLLOW ME ON MY SOCIALS!

Home Office Refresh

This office has officially undergone its third makeover, and I couldn’t be more excited about the transformation! The first makeover took it from an all-white space to a bold, colorful design with striking wallpaper and custom trim. While I loved the new direction, I wasn’t completely in love with the desk and decor. So, I decided to refine the space even further with a desk that brings both character and function, creating the ideal setup for a two-person home office.


I went with this solid wood Plank and Beam dining table that I repurposed as a desk. The quality is incredible, and the rich wood tone adds warmth and sophistication. This piece is perfect for a large single-person workspace or, as I’ve arranged it, a dedicated two-person home office setup, offering ample space for productivity and collaboration.


While the wallpaper, custom paint, chandelier, curtains, rug, and side buffet storage cabinets all stayed the same—because they’re timeless favorites—the new desk and decor have completely elevated the space. I sourced most of the decor from Goodwill, estate sales, and antique stores, making every piece feel curated and full of history. One of my favorite finds is the brass lamp on the desk. Since the original wiring was beyond repair, I simply snipped the cord and added rechargeable light bulbs to give it new life.


This third makeover feels like the perfect balance of bold design and curated charm. By incorporating a two-person desk and layering vintage decor with my rich color palette, I’ve created a workspace that is not only functional but also stylish and inviting. This evolution has been a journey, but I can confidently say this version of my office is my favorite yet!

If you’re looking for inspiration to refine your own workspace, consider repurposing furniture in creative ways and incorporating vintage elements for a truly one-of-a-kind look. Whether you need a single workstation or a two-person home office, choosing the right desk and decor can make all the difference. I can’t wait to hear what you think of this latest transformation!
IF YOU ENJOYED THIS POST, YOU MIGHT BE INTERESTED IN MY Floral Wine chiller Post.
FOLLOW ME ON MY SOCIALS!

The Perfect Wine Chiller
Elevate Your Party with This Stunning Wine Bottle Chiller
Looking for a party trick that will have your guests raving? Say hello to the easiest and most stunning wine bottle chiller you'll ever use! This ice bucket mold comes in a set of two, and I found it on Amazon. With just a little creativity, you can customize it to match any party theme and make your drinks look as fabulous as they taste.
Gather Your Decorations
You can grab fresh flowers from the store like a civilized human being or embrace the thrill of the hunt by picking them from your garden (and maybe dodging a few spiders along the way). Either way, the effort is totally worth it!
Not into florals? No problem! Here are a few fun ideas:
4th of July: Red and blue fruit for a festive patriotic vibe.
Christmas: Cranberries, pinecones, and evergreen clippings for a cozy holiday feel.
Tropical Party: Citrus slices and mint leaves for a bright, summery aesthetic.
Prep Your Mold
Arrange your chosen decorations inside the mold. Get creative and layer different elements for a more dynamic look. I used a pair of chopstick to push everything to the bottom in the beginning!


Fill with Water & Freeze
Once everything is arranged to perfection, fill the mold with water and place it in the freezer for 12-24 hours. (Overnight works too, but the longer, the better!)


Unmold Your Ice Bucket
Run hot water around the outside of the mold to gently loosen your frozen masterpiece. Carefully remove the plastic, and voilà—a breathtaking wine chiller that doubles as table decor
Serve & Impress
Set your ice bucket in the included acrylic basin to catch any melting water, place your favorite bottle of wine or bubbly inside, and watch as your guests gush over your party-planning genius.


This wine chiller isn’t just functional—it’s a total conversation starter. Whether you're hosting a backyard barbecue, a holiday soirée, or an elegant dinner party, this eye-catching centerpiece will take your hosting game to the next level. Cheers to effortless style and ice-cold drinks!