
Let the Robots Mow

If you’ve ever wondered how we manage to keep 6 acres looking clean without spending every weekend pushing a mower, meet our real MVPs: our robot lawn mowers. We use three of the Luba 2 AWDs. One for the front yard and two for the back.
These little guys are all-wheel drive, so they handle our hills like champs (they can tackle up to an 80 percent slope!). They map the yard on their own using AI, dodge obstacles, and even pause for rain because.


You can control everything from your phone, which means I can be sipping coffee while watching one of them stripe the yard in a checkerboard pattern. And yes, you can set custom cut heights and patterns: parallel, diamond, checkerboard - you name it.
They mow up to 1.25 acres a day, and if someone ever tried to walk off with one, they’ve got GPS anti-theft tracking too. Basically, they’re the future and we’re just living in it with better-looking grass.
If you have a smaller lawn and don’t need the big Luba 2 AWD, let me introduce you to its little sister. The Yuka Mini is perfecttttt for smaller yards.


Just like the Luba, the Yuka Mini is totally smart. It uses AI auto mapping, can mow up to 15 separate zones, and handles hills up to a 50 percent slope (which is about 27 degrees). It detects rain, avoids objects in its path, charges itself automatically, and even has geo theft tracking for peace of mind. It mows up to 0.2 acres a day, which is ideal for small to medium-sized yards.
Big yard or small, these robot mowers are the best little yard crew we’ve ever had.
IF YOU ENJOYED THIS POST, YOU MIGHT BE INTERESTED IN my Summer Porch refresh!
FOLLOW ME ON MY SOCIALS!

My No-Renovation Guest Room Refresh

I gave our guest room a little refresh recently, and I’m honestly so happy with how it turned out. No renovation, no paint cans, just a few cozy additions and a little furniture shuffle. It feels like a totally different space, but without the stress of a big project.
The biggest change was moving the bed to a different wall. That one simple shift made the whole room feel more open and balanced. Sometimes just rethinking your layout can breathe new life into a space without spending a dime.
Then I layered in a few new pieces that really made the room feel welcoming. The striped bedding feels classic and calm, and I paired it with floral sheets underneath for a bit of contrast. That mix keeps the bed from feeling too stiff or one-note. In a guest room, I think it’s important to add those little details that make things feel thoughtful, like you actually planned for someone to stay there, and you didn’t just throw a bed in and called it good.


I also added a textured knit throw at the foot of the bed. It’s soft and cozy, and it gives guests something extra to grab if they get cold at night. Having those little comfort items out and visible goes a long way in making the space feel warm and inviting.
The nightstands got a few updates too. One side has a beautiful lamp with a glass petal shade that gives off the softest glow in the evenings. It’s not just pretty, it’s practical too, because no one wants to fumble around looking for a light switch in a new space. On the other side, I added a small green tray that’s perfect for jewelry, keys, or anything guests want to set down at the end of the day. And instead of laying the gold mirror tray flat, I styled it upright using a plate holder. It adds a little height and shine to the nightstand, almost like a piece of art, and gives the whole setup a more styled, intentional look.
I swapped out the rug that used to be in here and brought in one I had in a different room. It’s always surprising how much that kind of change can shift the whole feel of a space. And I finally added new curtains, which helped soften the room and made it feel more finished and cozy. Just pulling in pieces I already had and mixing in a few new ones made the space feel completely refreshed.


All of these little things, like the soft lighting, layered bedding, spots to set things down, are what make a guest room actually feel super welcoming. They show that you thought about comfort, and looks. And the best part is that none of it required a huge budget or a weeks-long project.
If your guest room’s been feeling a little blah, don’t stress. You don’t need a full makeover to make it feel cozy and inviting. Just moving a few things around, layering in some comfy pieces, and adding thoughtful little touches can go a long way. Soft lighting, extra blankets, a spot to drop your stuff are all details that make guests feel like the space was put together just for them. A little effort really does make the whole room feel warm, welcoming, and ready for company.
IF YOU ENJOYED THIS POST, YOU MIGHT BE INTERESTED IN my Home Office Refresh!
FOLLOW ME ON MY SOCIALS!

Pantry Organization


From Food Piles to Functional Pantry
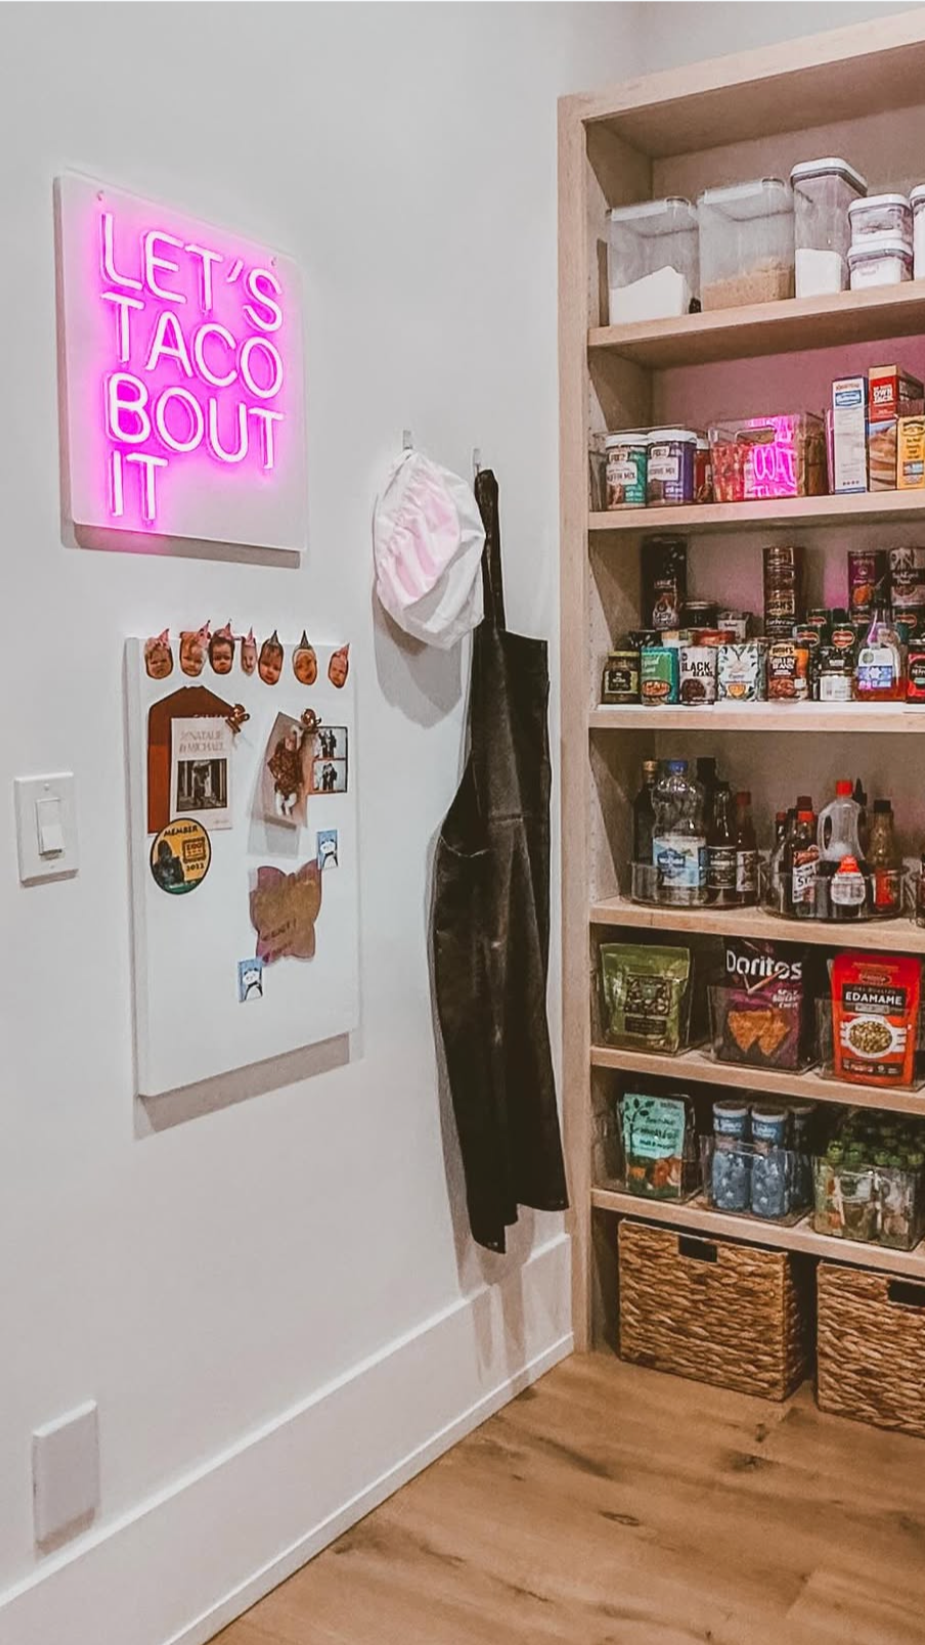
When I say our pantry was a mess before… I mean it was a mess. We had a couple of basic IKEA cabinets, but no actual shelving. Everything else? Just piled on the floor. Boxes stacked on top of bags, cans rolling around, and a constant game of “what expired in here and where did I put the syrup?”
It was not working.
So we finally decided to give it a real setup, and I pulled together a bunch of my favorite organizing pieces to help make it actually functional.
Pantry Shelving That Actually Works
We added real shelves along one wall, and that’s where all of our everyday pantry storage lives now. I used clear containers for pretty much everything, like flour, pasta, cereal, baking ingredients, snacks, you name it. Nothing’s falling over anymore, I can actually see what we have, and it doesn’t feel like a mess every time I open the door.
Spice Racks & Lazy Susans
All the smaller stuff, like condiments, oils, sauces, baking extras, used to get lost in the shuffle. I’d forget what we even had. Now I use a three-tiered shelf to line things up so nothing gets hidden in the back, and lazy susans for anything in a bottle or jar. It keeps everything visible and easy to grab without knocking over five other things in the process. Highly recommend.


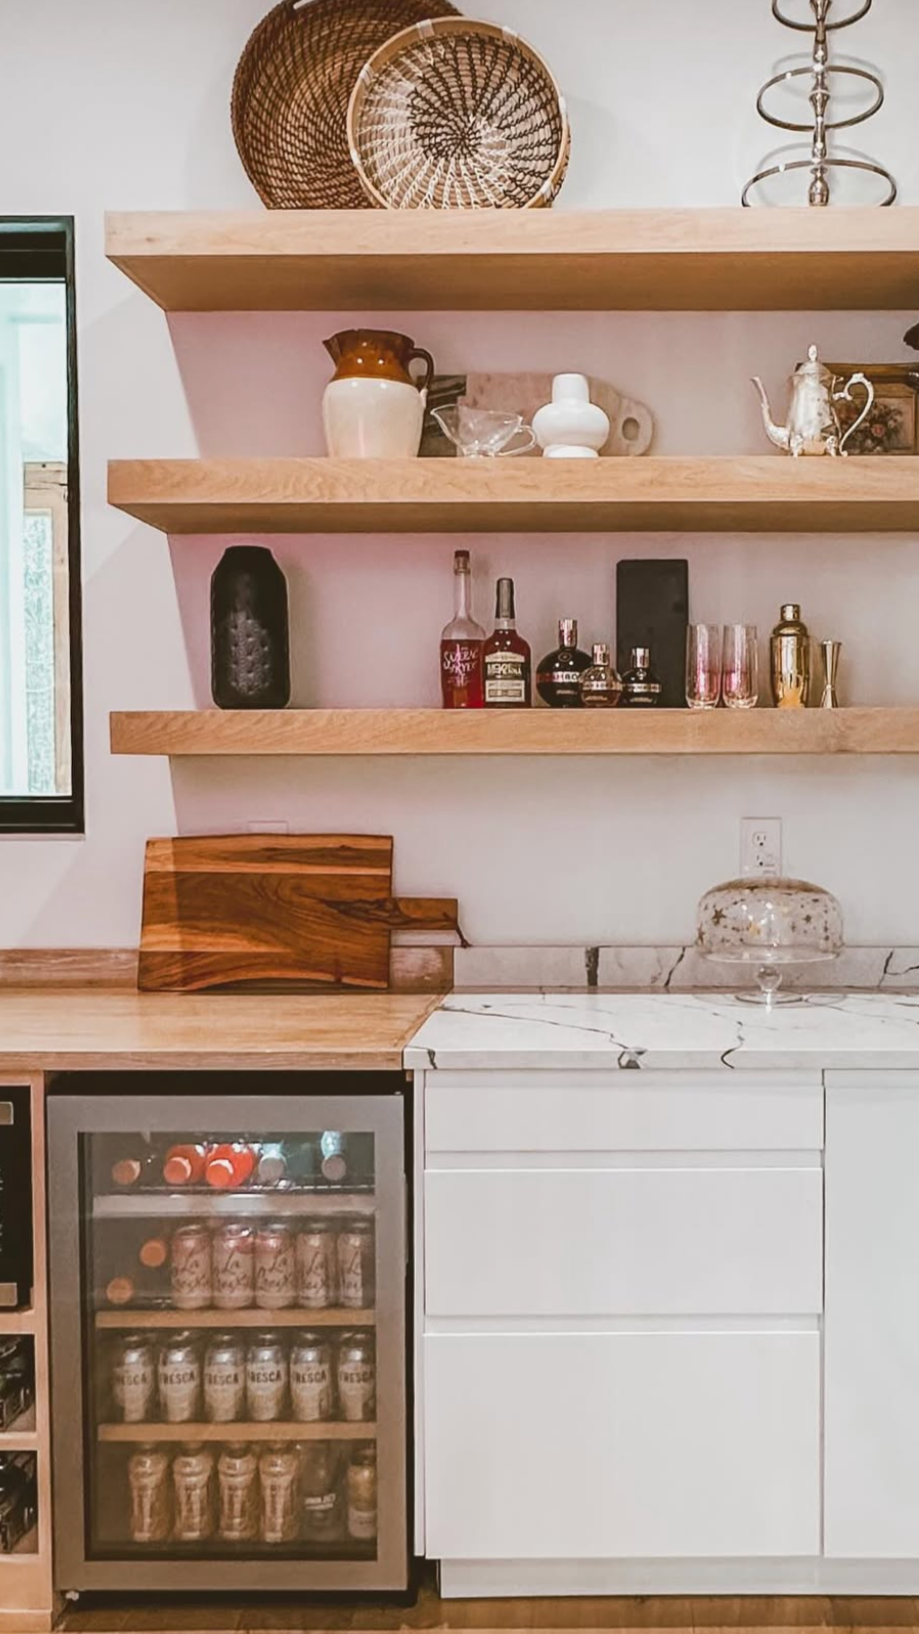
Counter Space, a Drink Fridge & Open Shelving
We already had some counter space from the original cabinets, but we extended it a bit and made it more functional. I set up a little drink zone with a mini fridge, a few pull-out bins, wine bottle storage and a bread box. It’s super practical but still feels put together.
Above it, we added open shelving, which gave me the perfect spot to display a few of my prettier pieces, that I usually pull out when we’re entertaining. Some pretty jugs, a teapot, a couple of serving items, and a few things that just make the space feel a little warmer and more personal. It balances out all the practical stuff and makes the room feel like it fits in with the rest of our home.
Finally, a Pantry That Works!
I honestly still can’t believe the difference. We went from a “stuff everywhere on the floor” situation to a space that finally works for us. And coming from our last house, where we didn’t even have a pantry, this feels like such a luxury. Having a spot where everything has a place (and actually stays there) makes such a big difference in day-to-day life.
Links At A Glance
Neon Sign (Not sold anymore)
IF YOU ENJOYED THIS POST, YOU MIGHT BE INTERESTED IN my Sheet Storage!
FOLLOW ME ON MY SOCIALS!

How To Make An End Cap For Chair Rail

Let’s talk trim. If you’re adding chair rail or any kind of molding to your walls, you’ll probably run into the question: how do I end it cleanly? Sometimes the molding wraps around a corner or continues into another space, but other times, you just need it to stop.
That’s where an end cap comes in.
It’s basically a little return piece that finishes the edge of your trim so it doesn’t look like it just… stopped mid-thought. And good news: it’s actually really easy to do with just a few cuts and a little patience.
I made a handy video explaining exactly how to do it, below!
In case you're curious, my hallway trim is actually two pieces layered together. The back board is 4.5” tall and 1/2” deep, and the rounded piece on top is 2.5” tall and 1” deep. The layered look adds a little extra dimension.
One more thing: always wear your safety goggles, even for quick cuts. It only takes a second and makes all the difference.
An end cap might seem like a small detail, but it really pulls the whole project together. It gives your trim a clean, finished edge and makes everything feel more polished and purposeful.
If you give it a go, let me know—I’d love to see how it turns out in your space!
Links At A Glance
Paint Color - Reddened Earth by HGTV Home by Sherwin Williams
Trim - Ace Hardware
IF YOU ENJOYED THIS POST, YOU MIGHT BE INTERESTED IN My blog about How to do crown moulding!
FOLLOW ME ON MY SOCIALS!

Vegan Boxed Brownies (With a Coffee Twist)

My Go-To Vegan Brownie Hack (Even Though I’m Not Vegan)
Okay, confession time: I’m not vegan. I love butter and cheese as much as the next person. But so many of my friends and family are either vegan or dairy-free, and I always want everyone to feel included when they come over. Dessert shouldn’t be something people have to skip, especially when it’s something as easy (and delicious) as brownies.
So here’s the little hack I use all the time: boxed brownie mix. Yep, most of them are already vegan and have no eggs or dairy in the dry mix. You just need to swap out the usual wet ingredients for a few easy alternatives. I’ve tested this one a bunch of times, and it always turns out rich, fudgy, and honestly just as good as the “regular” kind. The coffee gives it a deeper flavor, the flax eggs hold everything together, and the texture is chef’s kiss.


Vegan Boxed Brownies (With a Coffee Twist)
Ingredients:
2 tablespoons flaxseed meal
6 tablespoons water
1 box Duncan Hines brownie mix
¼ teaspoon baking powder
¼ cup vegan butter, melted (there are so many great brands out there now!)
¼ cup oil
½ cup coffee (any kind—whatever you have brewed!)


Directions:
Preheat your oven to 350°F and spray an 8x12” baking pan with nonstick spray.
Mix the flaxseed meal with the water and let it sit for 5 minutes—that’s your egg replacer.
In a large bowl, combine the brownie mix and baking powder.
Add the flax eggs, melted butter, oil, and coffee. Stir it all up until it’s fully combined.
Pour the batter into your pan and smooth it out.
Bake for 25 minutes. If you’re using an 8x8 pan instead, go for 30-35 minutes.
Let the brownies cool (this part is hard), then slice them with a plastic knife for cleaner cuts.


That’s it. So simple. I’ve brought these to parties, served them after dinner, and packed them in lunchboxes—and no one has ever guessed they’re vegan. They just ask for the recipe.
Even if you’re not dairy-free yourself, having a go-to vegan dessert in your back pocket is such a thoughtful touch. And let’s be real, brownies are never a bad idea.
Let me know if you try it!
IF YOU ENJOYED THIS POST, YOU MIGHT BE INTERESTED IN My vegan thanksgiving recipes!
FOLLOW ME ON MY SOCIALS!

How to Make Floral Ice Cubes for Your Next Party

If you’re hosting anything, from a backyard hangout to a baby shower, you have to try floral ice cubes. Trust me, this is one of those DIYs that looks super fancy but is actually incredibly easy. They take almost no time to make, but they instantly make your setup feel thoughtful, festive, and way more elevated.
I used them in a clear drink tub and they totally stole the show. People were way more excited about the ice than I expected (like, full-on compliments about ice cubes). It’s such a simple touch, but it adds this fun, creative vibe that makes everything feel a little extra special without any real effort.


Here’s how I made them:
I used a mix of dried flowers, real flowers, and even a few fake ones I had lying around. Don’t overthink it! Just grab whatever looks pretty! I stuffed each section of the ice cube tray with petals and blooms, and didn’t worry about making them perfect. For the roses, I found a little trick: if you twist them quickly between your palms, the petals come off super easily. It’s oddly satisfying and made the whole process go faster.
Once your tray is packed with floral goodness, just fill it to the top with water and freeze overnight. No need to get fancy with layers or stages, you just pop it in the freezer and forget it.
One thing to keep in mind: if you’re planning to use these cubes in drinks (like cocktails or lemonade), make sure you’re using edible flowers. Not all flowers are safe to consume, so it’s worth double-checking. But if they’re just for chilling wine bottles or decorating a drink tub, feel free to use any combination of dried, real, or faux.


In the morning, you’ll have the prettiest ice cubes ever, like little frozen flower arrangements. I dumped mine into a clear drink tub with sparkling waters and wine bottles, and they instantly made everything feel so much more fun and festive. You could also pop them into pitchers, a punch bowl, or even individual glasses if you’re going all out. However you use them, they’re guaranteed to make people stop and say, “Wait…did you make these?!”
It’s such a small detail, but it really pulls everything together and makes your setup feel intentional. One of those easy little wins that looks high-effort but takes barely any time at all.
Give it a try and let me know how yours turn out, I’d love to see!
Links At A Glance
IF YOU ENJOYED THIS POST, YOU MIGHT BE INTERESTED IN how to make a hot chocolate bar!
FOLLOW ME ON MY SOCIALS!

The Amazon Curtains That I Love
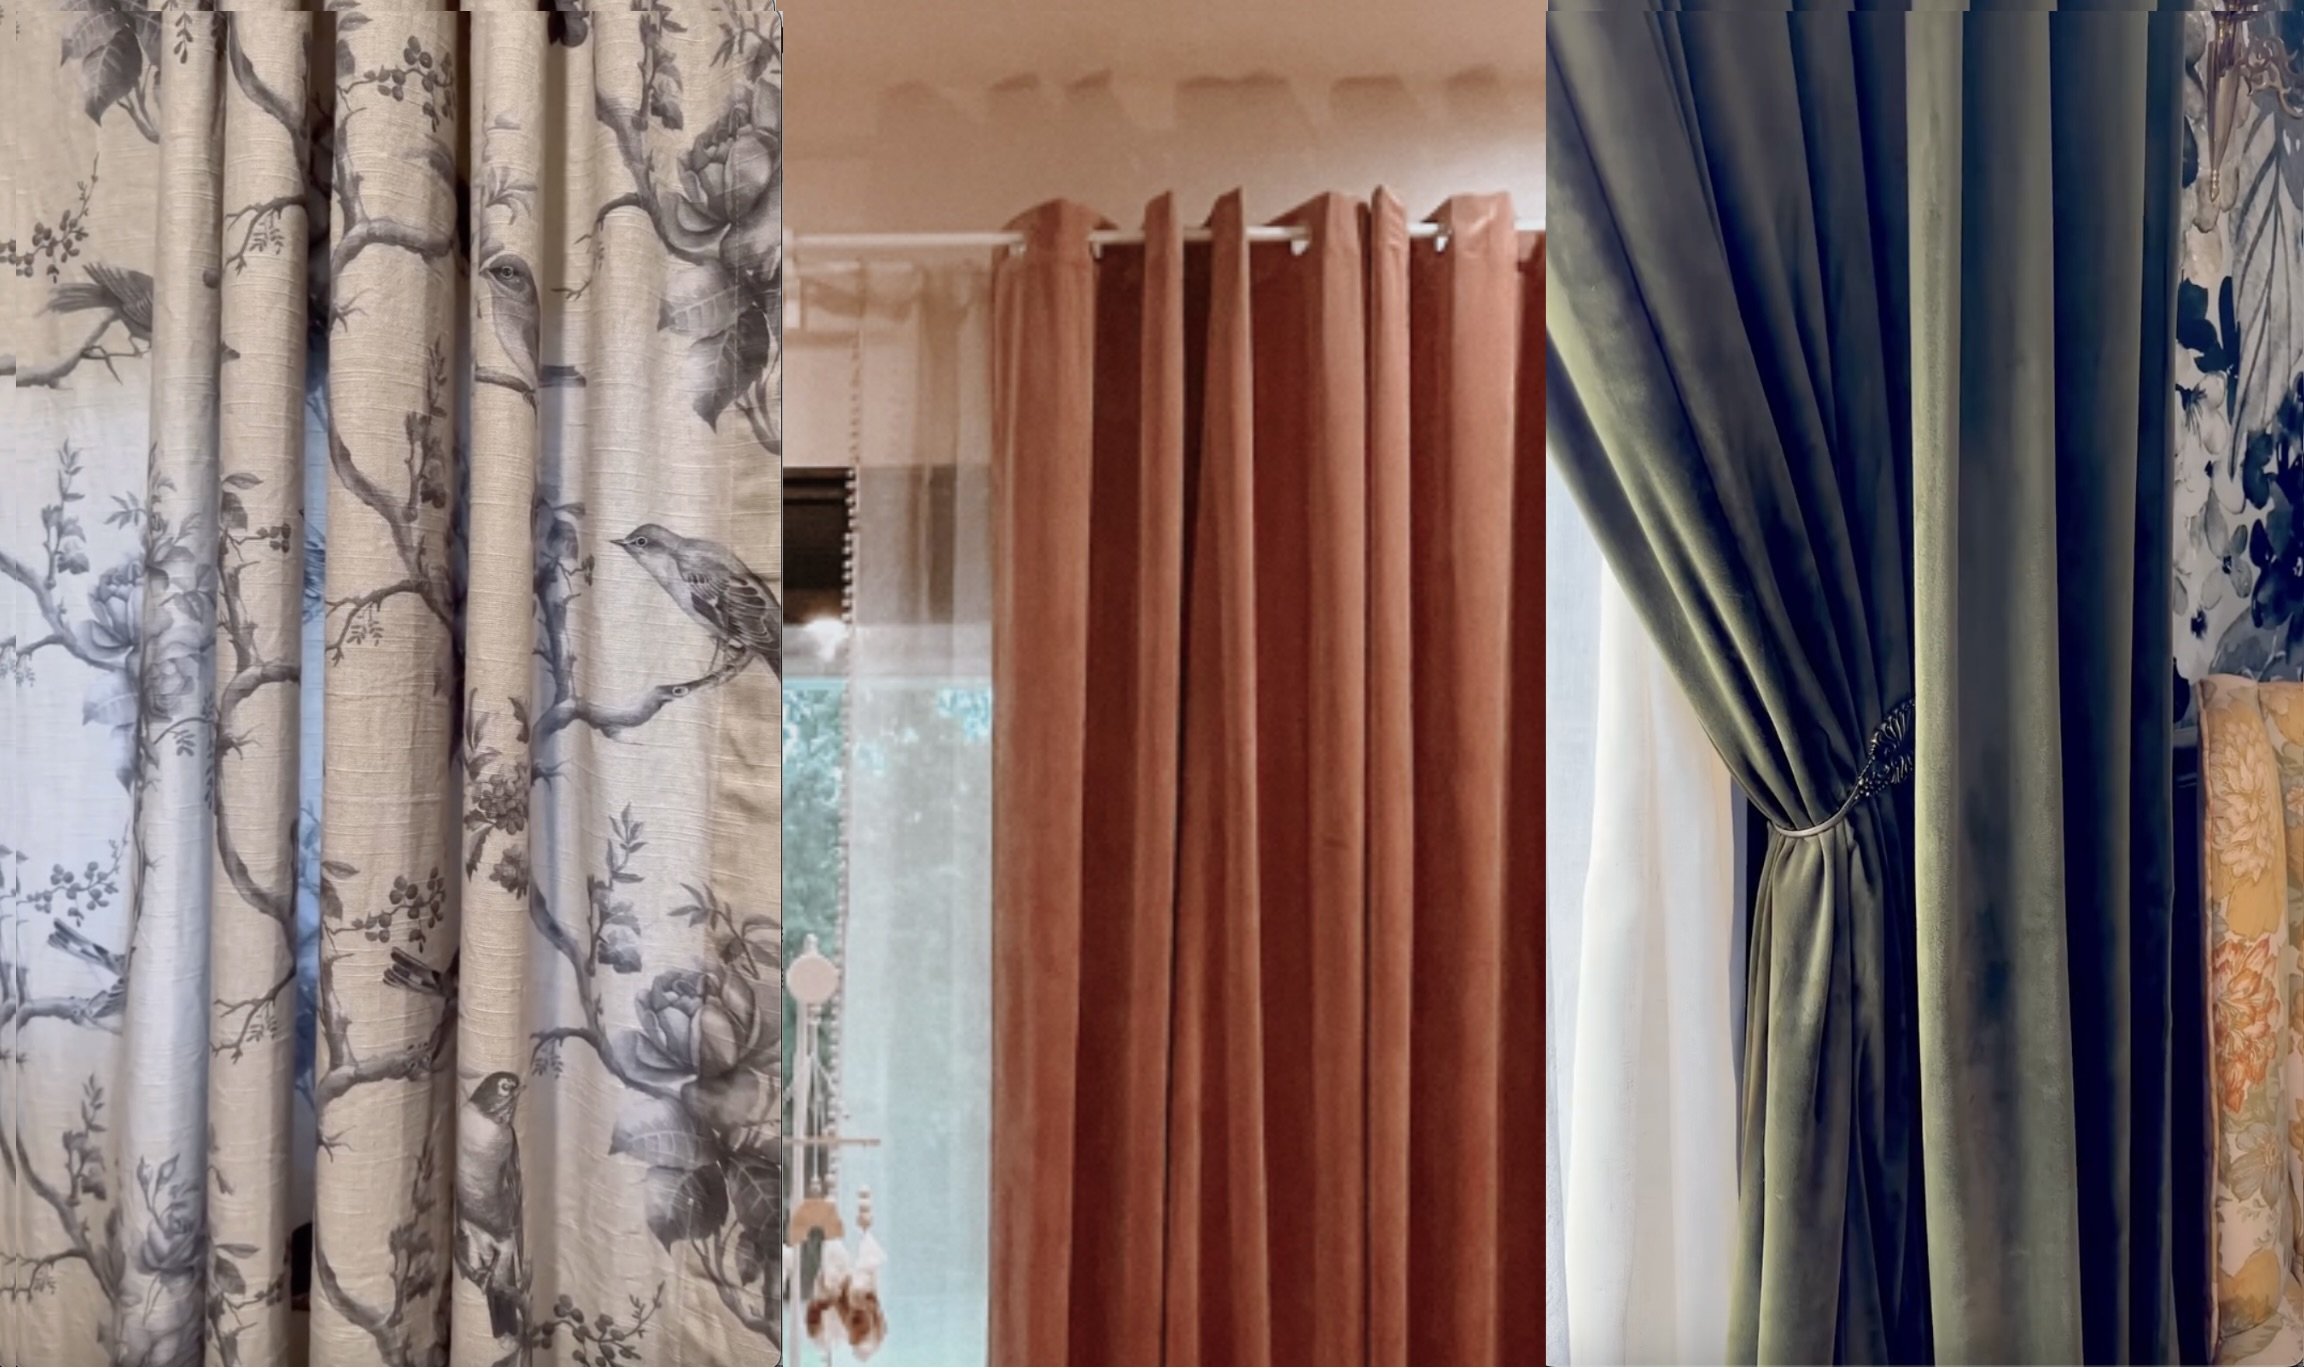
Curtains are one of those things that seem small until you realize how much they totally change a room. I’ve browsed so many over the years. Some curtains are too thin, others look shiny or stiff, and plenty just feel kind of sad once they're up. Some of my absolute favorite curtains in my home are actually from Amazon, so I figured I’d round them up and share exactly what I have hanging in each space.


We already have shades on the windows, so I didn’t need blackout curtains here. I just wanted something with a little texture and pattern that would let the light in when I opened the blinds. The ones I found are a soft, creamy linen-look panel with a design that adds interest without feeling busy. You can hang them with the back tabs for a neat, pleated look or use the rod pocket for something more relaxed. They hang beautifully either way, feel way more expensive than they are, and don’t wrinkle like crazy straight out of the package. Exactly what I was looking for.

This setup might be my favorite. I layered two sets: an olive green velvet panel on the outside and a light-filtering linen-style curtain behind it. The velvet adds this warm, moody vibe to the room (perfect for all the vintage details in here), and the layered look makes the whole space feel a little more styled without a ton of effort. It’s a super easy combo that makes a big impact and pulls the whole space together.


Her room is a little more fun and playful, so I mixed a soft blush curtain with sheer white panels that have the cutest little pom pom trim. The blush ones have a light blackout lining, which is perfect for keeping her room cool and nap-friendly, and the pom pom detail adds just the right touch of whimsy when the curtains are open. Together, they feel sweet and polished without being over-the-top. And she loves them, which is a bonus.
I didn’t expect to love Amazon curtains as much as I do, but these really came through. Each one added something different to the room, whether it was softness, color, texture, or just making the space feel more finished. And honestly, I couldn’t be happier with how they turned out.
Links At A Glance
Primary Bedroom
Lamp (Antique Store)
Nightstand (TJ Maxx)
Office
Lamp (Thrifted)
My Daughter’s Room
Bed (Facebook Marketplace)
IF YOU ENJOYED THIS POST, YOU MIGHT BE INTERESTED IN my Hallway Makeover!
FOLLOW ME ON MY SOCIALS!

DIY Personalized Cupcake Toppers

Let’s talk about one of my favorite little party details: personalized cupcake toppers. They’re the kind of thing that makes a dessert table feel extra special, and the best part is you can totally make them yourself. No fancy tools required, just a little crafting and some patience.
I made these for my daughter’s 1st birthday party and had so much fun putting them together. Here's how you can do the same:
What You'll Need:
Photos with the face big enough to actually show up once it’s cut out


How To Make Them
Pick your photos
Start by choosing clear, front-facing photos where the person's face is large enough to show up well once cut out. I used Canva to zoom in and fit two to three faces per page. You want the faces to be big enough to stand out on top of a cupcake, so don’t be afraid to crop in close.Print and cut
I printed mine on photo paper using my home photo printer, but you can absolutely get them printed anywhere you normally develop photos. Once they’re printed, just cut around each face. They end up looking so cute and personal.Attach to skewers
Flip the face cutouts over and tape a skewer or toothpick to the back. That’s it. No fancy supplies or tools needed. You can also add a second face on the back if you want them double-sided, but I usually keep it simple.Stick them in and enjoy
Once they’re ready, just pop them into your cupcakes. These always get a good laugh and make the whole party feel a little more personal and fun. They're perfect for birthdays, graduations, bachelorette parties, pretty much any celebration where faces on cupcakes would make people smile.


That’s all it takes. It’s a super quick and budget-friendly DIY that adds such a personal touch. I love how easy it is to switch up the style depending on the occasion: birthdays, showers, holidays, or even just for fun.
Let me know if you make some. I’d love to see how yours turn out!

