
My bestselling lighting picks on amazon

Good lighting doesn’t just brighten a room - it completely transforms it. The right fixture can bring in vintage charm, make a space feel instantly more luxurious, and pull everything together in a way that feels elevated but still effortless.
Over time, I’ve found a handful of lighting pieces that strike that perfect balance. They’re warm, timeless, and just the right amount of statement-making, and based on how often they’re added to carts, it seems you all agree.
These are the Amazon lighting picks I’ve used and loved in our home, and the ones that continue to be bestsellers month after month. If you’re looking to update a space with pieces that feel high-end (without the high-end price tag), this list is a great place to start.
This is hands-down my most clicked and most purchased light and once you see it in person, it’s easy to understand why. The all-brass finish gives it such a polished, sculptural look that instantly elevates any workspace. It’s bold without feeling over the top, and adds that perfect “finished” touch to the office. It has the look of a designer piece, but at a price that feels way more approachable.
These pendants totally transformed our hallway. The brass finish paired with the patterned glass gives off the prettiest glow, especially at night. They're an easy swap that adds so much elegance. I think people love them because they make even a simple hallway feel curated.


This brass vanity light with clear glass globes brings just the right amount of vintage charm to our red bathroom. The warm metal finish pairs beautifully with the bold walls, creating a space that feels layered and intentional. It’s classic, elegant, and gives off a soft glow that’s both flattering and functional—everything you want in a bathroom light.
This soft blush pink light has become one of my most asked-about pieces. It actually used to live in our sunroom before we moved it to the playroom—which just goes to show how versatile it really is. It adds a playful, charming touch without feeling too “kiddie,” and I love how it brings personality into any space. It would be just as sweet in a nursery, a kid’s room, or even a whimsical office corner.


My Bedroom Wall Sconces by the Fireplace
These sconces are a personal favorite—they’re simple, modern, and add so much warmth next to our fireplace. The vintage glass and brass finish bring a soft glow that feels cozy.
This is the crown jewel of our sunroom. The circular frame keeps things airy and open, while the design adds a little drama in the best way. It ties the whole room together and looks so good with the natural light pouring in. This one is always a hit when people see it in person!


Ready to Elevate Your Lighting?
Each of these pieces has become a bestseller for a reason—they bring character, warmth, and a little bit of luxury to everyday spaces. Whether you’re swapping out a dated vanity light or making a statement with a new chandelier, these picks add that thoughtfully layered look that takes a room to the next level.
Links at a Glance:
Hallway Mirror - Found at an estate sale
Toilet Paper Holder (Red Bathroom)
Horse Print (Red Bathroom) -frame is thrifted
Column Plant Holder (Bedroom) - Estate sale find
IF YOU ENJOYED THIS POST, YOU MIGHT BE INTERESTED my Blog post about My Best Selling Chandelier!

How to Make Your String Lights Smart

How to Make Your String Lights Smart (and Your Patio Way More Magical)
If you’ve ever wrestled with plugging and unplugging your string lights every night—or just wish you could control them from your cozy spot on the couch—this post is for you.
I finally made the switch to smart outdoor lighting, and let me just say: game changer. Not only do our string lights turn on with a tap from my phone, but I can also schedule them to come on automatically whenever I want, control them from my smart home device (Google Home, Alexa, etc) or use the Pico remote that also doubles as a switch.
Here’s exactly what I used and how easy it was to set up:


Step 1: Get the Right Smart Plug
This is the magic behind it all. I’m using the Lutron Caséta Outdoor Smart Plug, which is made for outdoor use and built to withstand the elements. It’s heavy-duty, reliable, and works seamlessly with the Lutron app and Smart Hub.
Step 2: Download the Lutron App
Once your plug is connected (mine lives tucked under the deck), just download the Lutron app and follow the prompts to add your new smart plug. I named mine “Deck String Lights,” and now I can turn them on/off, create schedules, or pair it with other smart home systems like Alexa or Google Home.


Step 3: Add Your String Lights
Plug in any ordinary string lights directly into the Lutron smart plug (that is paired with your Lutron Smart Hub) and you're done. Seriously—it’s that easy. Now I can set them to turn on automatically every evening or manually control them when we’re hosting or having a quiet night in.
Why I Love This Setup
No more crawling around under furniture to unplug lights.
Can automate lights to turn on and off at whatever time you want.
Looks super impressive when you “magically” turn them on from your phone.
Great for entertaining (especially when your dog looks this relaxed under a warm glow).
If you’re ready to level up your patio lighting, grab this smart outdoor plug, and thank me later. Whether you’re winding down after work or throwing a summer party, smart lighting totally changes the vibe.

Links at a Glance
To complete the look and functionality of your smart patio, consider these additional items:
IF YOU ENJOYED THIS POST, YOU MIGHT BE INTERESTED my Blog post about how to create the nancy Meyers aesthetic

The Secret to a Well-Styled Entryway
Why Getting the Scale Right in Your Entryway Is Important
Your entryway sets the tone for your entire home—it’s the first thing people see when they walk through the door, and it deserves just as much attention as any other room. One of the biggest things I’ve learned when designing ours? Scale is everything.
You can have the prettiest pieces in the world, but if they’re not the right size for your space, the whole room can feel a little… off. Oversized art, the right-sized rug, and furniture that fills the area without crowding it—it all matters more than you might think.
Take a look at the comparison between our finished entryway and what it looked like when we first moved in (pictured below). In the “before” photo, everything—art, console table, rug—was beautiful, but just too small for the space. It left the room feeling sparse and disconnected. Once we committed to properly scaled pieces, the entire area felt more grounded, intentional, and welcoming. It took a while to pull together all the right items, but good design takes time—and the final result is absolutely worth the wait.


Big Art, Big Moment
Let’s start with the art. I wanted something dramatic, something that made a statement the second you walked in. I ended up going with a massive 60” x 90” print from Big Wall Décor, and it’s honestly one of my favorite things in the whole house. I shared how I made it work in this blog post, but in short—the art file itself was free, and you choose where to print it.
The oversized scale works because the entryway is large. It doesn’t feel like it’s trying too hard—it just fits, and it makes the space feel polished and intentional.
A Rug That Grounds Everything
Underneath it all, I added a custom rug from Ernesta in color linen that spans almost the entire length of the wall. This was a game changer. A rug that’s too small can make everything else feel like it’s floating, but this one helps ground the furniture and defines the whole area as its own zone. The neutral tone works with everything, and the texture gives it enough interest without competing for attention.


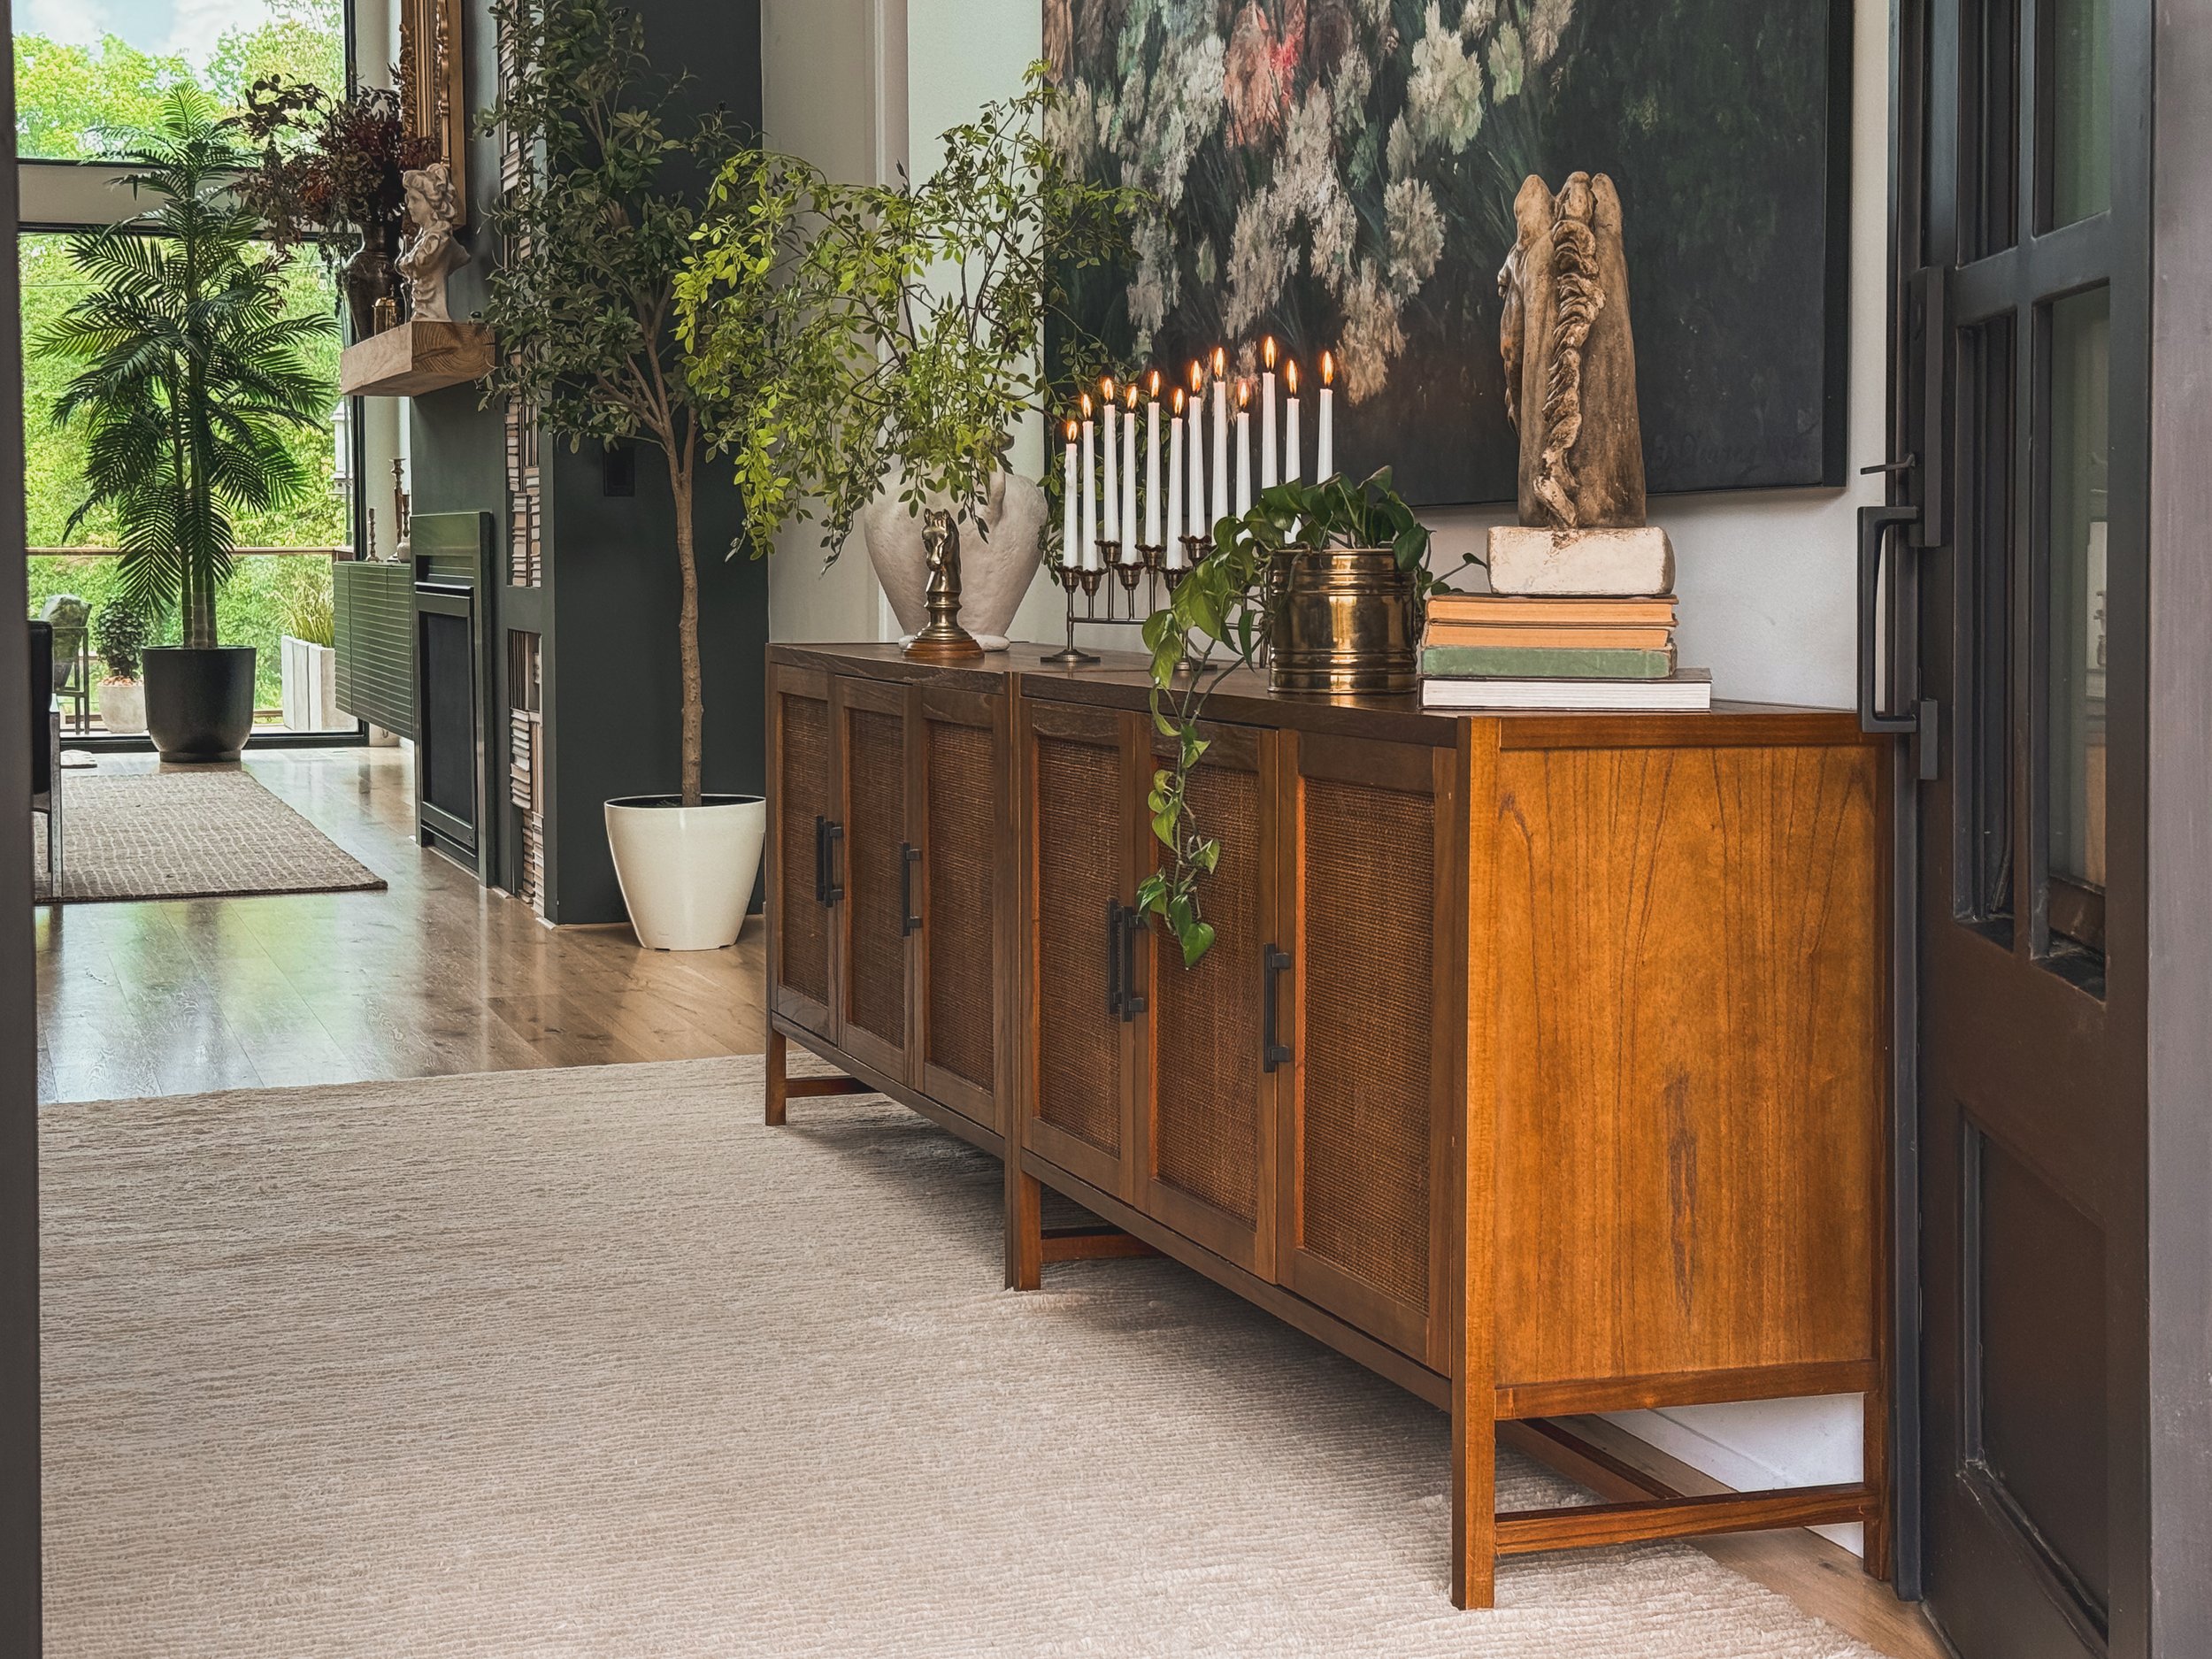
Anchoring with the Right Console
I get asked about this console setup all the time—and the truth is, it’s actually a combo of two different pieces! I placed the 2 cabinet units together to create one long, seamless piece—and honestly, it looks completely custom. The warm wood tones, woven door fronts, and clean lines help it feel substantial without being heavy, and the length is perfect for filling out the wall without needing any awkward filler pieces.
The Details That Pull It All Together
Once the foundation was set, I started layering in decor to give the space dimension and warmth. A long brass candelabra stretches nearly the full length of the console, adding height, symmetry, and just the right amount of vintage charm.
On one end, I placed a large vase filled with airy greenery to soften the lines and bring in a natural feel. On the other, I styled a small stack of books topped with a textured stone horse bust and a trailing plant in a vintage brass planter. The mix of materials—ceramic, brass, greenery, stone—adds character and creates that collected, effortless look I always love in an entryway.
The Takeaway
In the end, getting the scale right made all the difference in our entryway. From combining two consoles for the perfect fit to layering in a few well-chosen accents, each piece was picked with purpose—and it shows. It didn’t come together overnight, but taking the time to get it right was totally worth it. If your space feels a little off, start by looking at the size of what’s in it. A few smart swaps might be all you need to bring it to life.
Links at a Glance
Small Canvas Art (At Home find)
Vase (TJ Maxx find)
Horse Head (antique find, but similar links here)
Faux Olive plant (old entryway)
Brass planter (estate sale find)
IF YOU ENJOYED THIS POST, YOU MIGHT BE INTERESTED my Blog post about how to create the nancy Meyers aesthetic

How to Bring the Nancy Meyers Aesthetic to Your Outdoor Space

If you’ve ever watched a Nancy Meyers movie and found yourself swooning over the kitchens, the cozy lighting, the layered neutrals, and the inviting, lived-in feel of every space—then you’re in good company. There’s something effortlessly elevated about the “Nancy Meyers aesthetic,” and the good news is, you don’t have to move to the Hamptons or own a coastal villa to bring a little of that charm home.
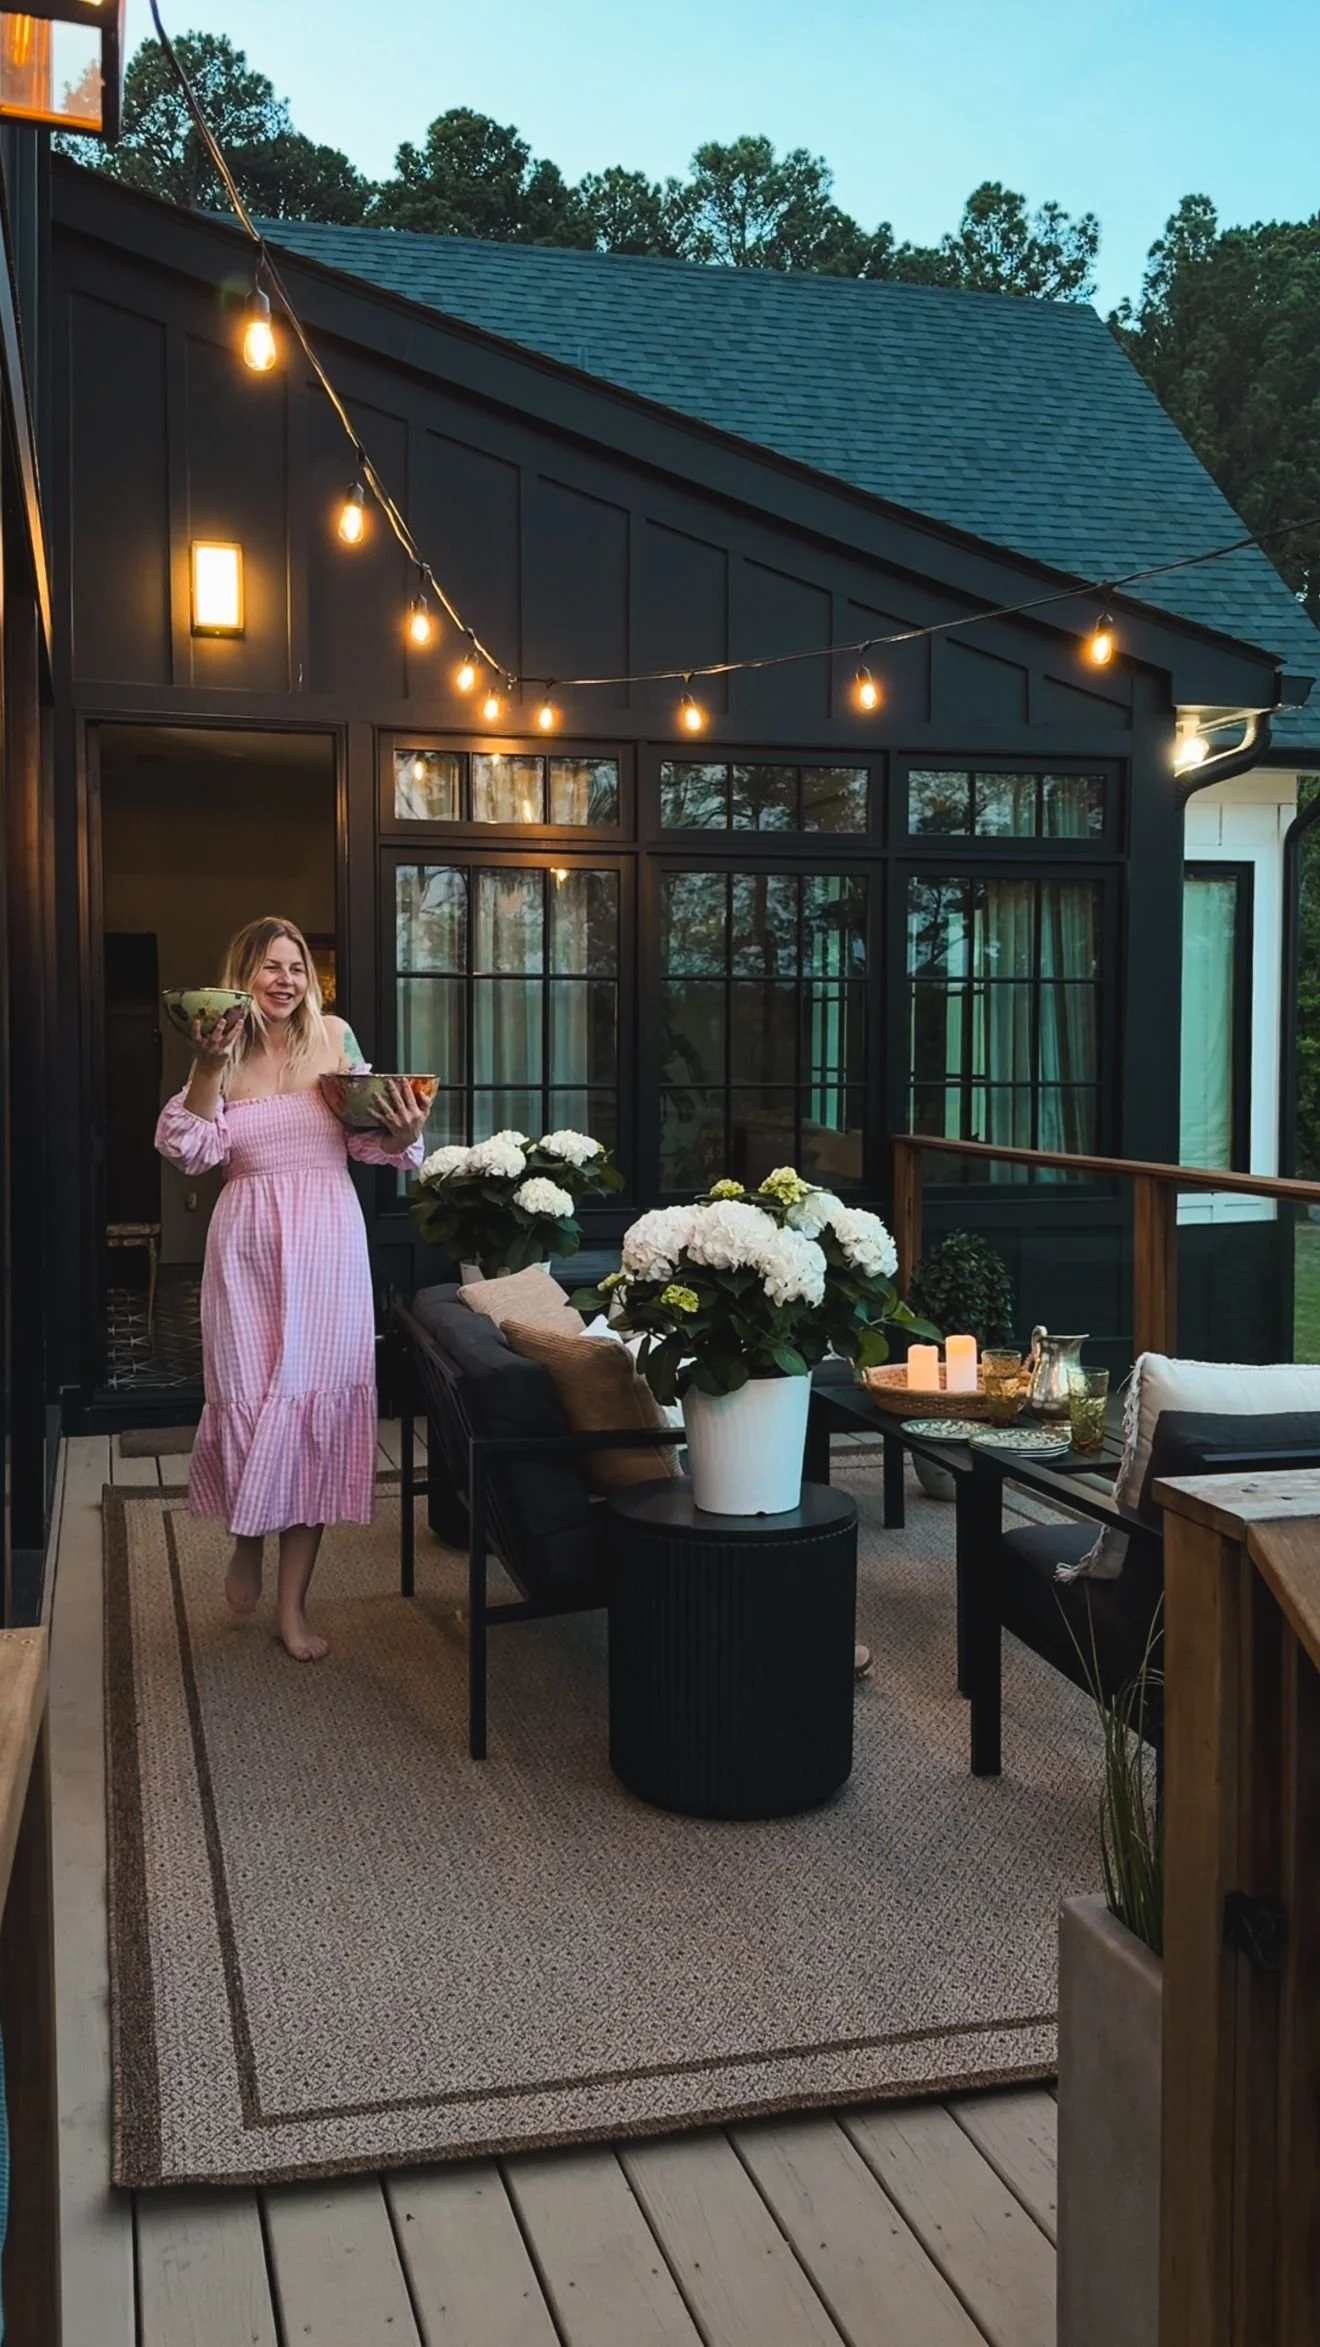
I recently gave our back patio a little refresh, and let me tell you—it’s giving Something’s Gotta Give meets It’s Complicated in the best way. Here’s how I leaned into the look:


1. Keep It Classic with Neutrals
A neutral base sets the tone. I already own an inexpensive black furniture set that I’m not willing to replace right now, so I chose a brown rug, soft beige and brown pillows and a textured throw to warm up the black metal furniture. Remember this look is all about timeless comfort, not trends.
2. Add Fresh Flowers (Always)
Nancy’s worlds are always filled with lush hydrangeas, fresh peonies, and plenty of greenery. I went with faux shrubs in concrete planters and real hydrangeas in white pots placed on my side tables to anchor the space and instantly add that soft, romantic charm. Bonus: I ended up planting the hydrangeas in the yard so now I’ll get years of beauty from them.


3. Set the Scene with Simple, Elegant Entertaining
Whether it’s sparkling water, lemonade, or just a bowl of strawberries, a pretty tray and glassware make even the smallest gathering feel special. I set our coffee table with a rattan tray, vintage-style plates, thrifted glass cups, and a thrifted silver pitcher —nothing fancy, but it feels intentional and a little luxurious.
5. Include a Little Personality
The little details bring it all to life. For us, that means letting our dog lounge wherever he pleases and keeping a pair of sandals kicked off nearby. It’s supposed to feel lived-in, after all—not staged.
6. Soft Lighting is a Must
While these photos were taken in the daylight, string lights overhead give off that dreamy glow once the sun goes down. You can’t go wrong with warm-toned bulbs and just enough sparkle to make the space magical. I also used a few battery powered candles on the coffee table.


The result? A patio that feels like a movie set—but still totally livable. Whether you're sipping coffee in the morning or hosting friends for evening drinks, it’s become my favorite place to exhale.
If you're craving a little Nancy Meyers magic, just start with a comfy seat, a hydrangea or two, and something to sip—your outdoor sanctuary is just a few cozy touches away.
Links at a Glance
Here’s everything I used to bring this cozy outdoor vibe to life:
IF YOU ENJOYED THIS POST, YOU MIGHT BE INTERESTED IN how i refreshed my porch to spring!
FOLLOW ME ON MY SOCIALS!

From Nursery to Big Girl: Simple Room Swaps

One of the sweetest (and most emotional) parts of motherhood is watching your baby grow—and along with them, their space grows too. I thought it would be fun to walk you through how we transitioned my daughter’s room from a cozy nursery, to a playful toddler room, and now into her vintage-inspired big girl room—with just a few thoughtful swaps along the way!
Spoiler: It doesn’t have to mean a full-blown makeover every time. A few intentional changes can completely transform a space without losing the heart of it. Let’s take a look:
Stage One: The Nursery (So Many Snuggles!)

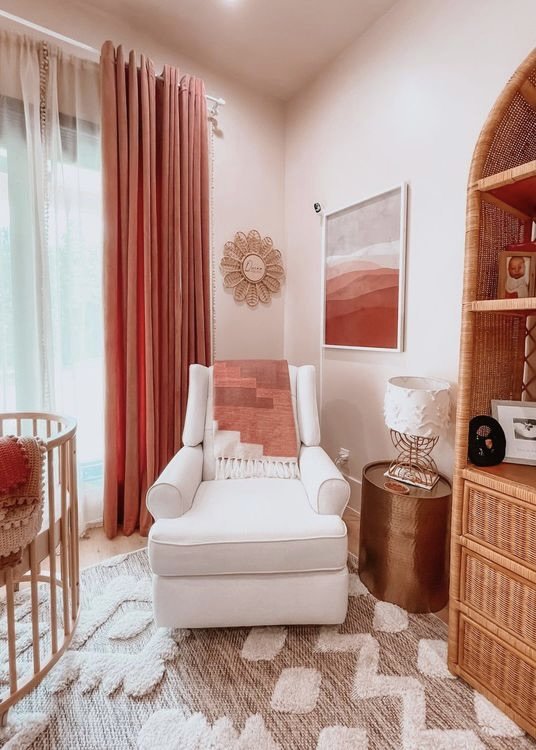
In the beginning, her room was pure sweetness. A soft rug, an oval crib nestled under dreamy curtains, a cozy rocker for all those late-night feedings, and a basket full of stuffed animals. The palette was warm and soft, with muted pinks and natural textures. Everything felt very gentle, very "newborn bubble."
Small Swaps Tip: Focus on softness, comfort, and a calming color palette—you’ll spend lots of time here, so you want it to feel like a hug!
Stage Two: The Toddler Room (Play All Day)


As she grew, so did her need for independence. The crib dropped down to a toddler bed height (big girl vibes, but still safe!) The rug got an upgrade as we went through potty training and I opted for a playmat that looked liked a rug, but was much easier to clean.
The big pieces stayed—the rocker, the curtains, the woven textures—but the room became more about exploration and movement.
Key Swaps:
Lowered the crib or transitioned to a toddler bed
Swapped the rug to a wipeable playmat
More floor-accessible toys and books
Safety first! Make sure you attach all furniture to the wall, hide outlets, and secure cords.
Small Swaps Tip: You don’t have to change everything—just adjust a few pieces to encourage more independence and imagination.
Stage Three: The Big Girl Room (All Grown Up…Almost)

Cue the happy tears: the full-size bed made its debut! Her vintage bed and new side tables gave the room a timeless, classic feel. So much has stayed, but the furniture grew up with her.
Now, the space feels a bit more structured while still cozy for sleeping. We have a separate playroom, so if you’re wondering where all the toys are — that’s where they live!
Key Swaps:
Full-size, vintage bed
Grown-up bedding with layered textures
Matching nightstands with "big girl" lamps
Decorative touches that feel a little more curated, a little less "baby"
Small Swaps Tip: Bring in just a few more "grown-up" pieces, but keep some of the whimsy! It’s still her room, after all.
Links At A Glance
Mobile (Purchased from Etsy but no longer for sale)
Round top rattan shelf - Facebook Marketplace
Blankets - Made by my mom
Lamp (nursery/toddler room)
Wall Art (nursery/toddler room) - TJ Maxx Finds
Dresser - From my childhood
Wipeable play mat (toddler room)
Full size bed - Facebook Marketplace

How it held up: cozy coupe edition

Hey everyone!
A while back, I decided to get crafty and give our Cozy Coupe a little glow-up with some custom paint. If you’ve ever thought about painting one of these iconic ride-ons, you might be wondering—how does it actually hold up over time?
Here’s the honest rundown.


For the makeover, I used Rust-Oleum spray paint—a combination of their plastic-friendly primer and a couple of solid color choices to match the fun but neutral vibe I was going for. I finished it off with a clear protective topcoat to help it stand up to all the toddler adventures ahead.
And at first? It looked amazing. Clean, bold colors, a totally fresh look, and so much more stylish and playful than the classic red.
Fast forward to now, and it’s definitely gotten lots of love (and a good amount of use)!
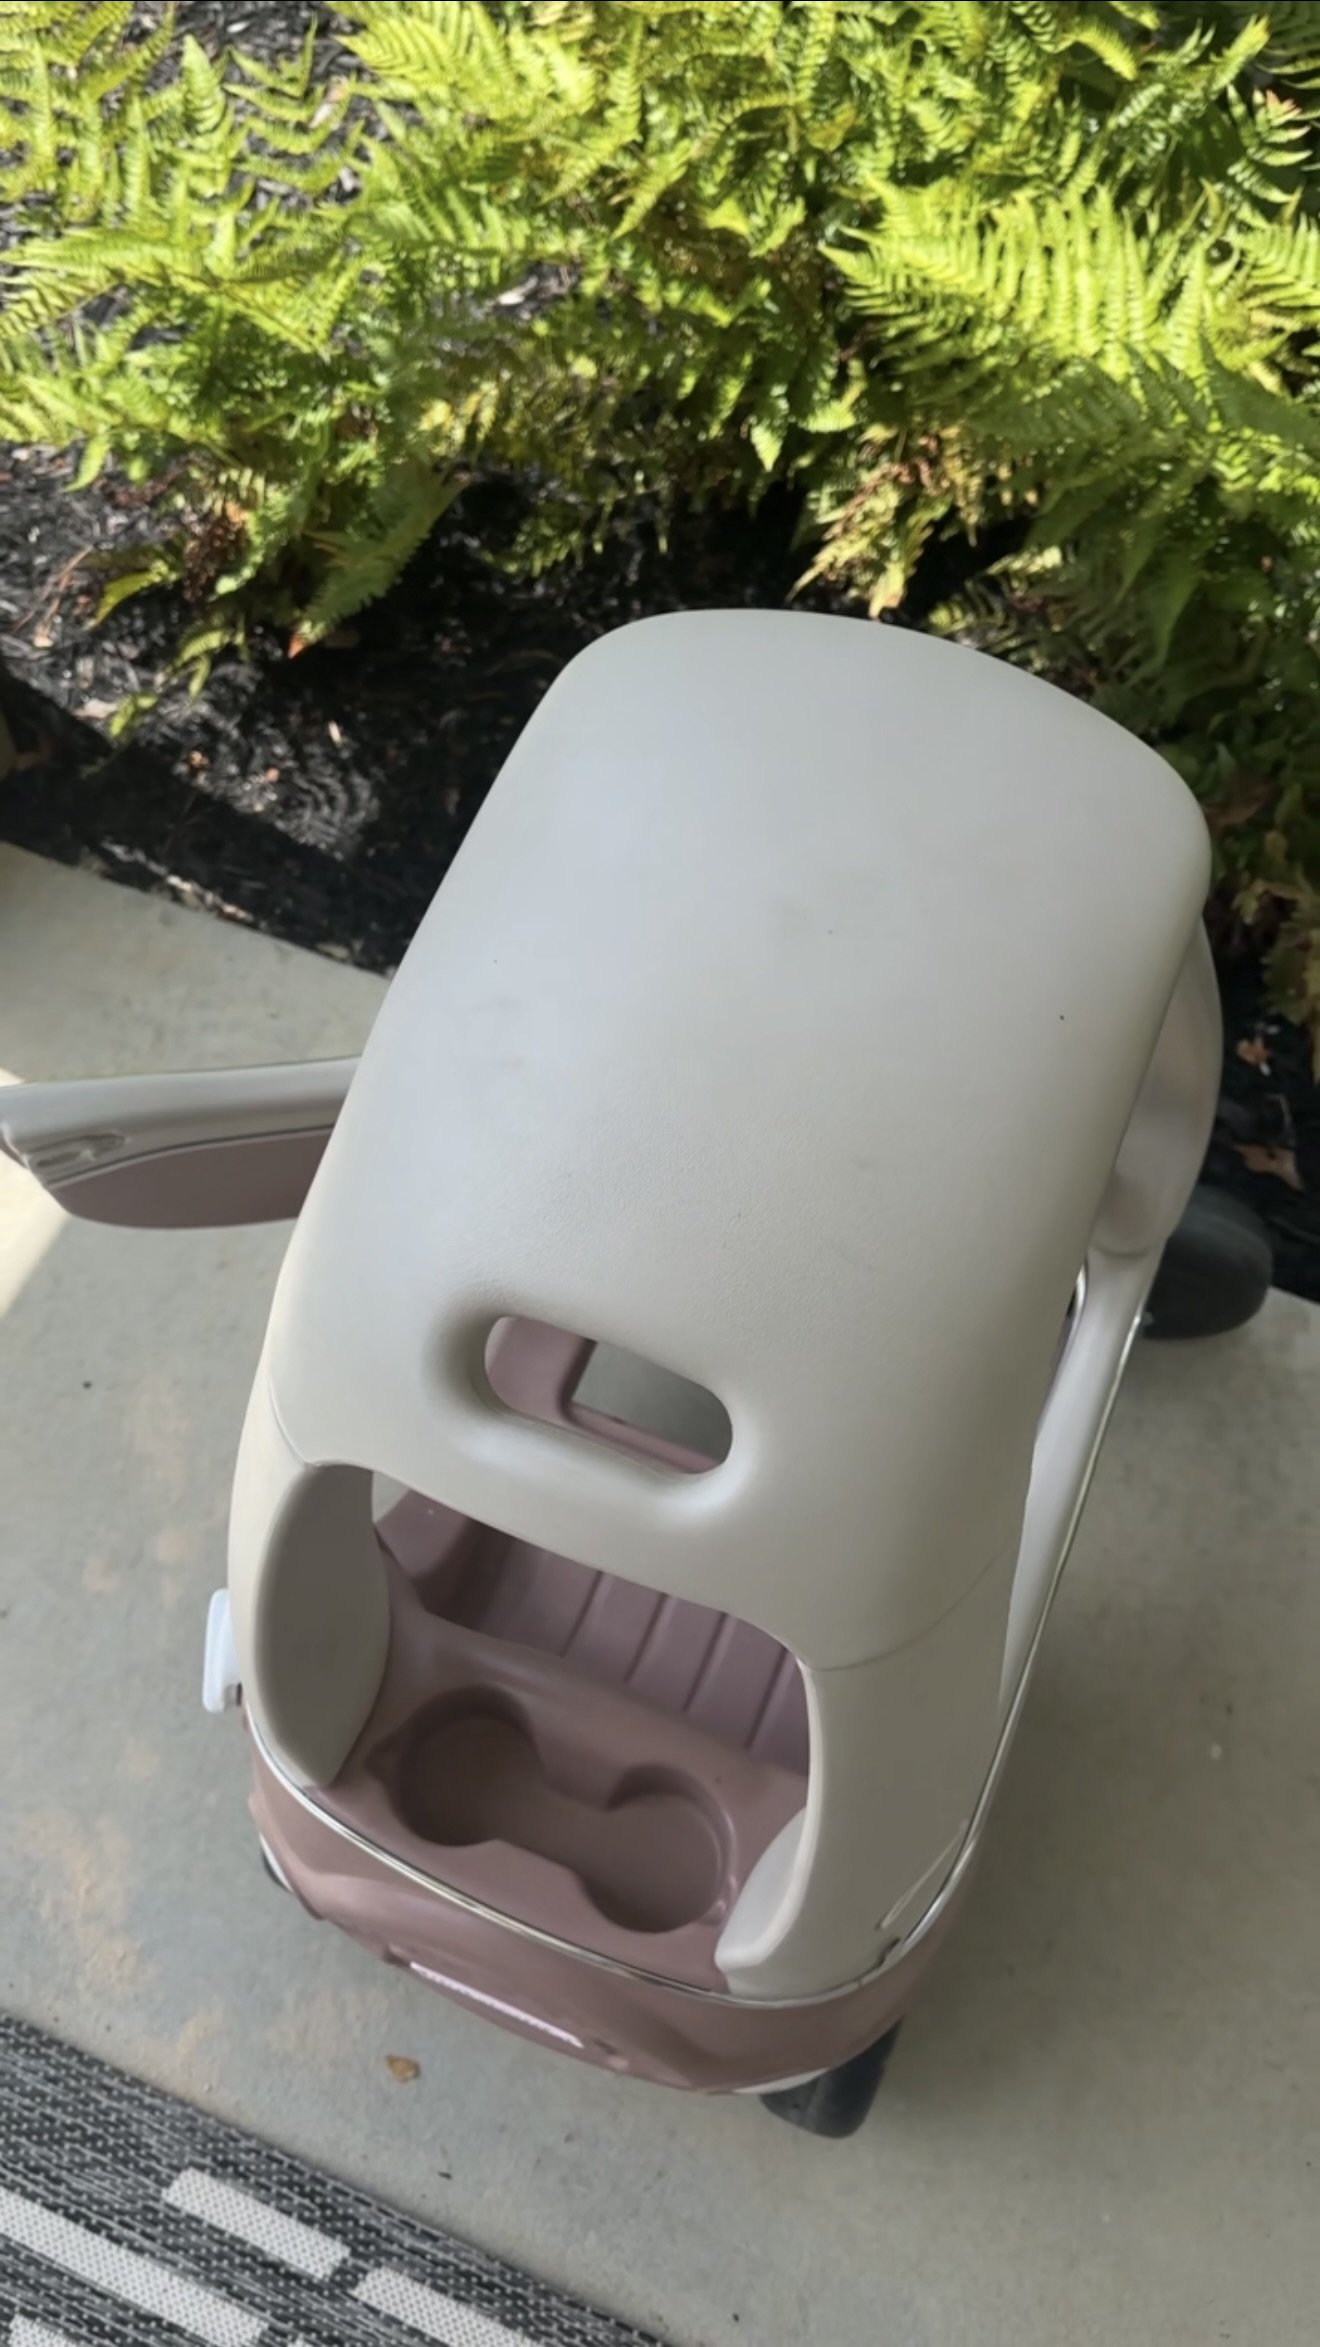

The paint has held up decently, considering the amount of climbing, scooting, and driveway races it’s survived. There’s some wear in the high-touch spots—the edges, horn, and anywhere it gets ram into walls (lol)—but overall, it’s still going strong. Sure it has a few chips, which just add to its "well-loved" charm, but it’s paint on a flexible plastic toy so it’s to be expected.
Would I recommend painting a Cozy Coupe? Absolutely—especially if you’re looking to customize it for a more personal or aesthetic touch! Just keep in mind, if you have a high-energy kiddo who treats it like a monster truck (like mine does!), you’ll probably see some signs of wear over time. But honestly? Watching them enjoy it so much makes every little paint chip totally worth it.
If you’re set on customizing one, I do a complete breakdown in this blog post.
All in all, it was a fun DIY project!

My best selling chandelier

This Chandelier Is in My Office — and It’s Also My Best Seller (for Good Reason)
Okay, I have to brag on this chandelier for a second — not only is it living its best life in my office, but it also happens to be my best-selling chandelier. And honestly? I get it. The hype is 100% deserved.
Let’s start with the look — it's modern, luxe, and just the right amount of sparkle. The gold finish isn’t too warm or too brassy, and the crystals give off the most beautiful light. It makes my office feel like a high-end design studio instead of just a workspace, which honestly boosts my mood (and my productivity).


I’m pretty handy with DIY, but electrical isn’t my thing. Although my husband got it put up with no problems - and I helped! If you’re into those instant gratification upgrades, this is it.
And judging by how many people have added it to their own homes, I’m not the only one who’s obsessed. Whether it’s going in an office, dining area, hallway, or even a luxe little closet setup, this piece just works. It’s bold but not overwhelming, glam but still approachable.
So yes — I’m absolutely that person working under a chandelier, and I wouldn't have it any other way. You can snag it here if you’re ready for a space glow-up.
Curious about the wallpaper? Check out this blog post.
Curious about the paint colors? They are custom, read more about them here!

Refresh your porch for spring
Spring Porch Refresh: Cozy Vibes with Faux Greenery and Rocking Chairs
Spring is finally here, and if you’re anything like me, you’ve probably been itching to give your porch a little love. After months of cold weather and gray skies, it’s time to bring some life (and color!) back to our outdoor spaces. The good news? You don’t need a full renovation—just a few simple updates can totally transform your porch into the perfect springtime hangout.
Let’s talk about a few easy ways to refresh your porch and make it feel warm and welcoming.


1. Faux Plants for the Win
Look, I love real plants as much as the next person, but I also love not watering things. Faux plants have come a long way and can seriously pass for the real deal. Try adding a couple of faux ferns or trailing ivy in cute planters. You get all the green without the upkeep. Win-win.
2. Wreath It Up
A spring wreath is like a smile for your front door. Whether you go with something floral, leafy, or even a combo of both, it sets the tone and adds a pop of color right at eye level.
3. Black Rocking Chairs = Instant Charm
There’s something timeless about a pair of black rocking chairs on the porch. They add that classic look but still feel fresh and modern. Throw a patterned pillow or a soft throw on them and boom—instant cozy corner. Perfect for sipping coffee in the morning or winding down with a book in the evening.
4. Layer in Some Textures
Think outdoor rugs, woven baskets, maybe even a lantern or two. Layering different textures makes your space feel lived-in and inviting without going over the top.
5. Keep It Chill
You don’t have to go overboard. A few thoughtful pieces can totally shift the vibe. Focus on what makes you feel relaxed and happy—that’s what spring is all about anyway.


So there you have it. A mini porch makeover that’s low stress but high on charm. Grab a glass of lemonade, kick back in your new favorite rocking chair, and enjoy those longer days.
Shop this post!