
Decorating Our Bedroom For Christmas
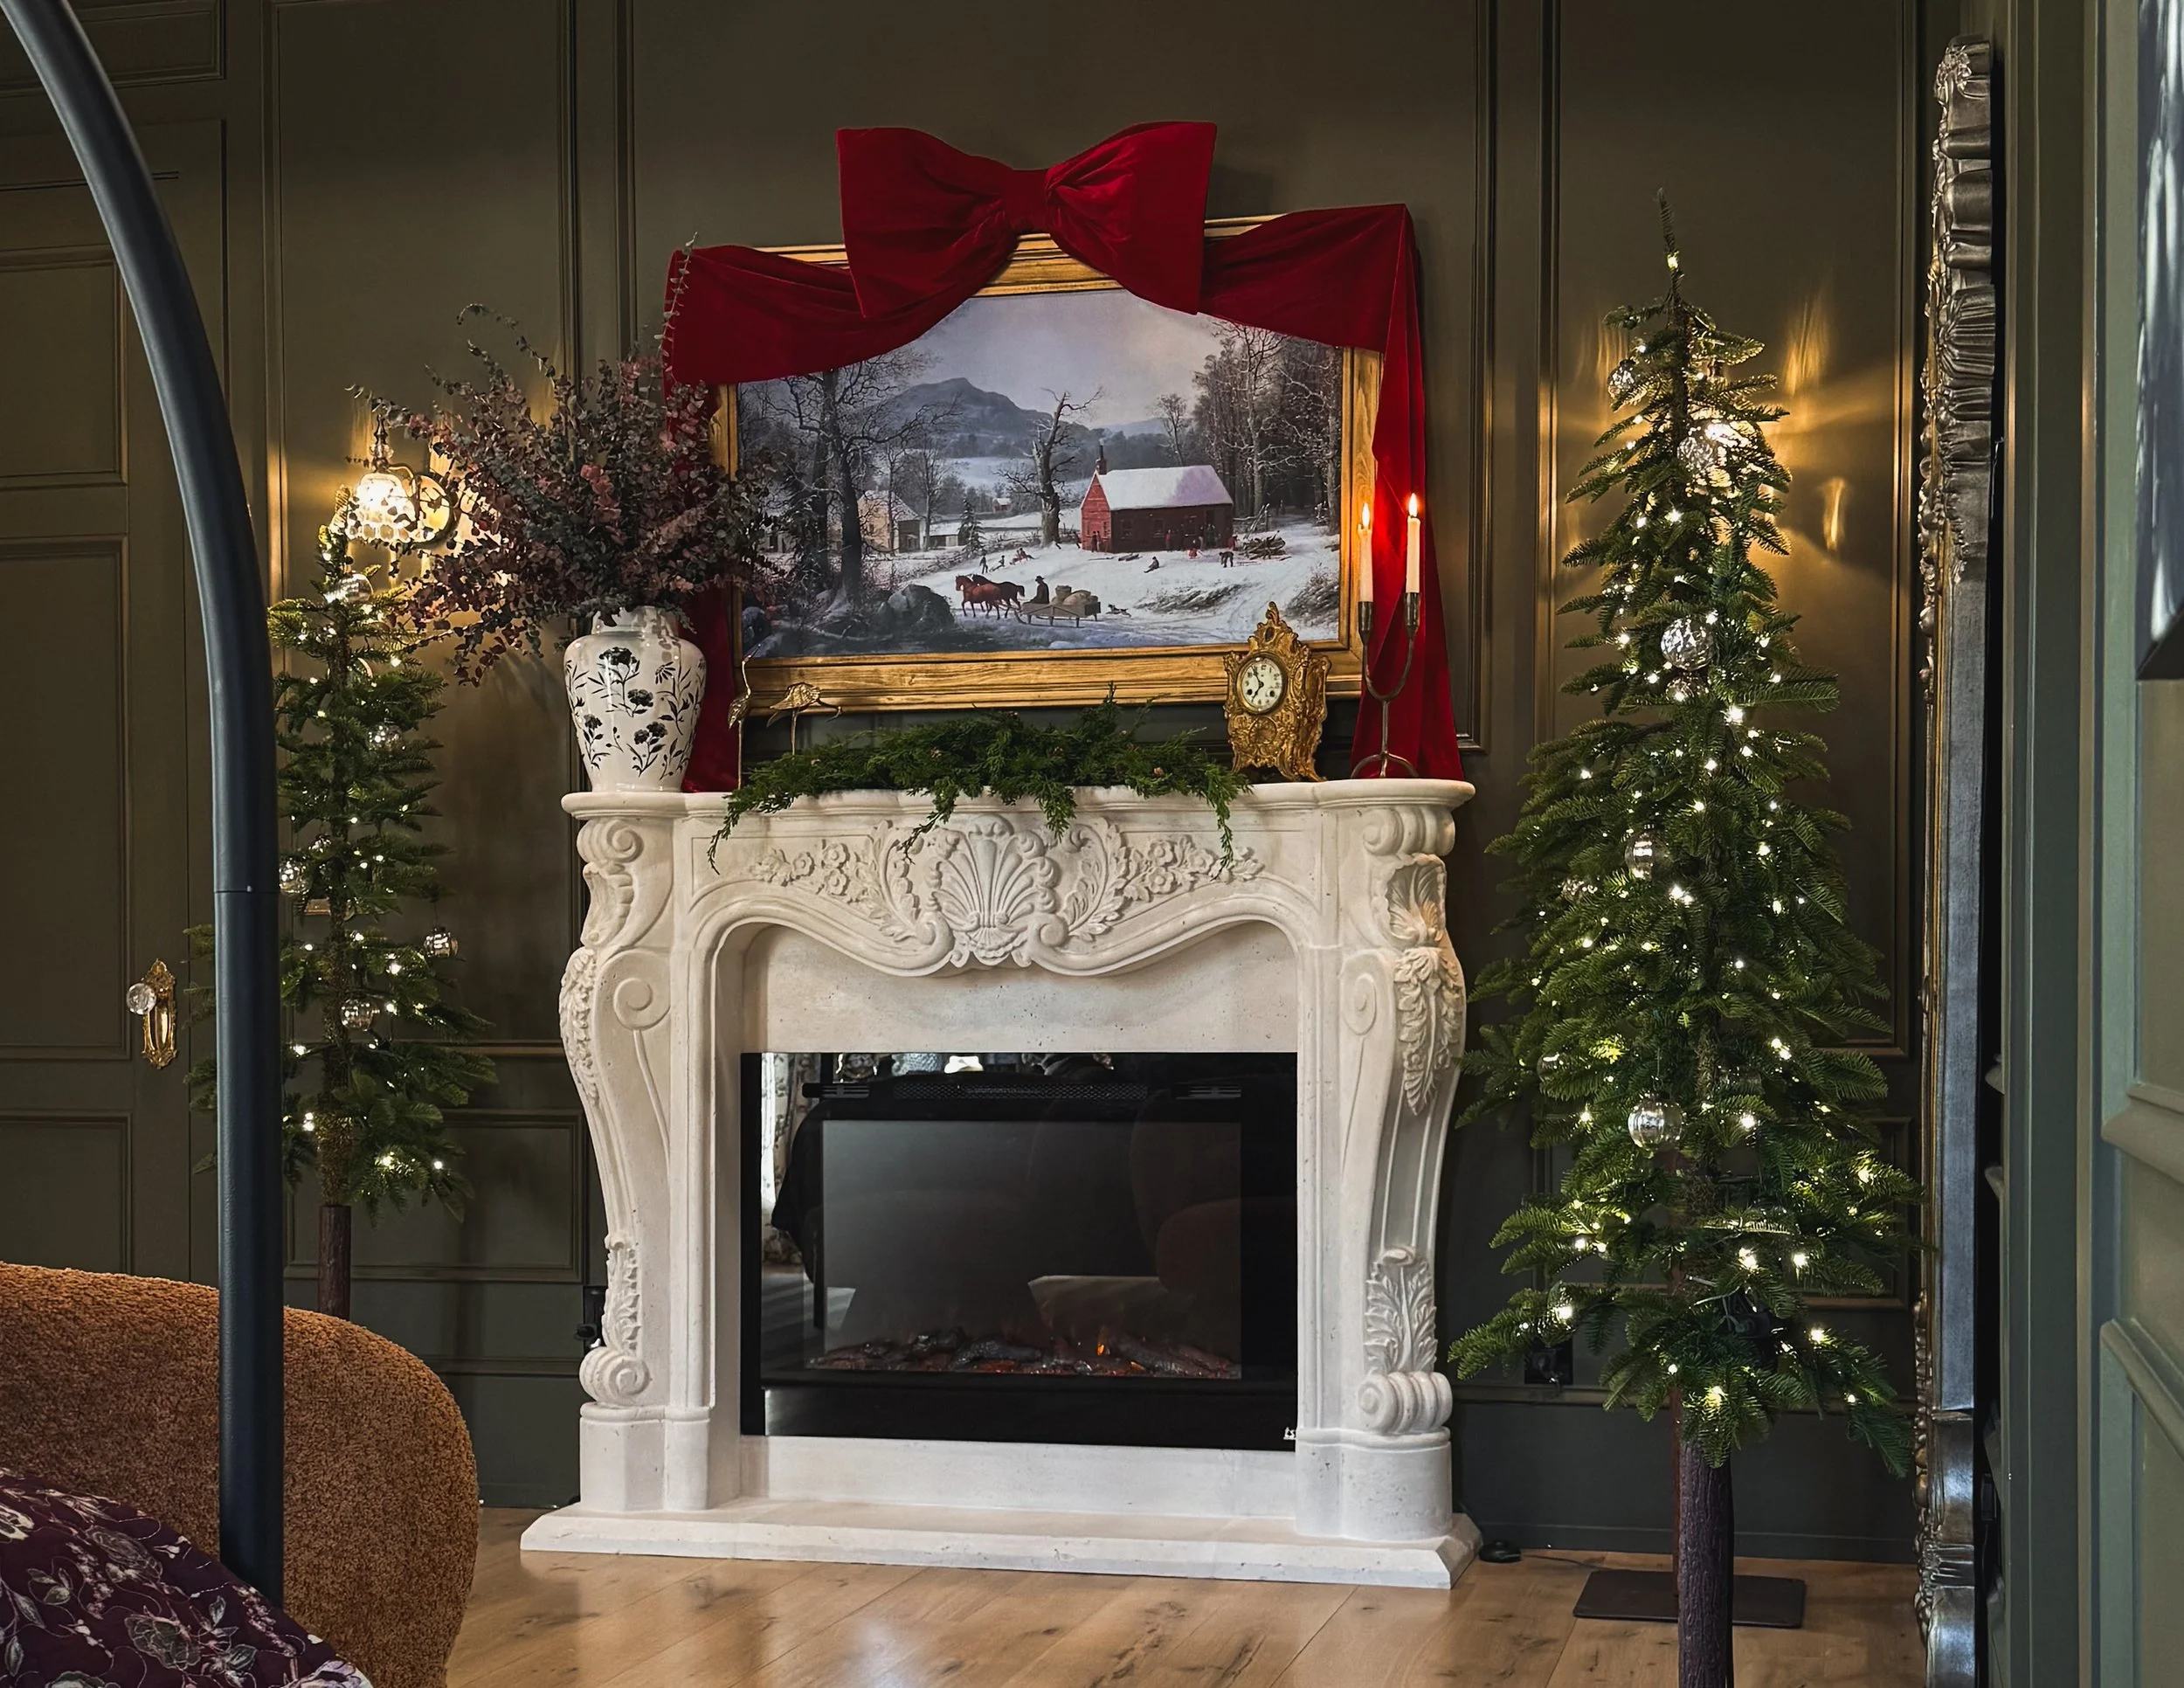
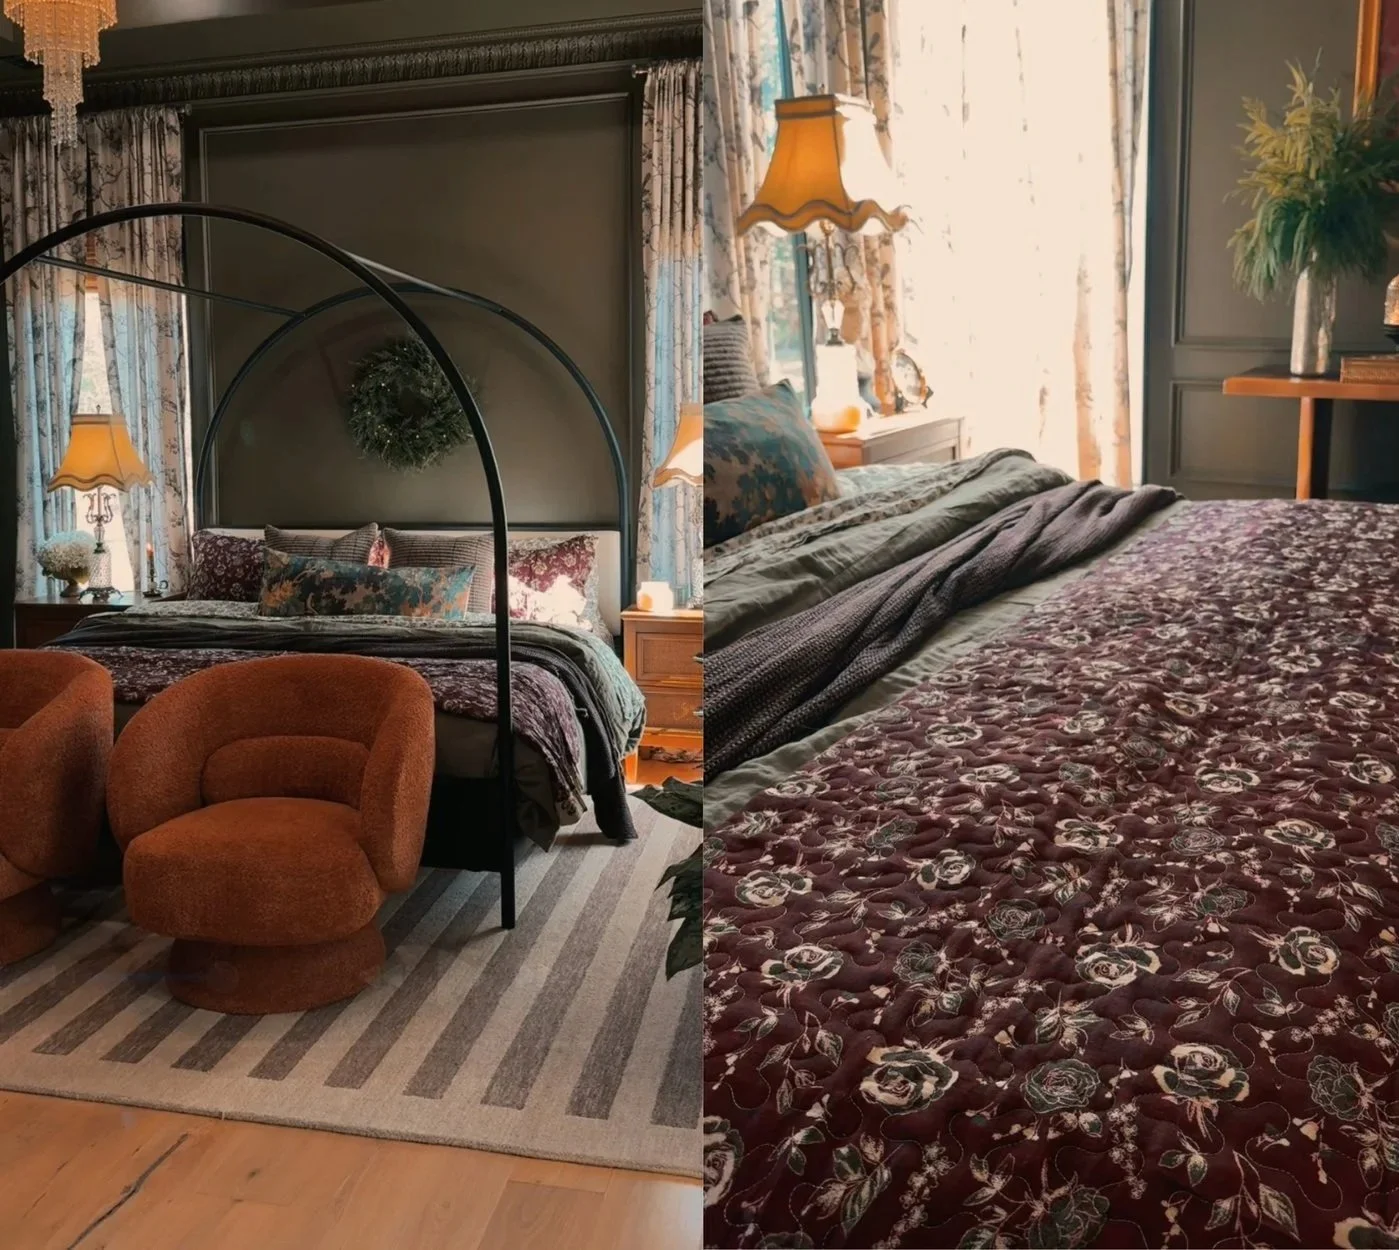
Our bedroom is officially the first room I decorated for Christmas this season, and I am so glad I started here. Before I pulled out any Christmas bins, I gave the room a really good deep clean and swapped in a new rug and the maroon flowered blanket. Once everything felt fresh and cozy, it was the perfect space to ease into holiday decorating without feeling overwhelmed.
For Christmas decor, I kept things simple and focused on pieces that bring in a soft glow and a little bit of magic. I added multiple small lit trees, and they completely changed the atmosphere of the room. The warm lights at night feel peaceful and calming, and the whole space feels like a quiet retreat at the end of the day.
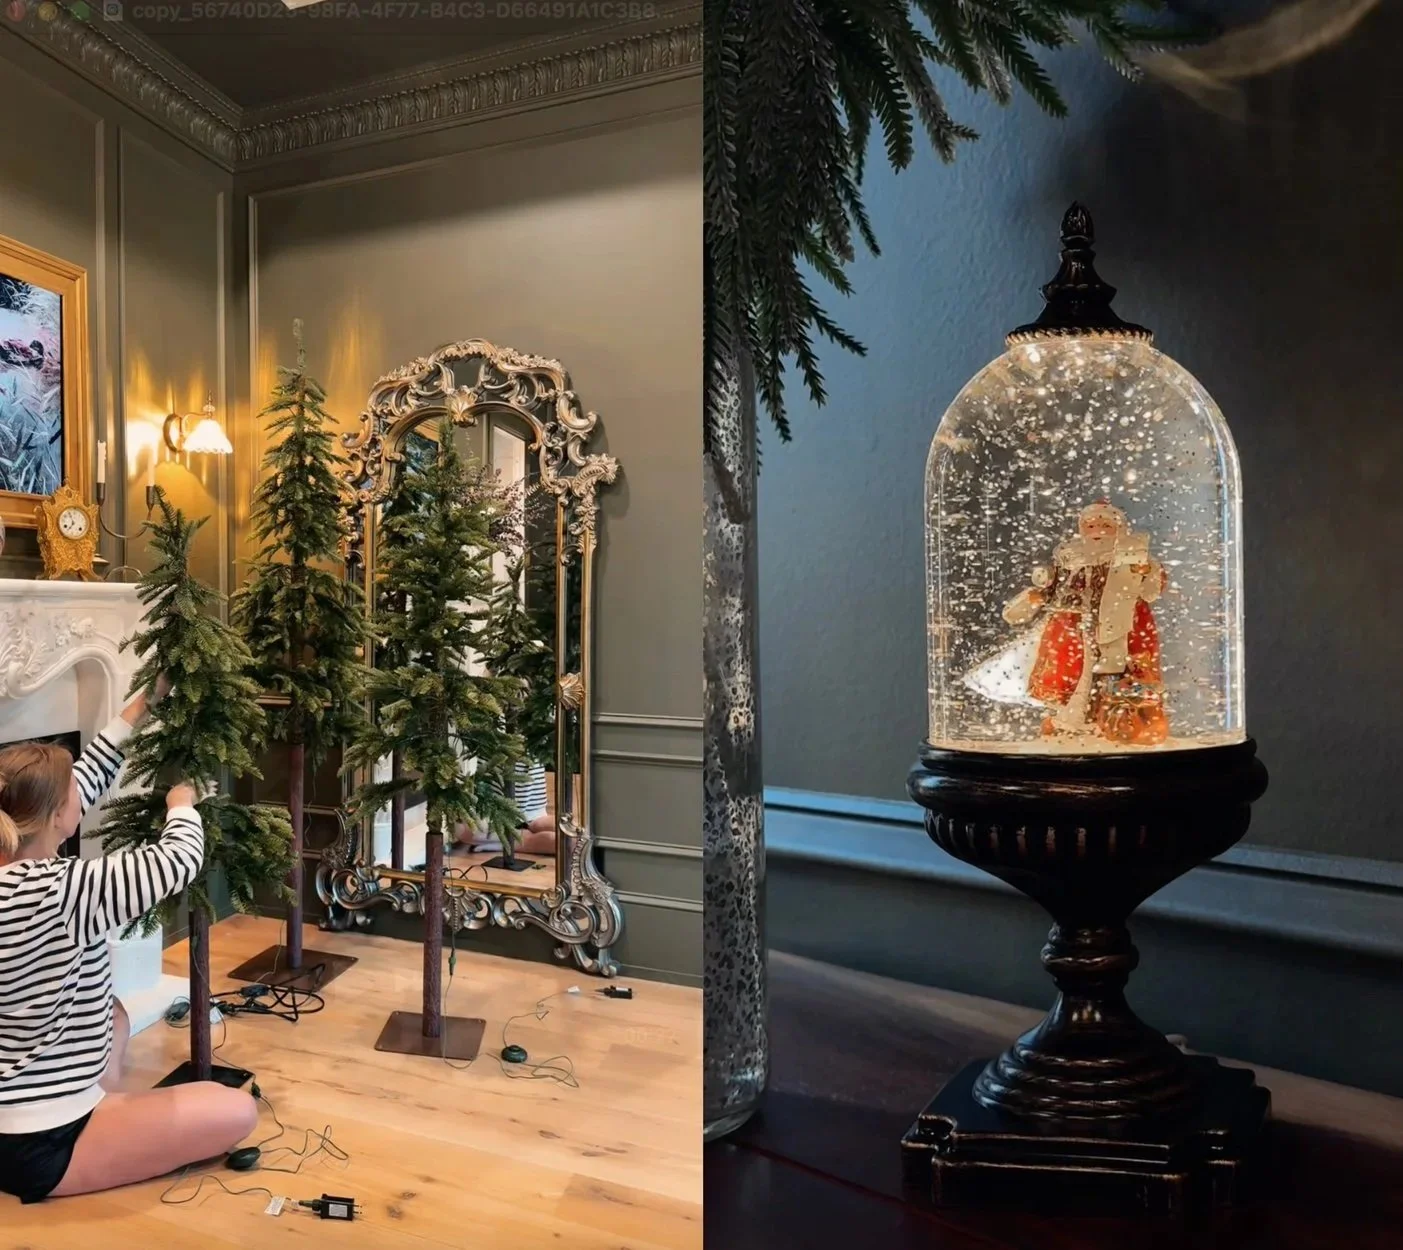
One of my favorite details is the crackle glass ornaments. They catch the tree light in the prettiest soft sparkle, and they are beautiful even during the day. I also added a snow globe on the nightstand, and the slow swirl when it is lit feels whimsical and sweet. It is such a small thing, but it brings so much joy.
I hung a large bow above the TV and I love the way it finishes the space. It is a simple touch that feels classic, and ties everything together.

It is amazing how just a few pieces can transform a room. I have been sneaking into bed early just to sit with the lights glowing and enjoy how beautiful it is.
This is your reminder to decorate the room you actually rest in. Light the trees, add something that makes you smile, and enjoy every peaceful minute.
Links At A Glance
Paint Color - Field Trip by Clare Paint
If you liked this you might be interested in my 2025 Holiday Gift Guide

2025 Holiday Gift Guide For Her

The 2025 holiday gift guide is here! Holiday gifting season is officially here and I am so excited to share my curated gift guides with you. I pulled these roundups together using things I have personally bought, received, loved, and gifted, along with a few new finds I already have my eye on. If you are shopping for friends, sisters, moms, teachers, or treating yourself, there is something good waiting for you.

I put together separate lists for every type of girl in your life. The Gift Guide for Her is full of pretty, thoughtful, feel good pieces that never miss. The Beauty Lover Guide is packed with skincare favorites, body care treats, and fun beauty gadgets she will actually use. The Fashion Girly Guide is for the stylish one who loves wearable everyday pieces that still feel special. And the Homebody Guide is my cozy collection for anyone who loves slow mornings, soft blankets, good coffee, and a perfectly styled space.

I hope these guides make gifting easier and a lot more fun. Save this post to come back to later and send it to someone who might need a little hint.
Happy gifting and happy holiday season, friends.
If you like this, you might be interested in how to host a stress-free holiday party!

DIY Fringe banner
If you’re looking for an easy, budget-friendly way to make a party backdrop or decorate for a celebration, a DIY fringe banner is the way to go, and you only need a few supplies.
You’ll Need:
Here’s how to make one:
Start by laying out your string (or twine, ribbon, whatever you have) on the floor and tape it down so it stays in place. Then, spread out your plastic tablecloth on the floor and scoot it underneath the string. Fold the tablecloth in half over the string so it drapes evenly on both sides.
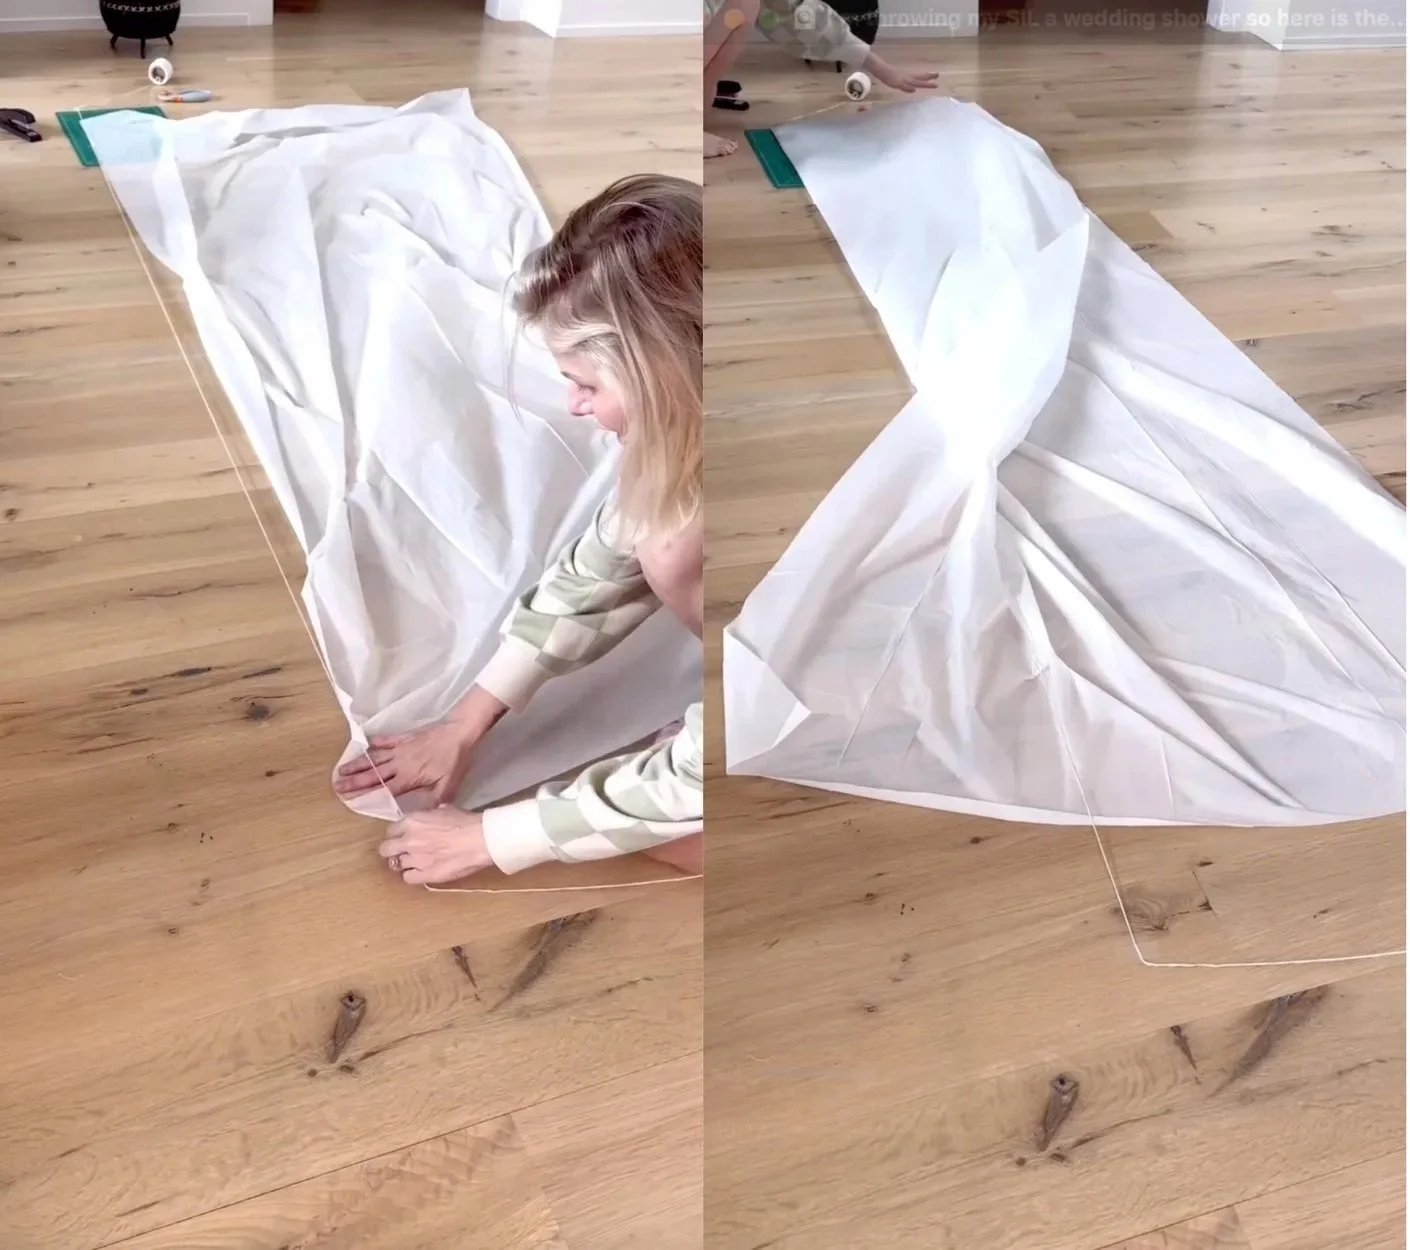
Next, grab your stapler and staple the folded edge right below the string every 6–8 inches. This will hold the tablecloth in place and give your banner a sturdy top edge to hang from.
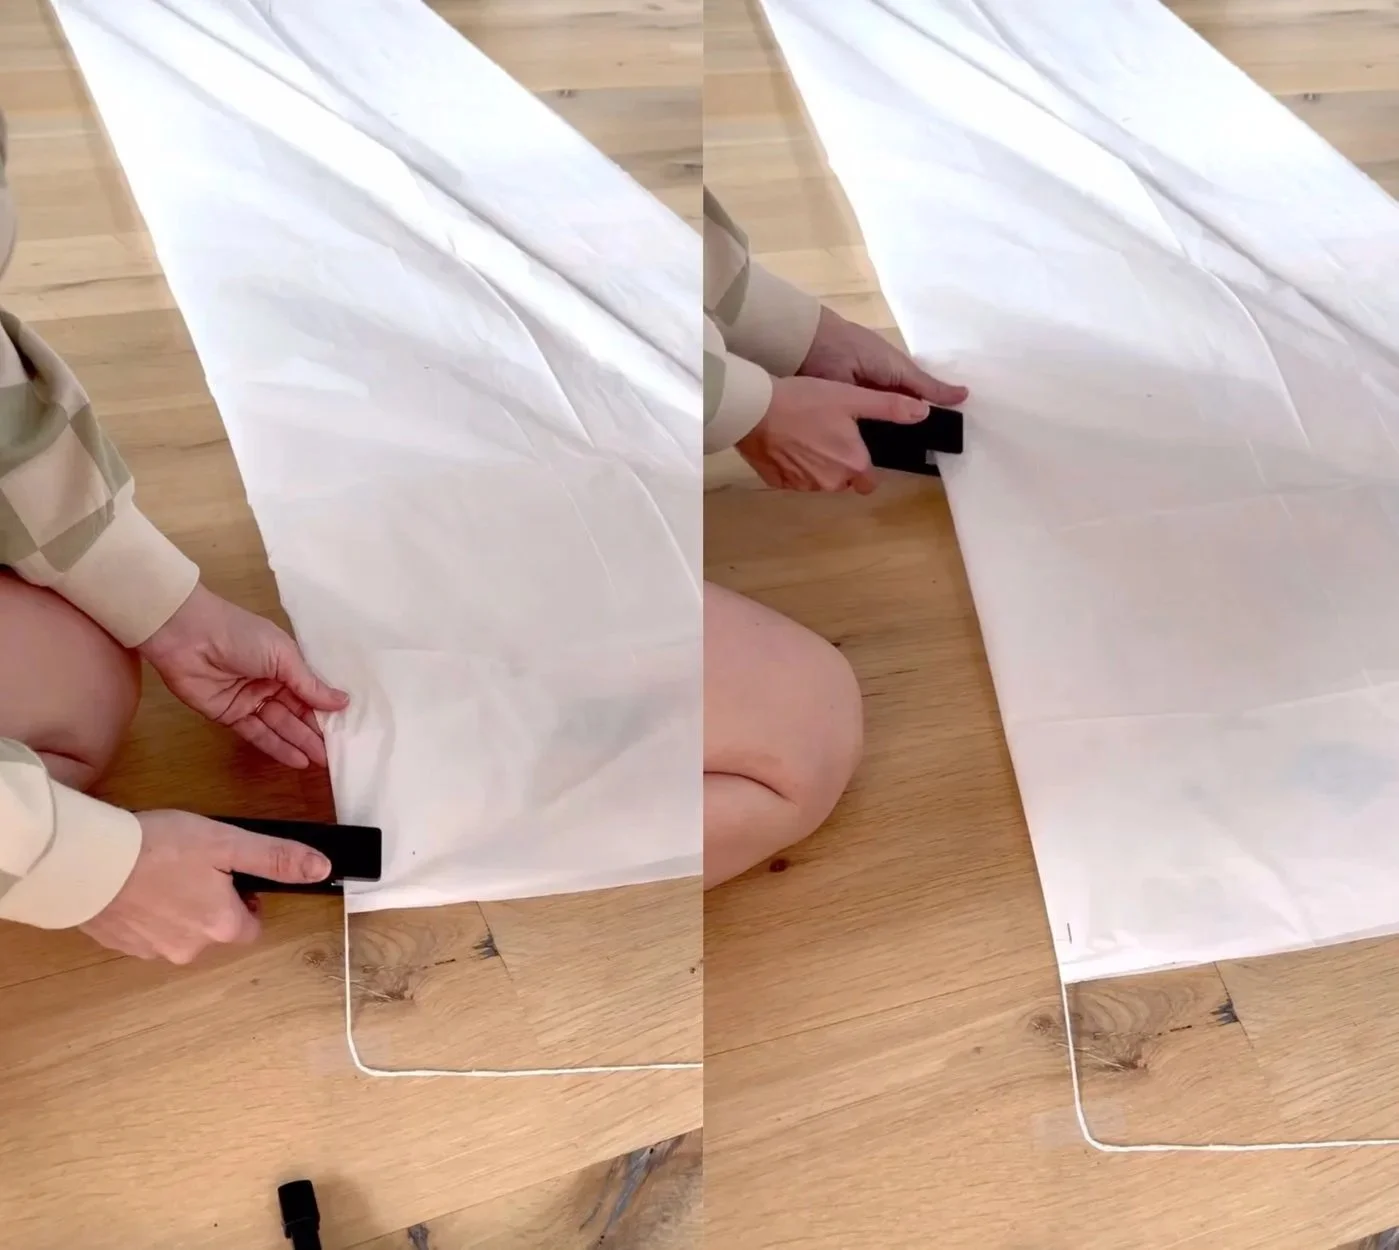
Now it’s time to make it look fringy! Fold the tablecloth up about an inch and a half below the string, then fold it one more time the same way.

Using a rotary cutter or scissors, cut vertical strips into the tablecloth, just up to the bottom of the string, not through it.

Once you’ve cut the whole thing, lightly bunch the tablecloth together with your hands to fluff it up and give it some texture. Then repeat the whole process with more tablecloths until your banner is as long or as full as you want it.
How many tablecloths you’ll need depends on the length and fluffiness you’re going for, but honestly the more the merrier!
Hang it up, step back, and admire your DIY fringe masterpiece. Perfect for birthdays, showers, photo backdrops, or anytime you just want to make a space feel festive.
If you like this, you might be interested in my Music Themed First Birthday Party!

Adding Playful Scallop and Beaded Trim

When I started my daughter’s room makeover, I wanted to go all in on color and charm. I ended up using three different paint colors to give the space depth and personality, but I also wanted to add some whimsical texture to make the room feel even more special. That’s where the trim came in.
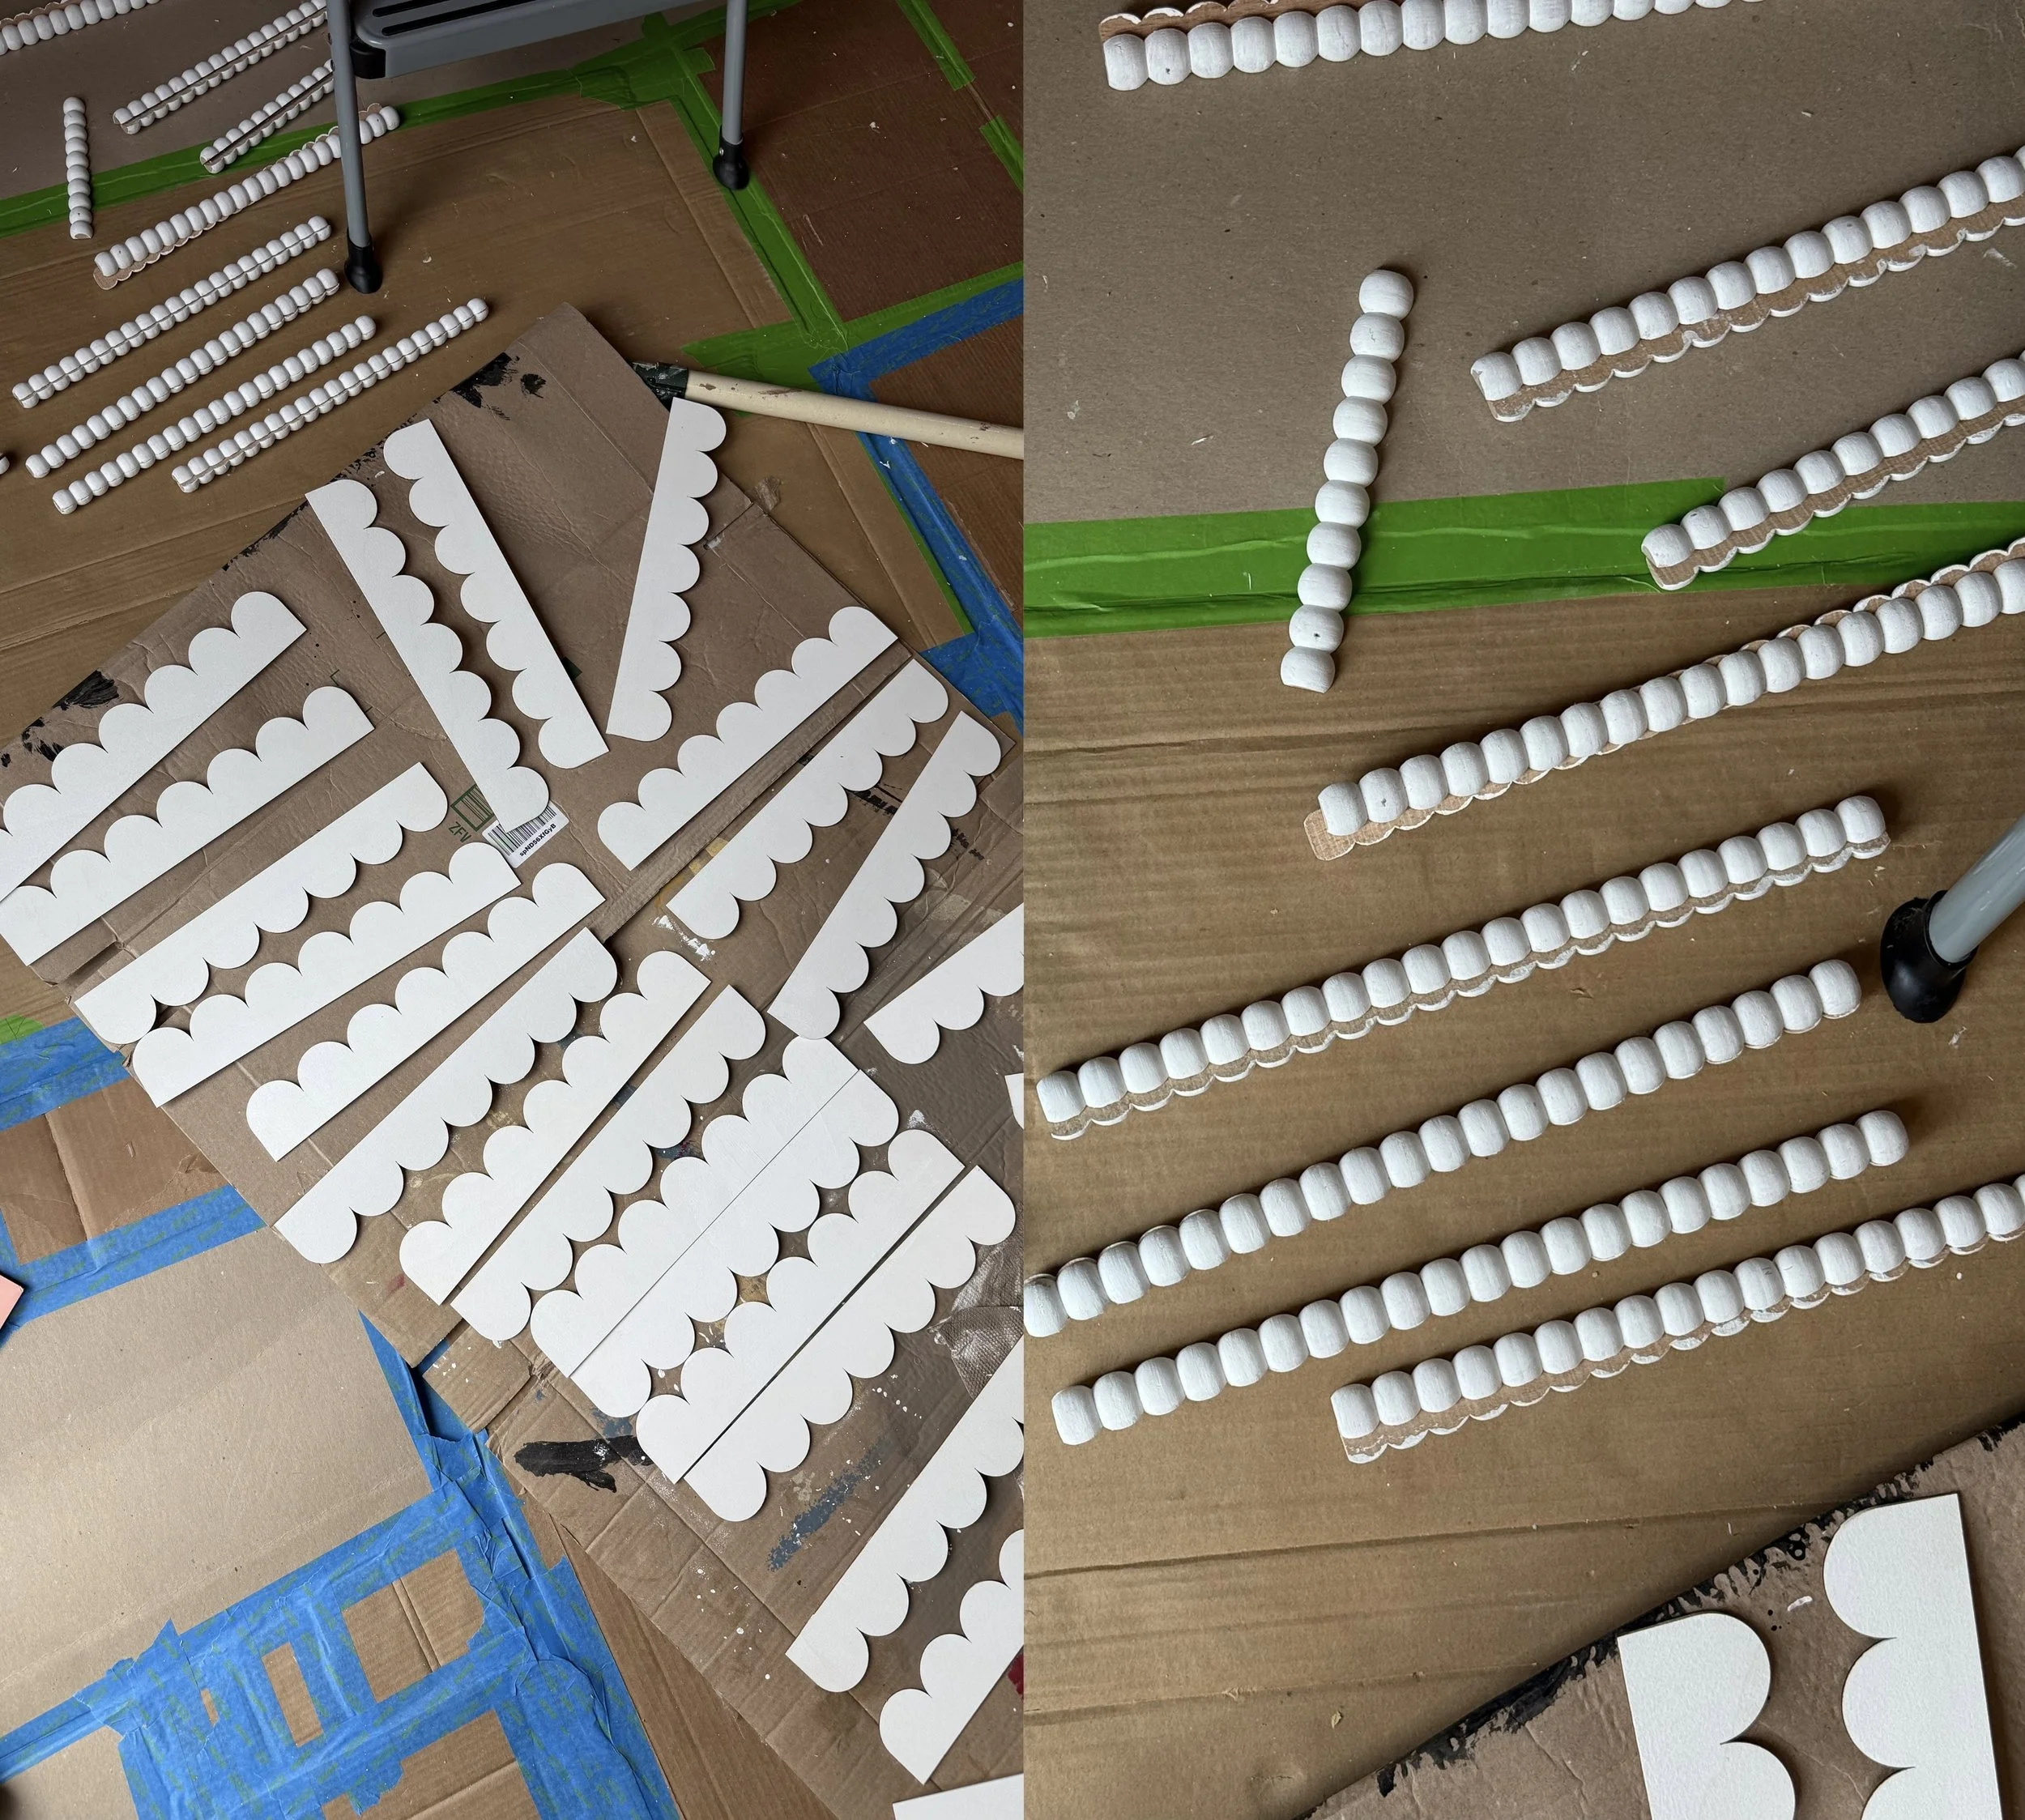
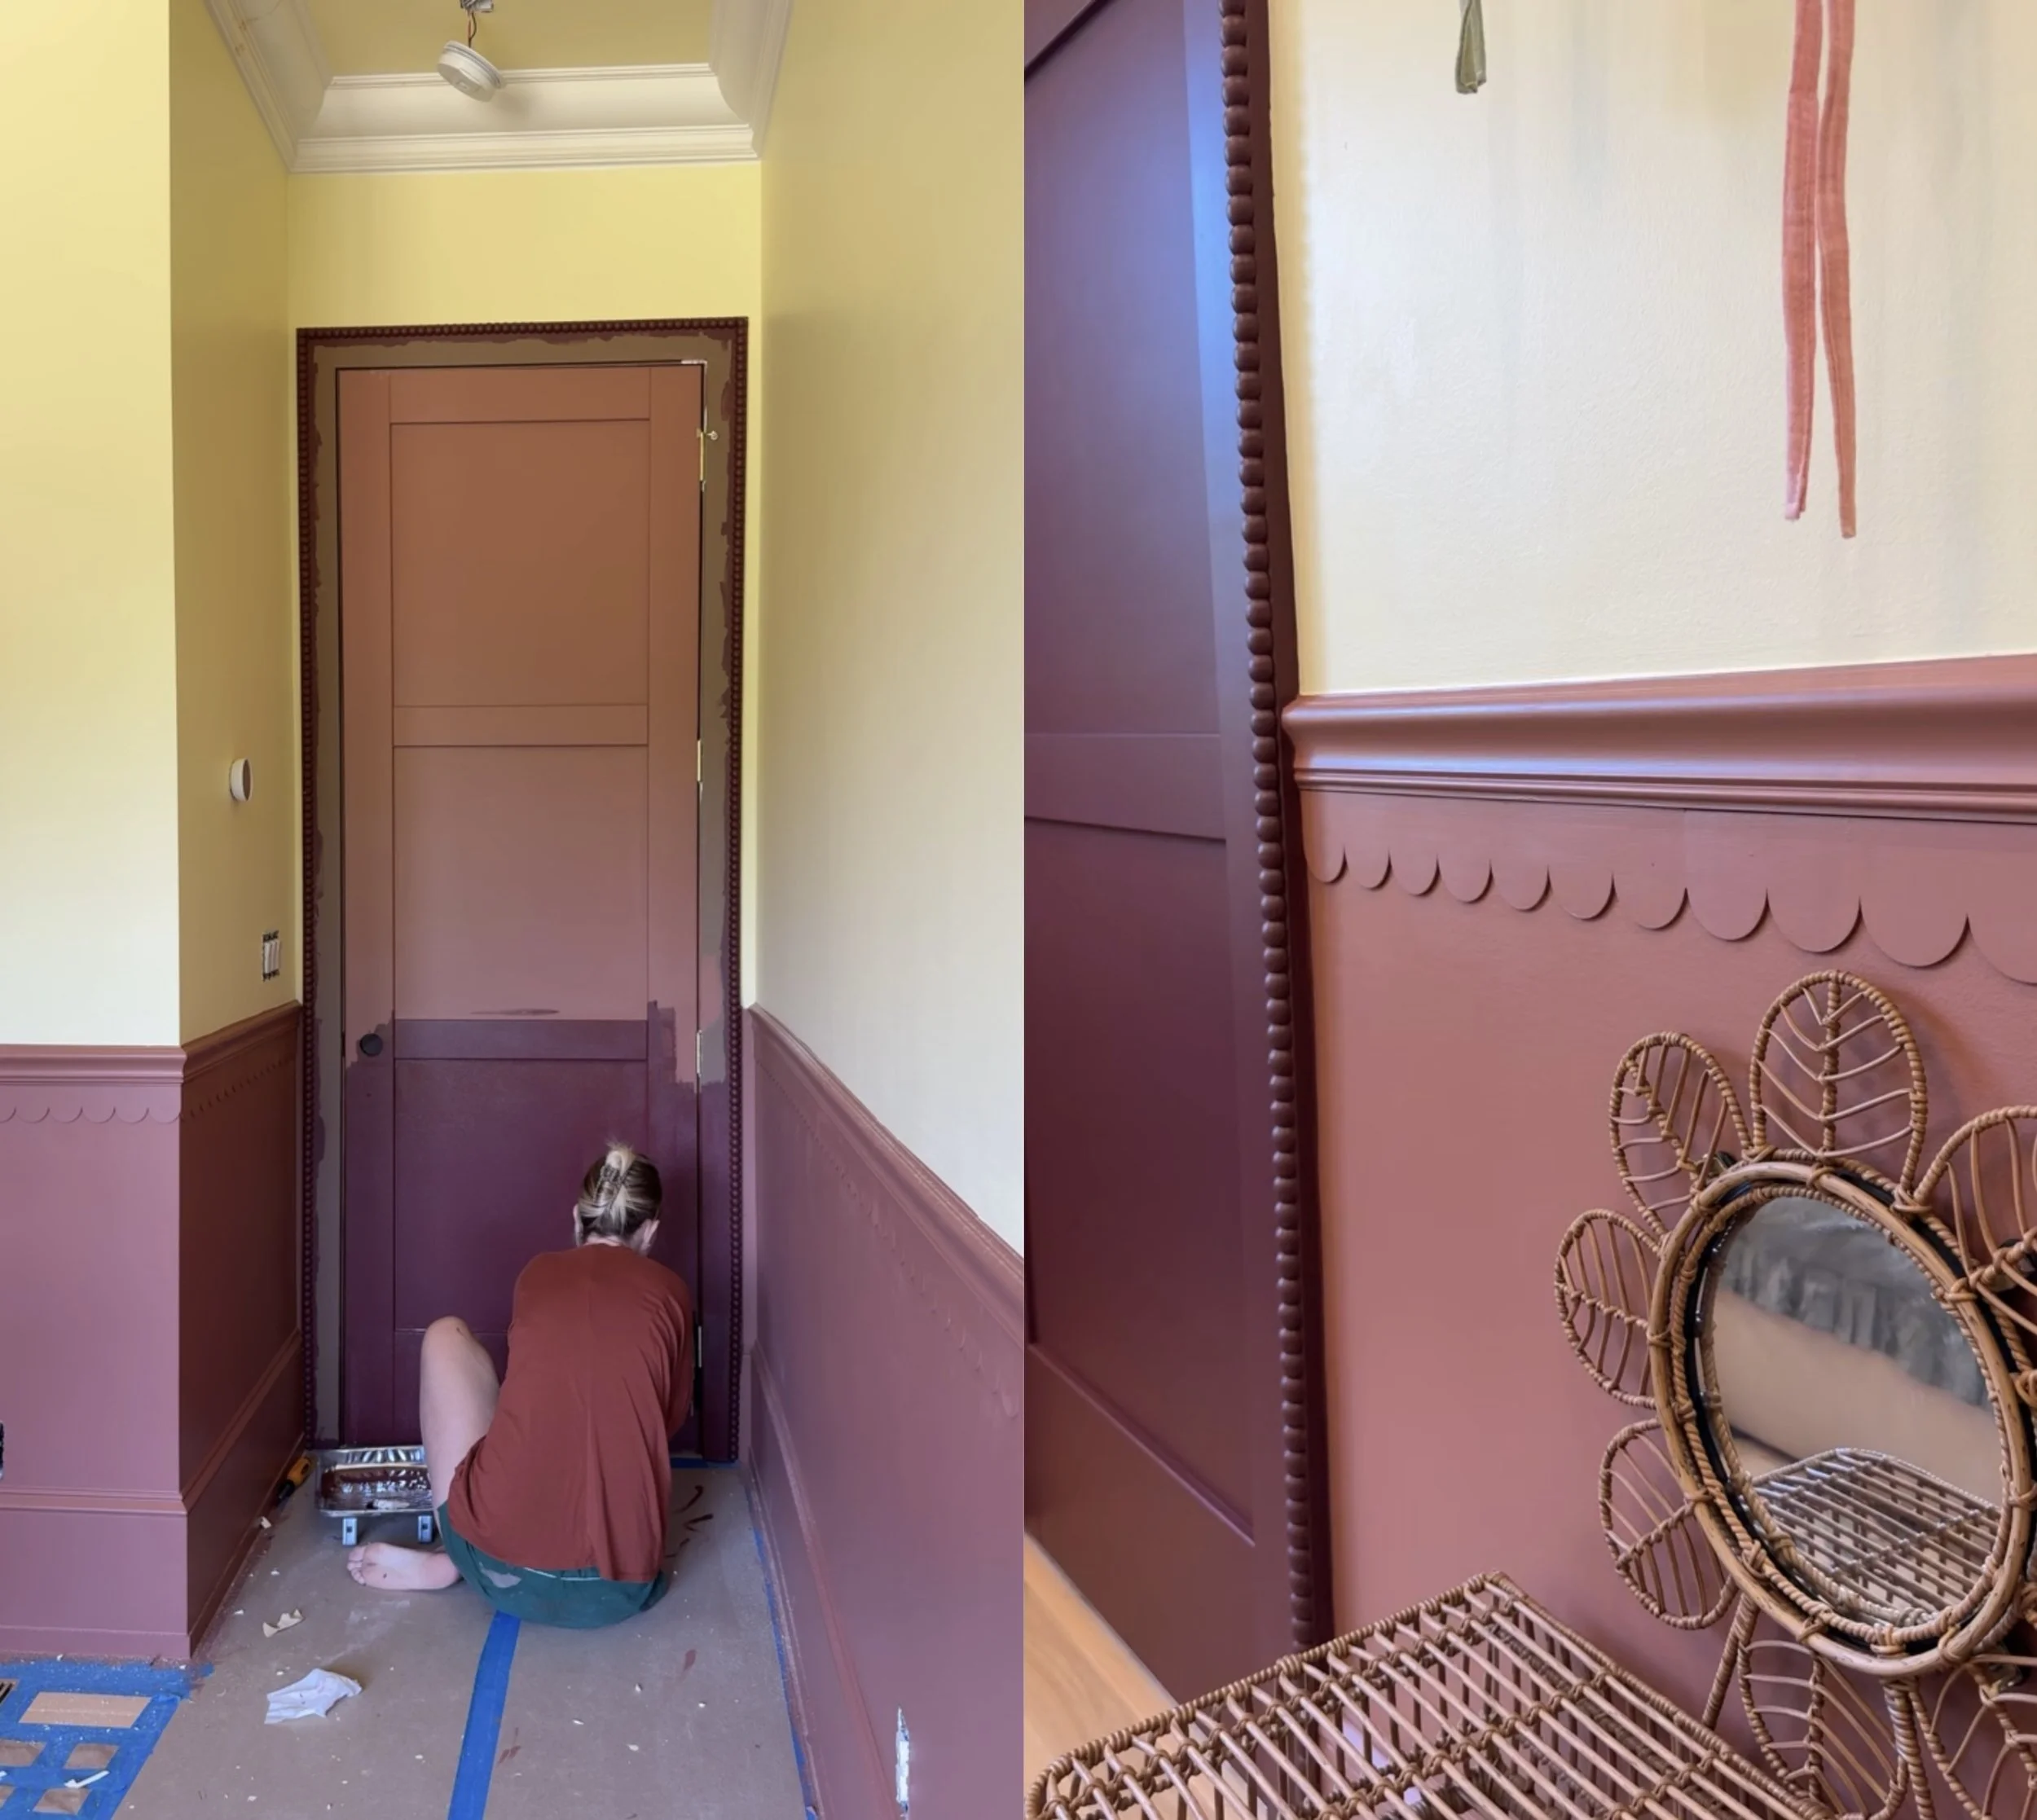
I started with my usual crown moulding, chair rail, and added base cap to the baseboards to give the room that polished, layered look I love. To make the space feel a little more magical, I added two extra details: scallop trim beneath the chair rail and beaded trim framing the doors.
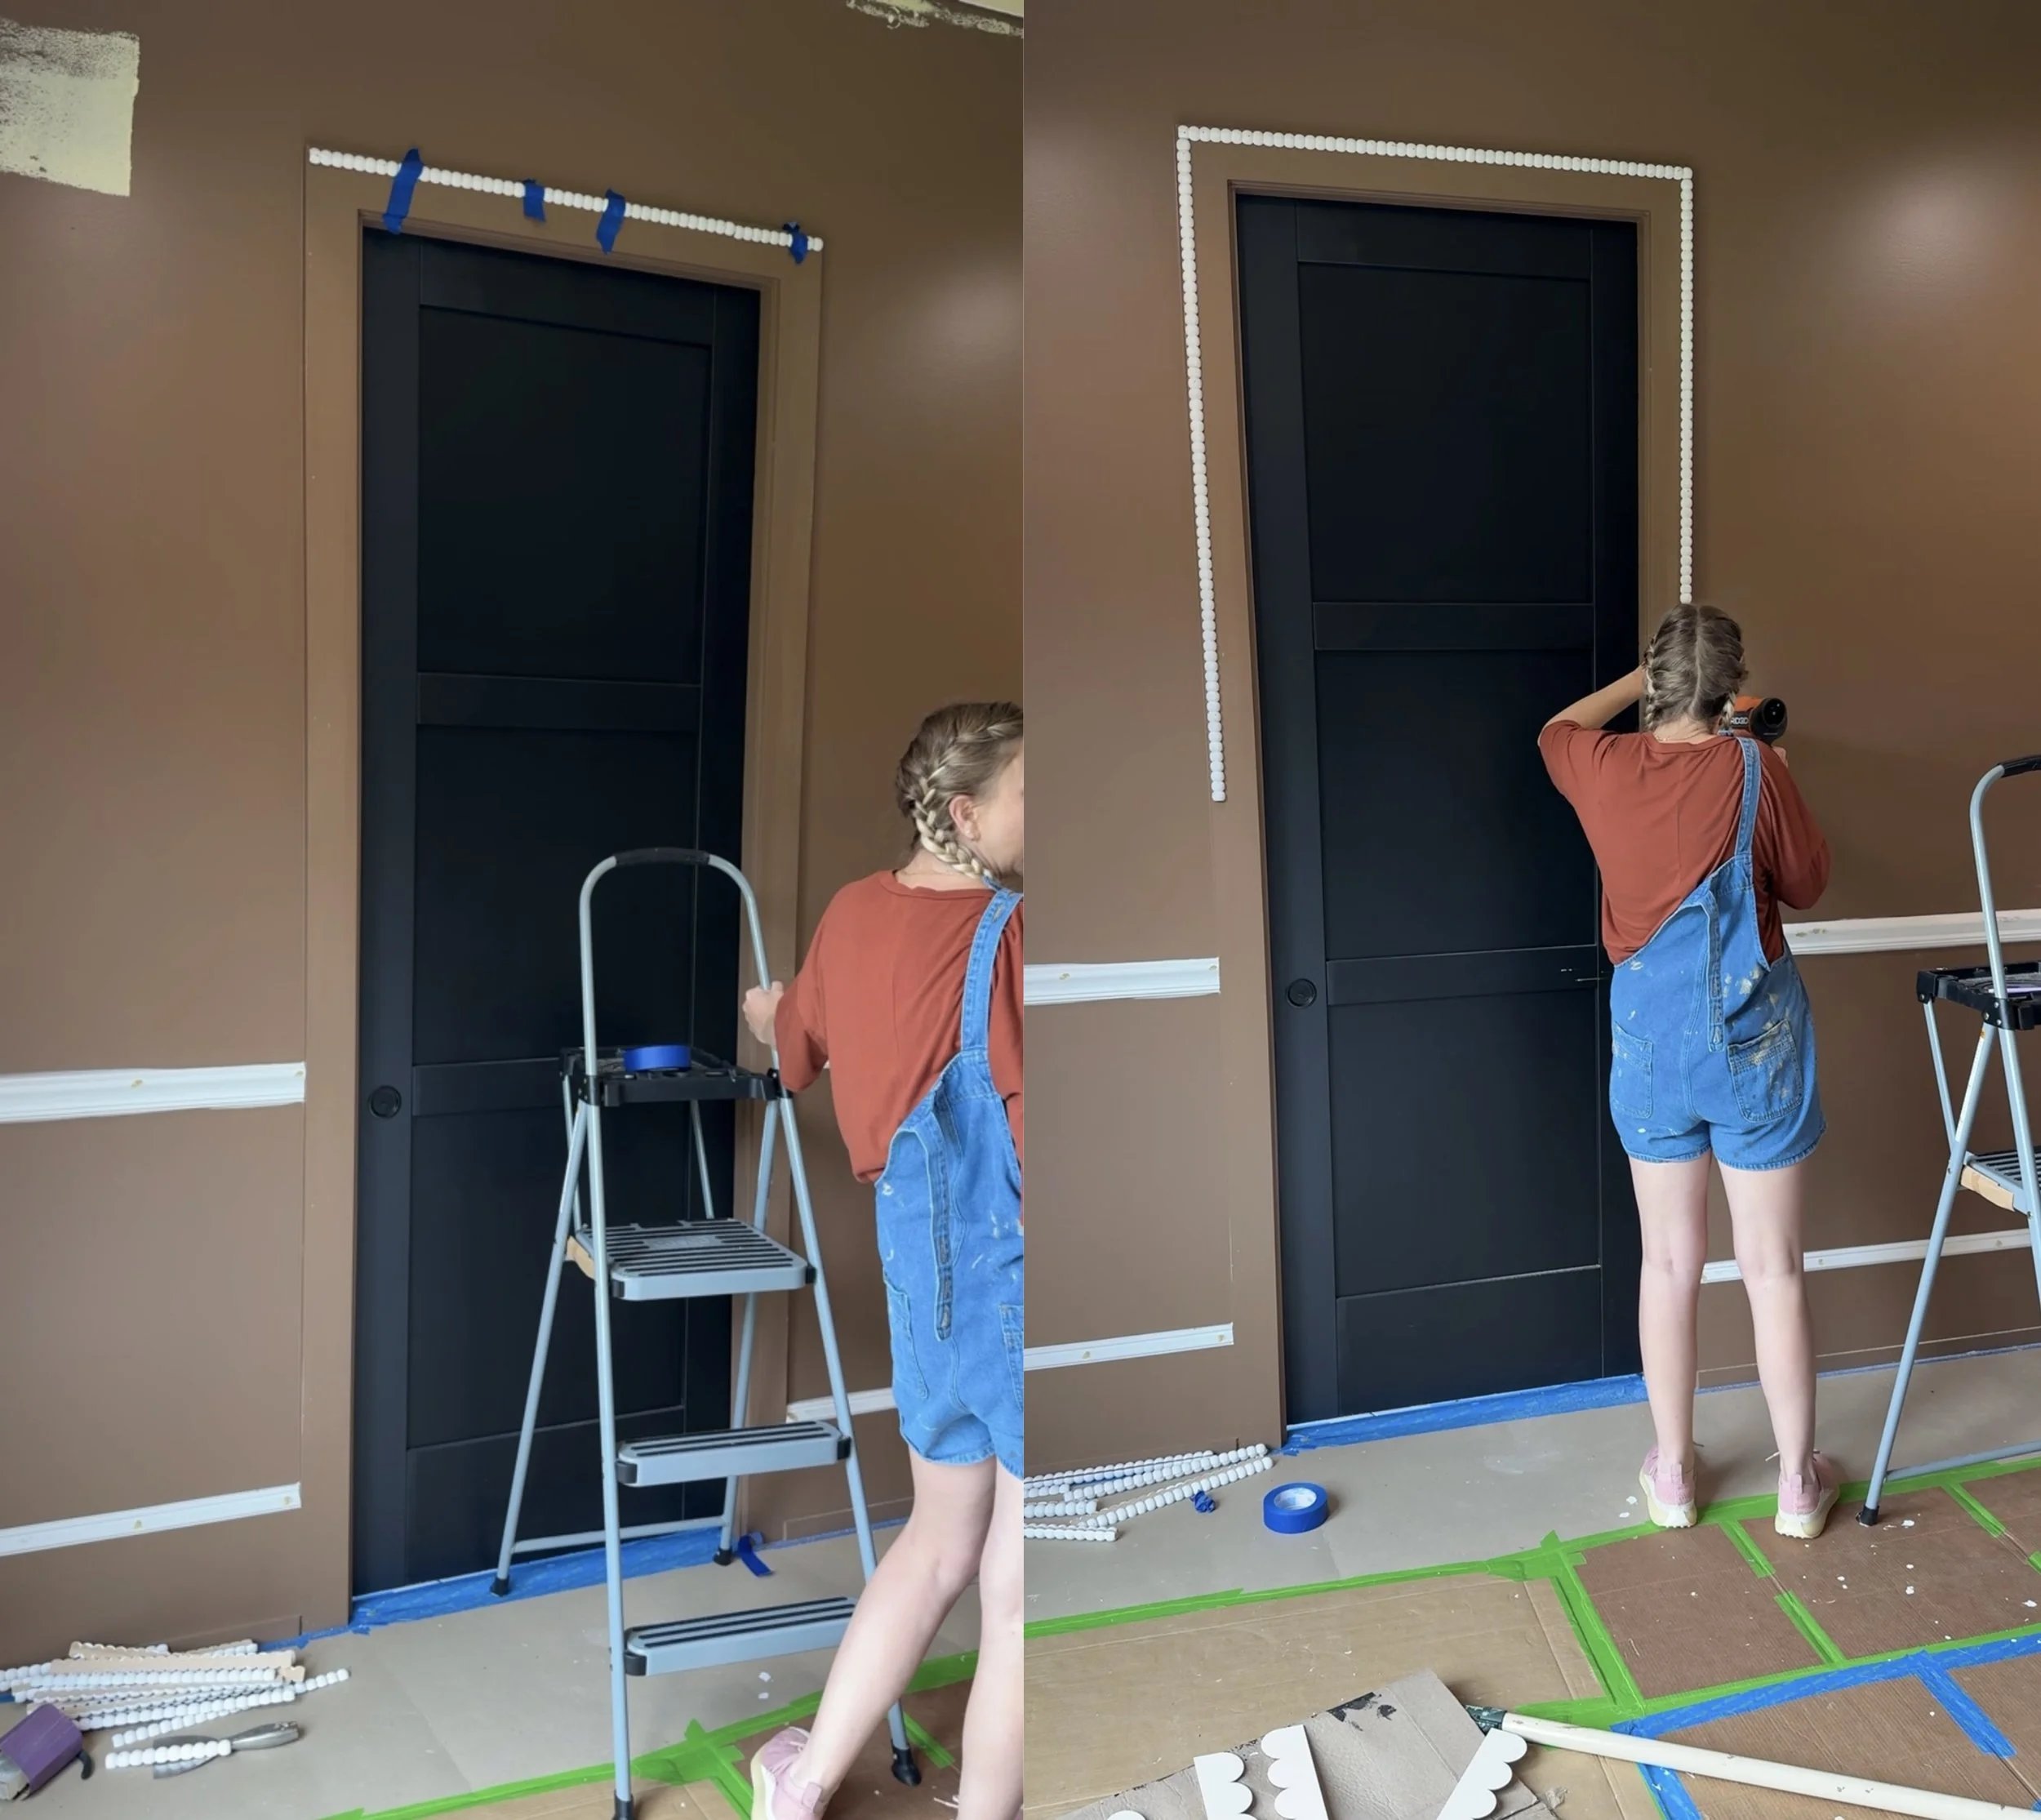
Both were installed using only brad nails so they can be easily removed in the future if we ever decide to change things up. Normally, I would caulk trim for a seamless finish, but I skipped that step here so the pieces would stay flexible and easy to swap out later. The scalloped trim adds such a fun, storybook touch to the walls, while the beaded trim gives the doorways a sweet, old-fashioned feel that ties everything together.
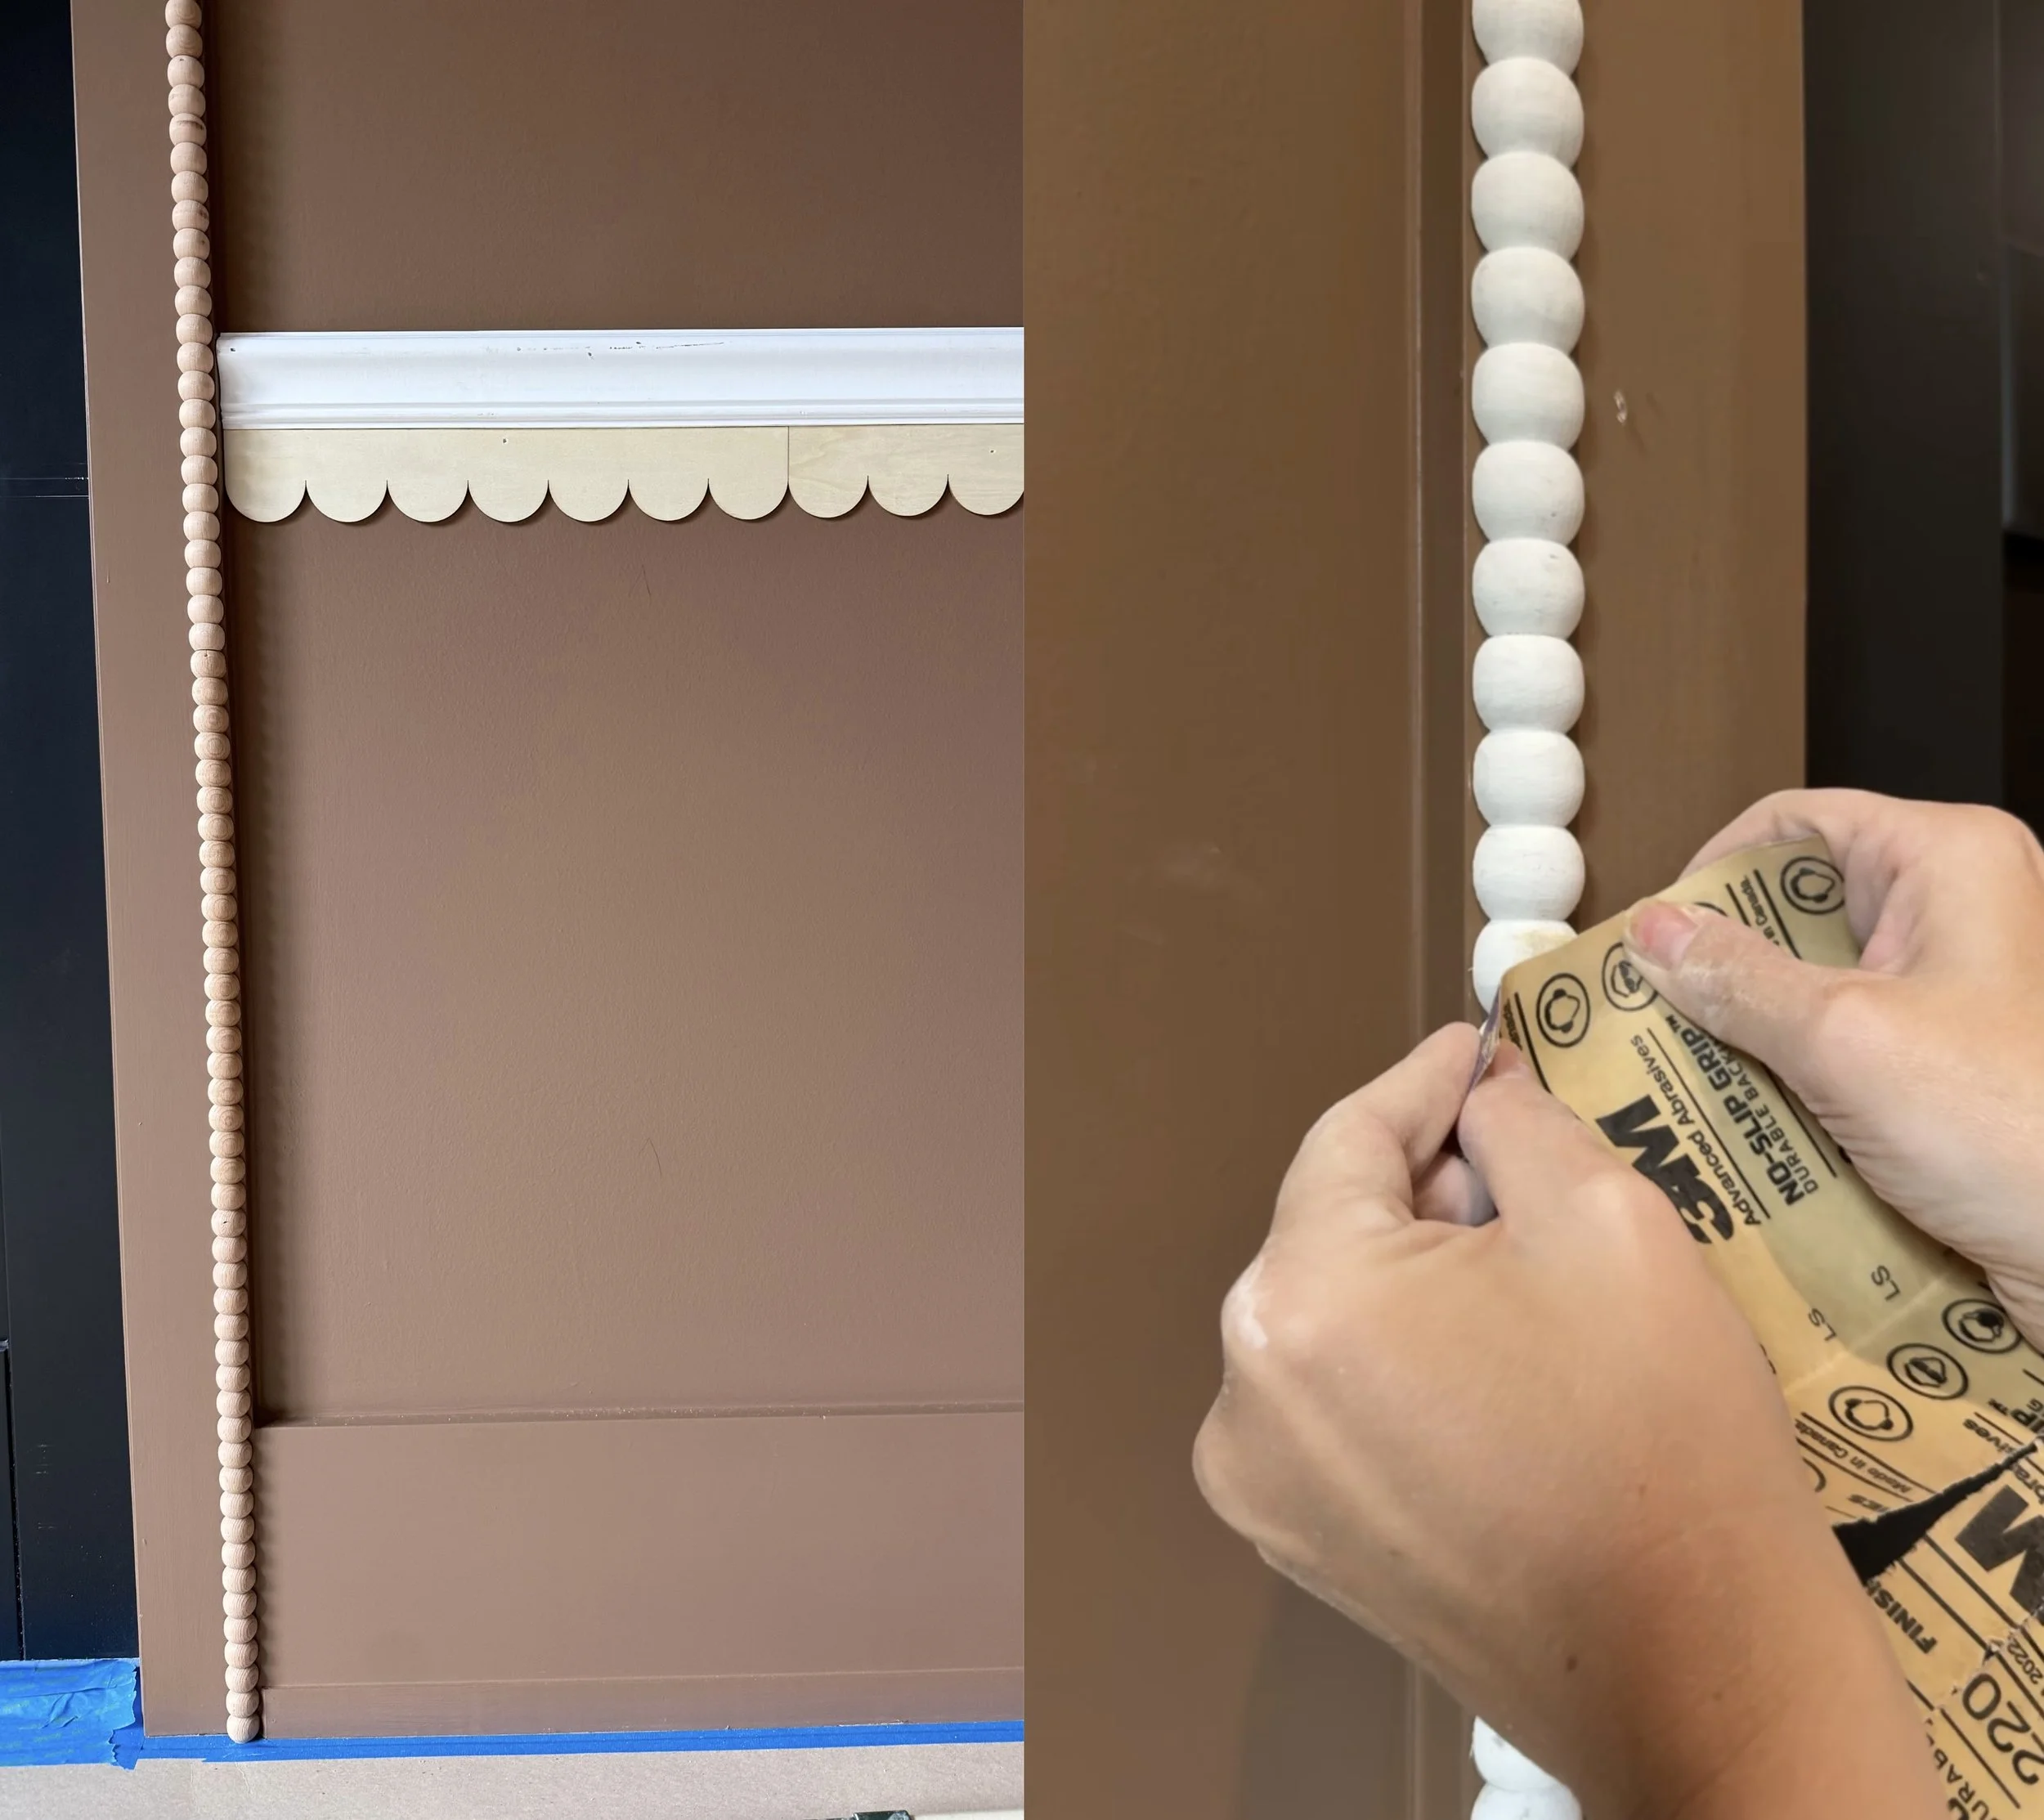
One quick tip: I highly recommend pre-painting the scallop and beaded trim before installing. As cute as they are, those tiny curves and grooves are insanely tedious to paint once they’re up on the wall. Painting them ahead of time will save you a ton of time and frustration later.
It’s a reminder that the extra details really do make a difference. The added shapes and textures give the space personality and make it feel thoughtfully designed, while still leaving room for it to grow and change right along with her.

Links At A Glance
Hanging Rattan Hot Air Balloon
If you like this, you might be interested in my Crown Moulding Tutorial!

Halloween Headboard Sign DIY

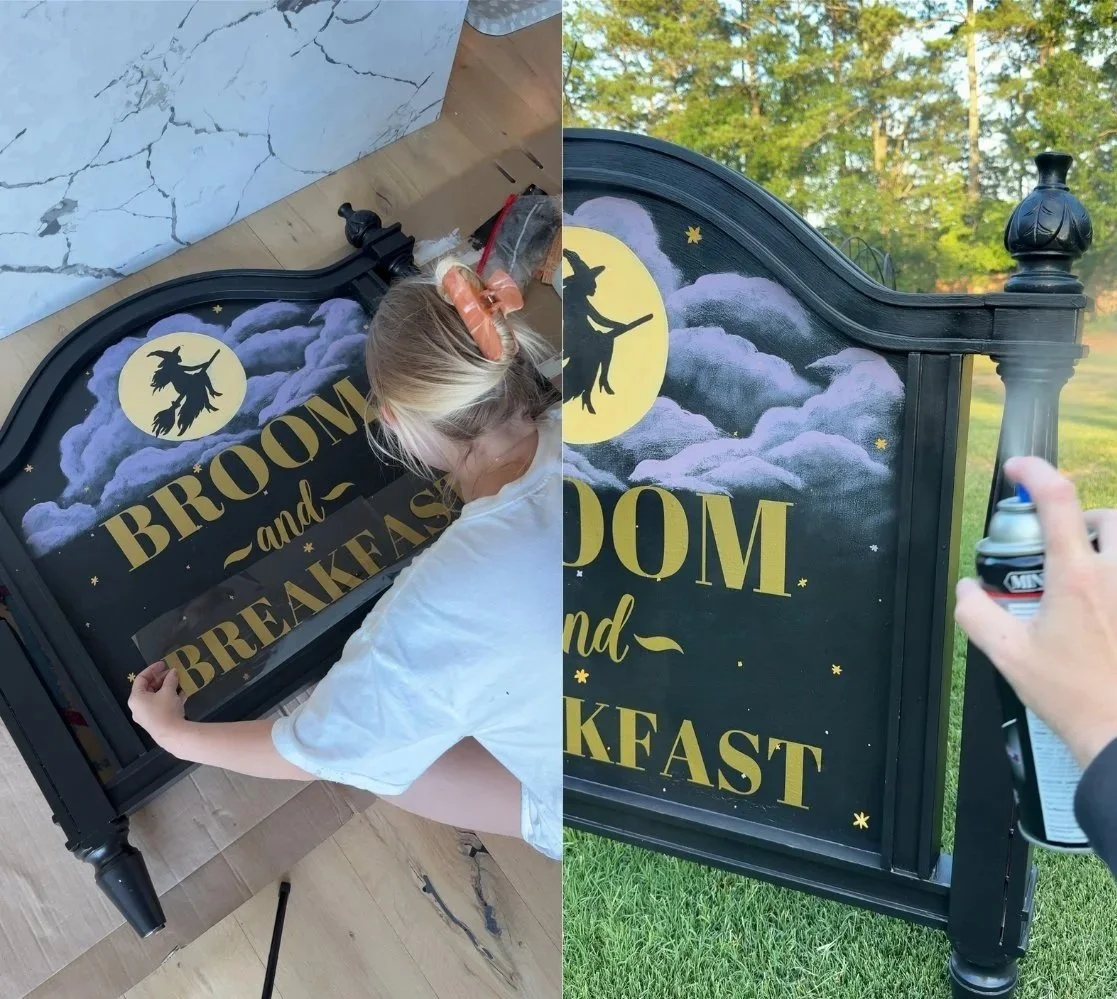
This project started when I found an old headboard on Facebook Marketplace. It was the perfect shape for what I imagined: a spooky little “Broom & Breakfast” sign for Halloween, the kind of thing you’d see outside a haunted inn in Salem.
Here’s how I turned a used headboard into a custom Halloween decoration that’s now one of my favorite DIYs ever.
What You’ll Need
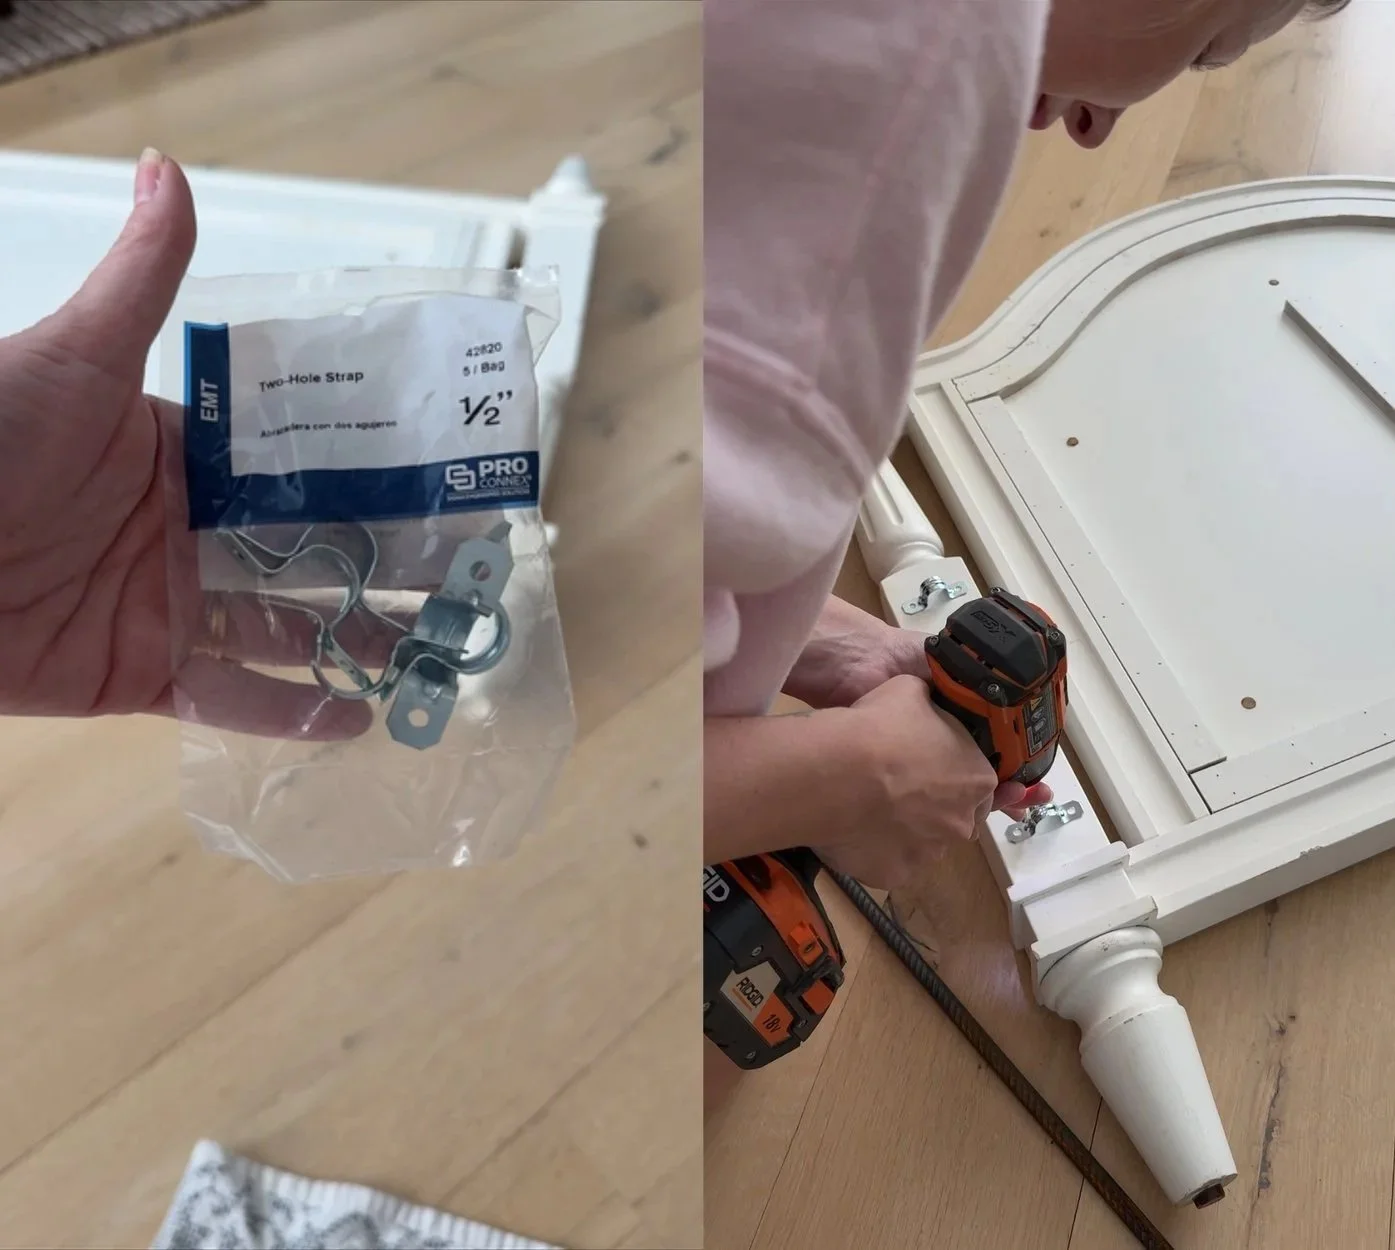
Step 1: Add Pipe Brackets
Before I started painting, I screwed on four pipe brackets to the back of the headboard. We will use these to make it stand in the yard later.
Step 2: Prime It
First things first, prime your headboard. I didn't and I regret it! Alwaysss prime!
Step 3: Paint It Black
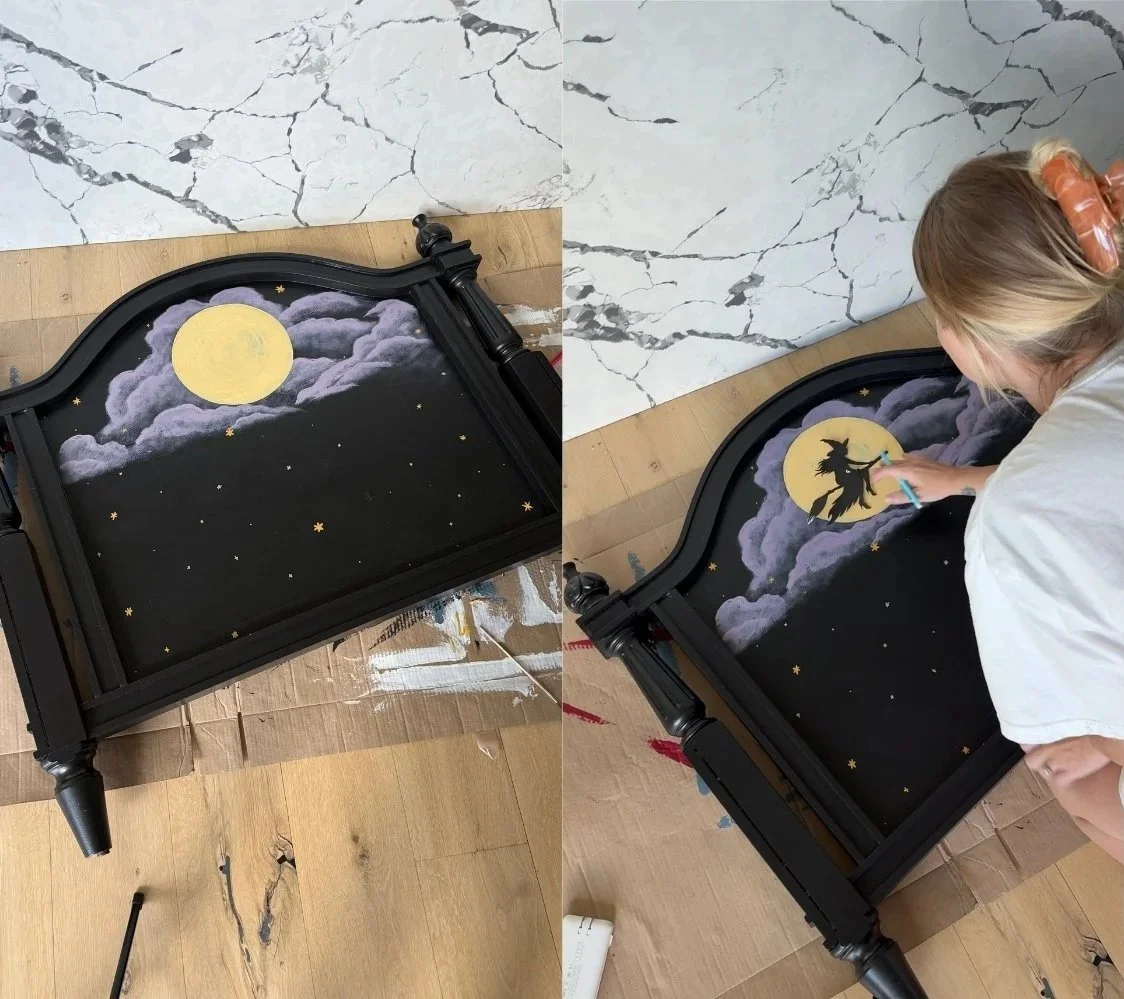
Next, I painted the entire thing black. I wanted a moody, witchy vibe and two coats did the trick for me

Step 4: Hand Paint the Clouds and Stars
To make the sign feel more dimensional, I hand-painted soft purple clouds around the moon and the witch. This part was super fun. No rules, just a youtube tutorial and blending until it looked right. I also added yellow stars around the entire front.
Step 5: Add the Moon and the Witch
Once the base coat was dry, I painted in the round yellow moon. Then I printed out a photo of a witch, cut it out, and used it to trace the outline. Then I filled it in with black paint.
Step 6: Add the Lettering
I used my Silhouette vinyl machine to cut out the “Broom & Breakfast” letters. You could use pre-made vinyl letters or stencils too. Once the letters were positioned where I wanted them, I carefully applied them to the headboard.
Step 7: Seal It
Since this piece will live outdoors, I sealed it with multiple coats of polycrylic. Don’t skip this step because it protects your hard work from the elements and keeps the finish looking crisp.
Step 8: Make It Sturdy
To make sure the sign could stand up in the yard, I slid rebar through the pipe brackets and hammered them into the ground. It’s super sturdy and stands perfectly without tipping.
The Final Result
What started as a random Marketplace find is now a statement Halloween piece that looks like it belongs outside a spooky old inn. It’s playful, a little eerie, and totally unique.
If you’re thinking about making one yourself, do it. You can customize the design, color, or theme for any holiday or season.

If you like this, you might be interested in my Halloween String Light DIY!

DIY Tutorial: Folding Kids’ Tables for a Party
When you’re hosting a big party for little ones, having kid-sized tables makes all the difference. I made six folding tables for my daughter’s party, and they turned out both practical and so cute. Here’s how you can make your own!

This tutorial will make (six) 48x32" wooden tables with folding legs.
Materials:
(2) sheets of ¾" thick 4'x8' sanded plywood (~$65 each)
(24) folding hairpin legs, 12.5" tall (4 per table)
(30) 15.75" floor cushions for seating
Tools:
Step 1: Cut the plywood into table tops
Each 4’x8’ sheet of plywood makes three 48"x32" tables.
Use your circular saw to cut the plywood sheets into thirds

Step 2: Smooth the edges
Run a router along all edges so the tables are smooth and safe for little hands.
If you notice any rough spots, lightly sand with sandpaper until the surface feels soft.

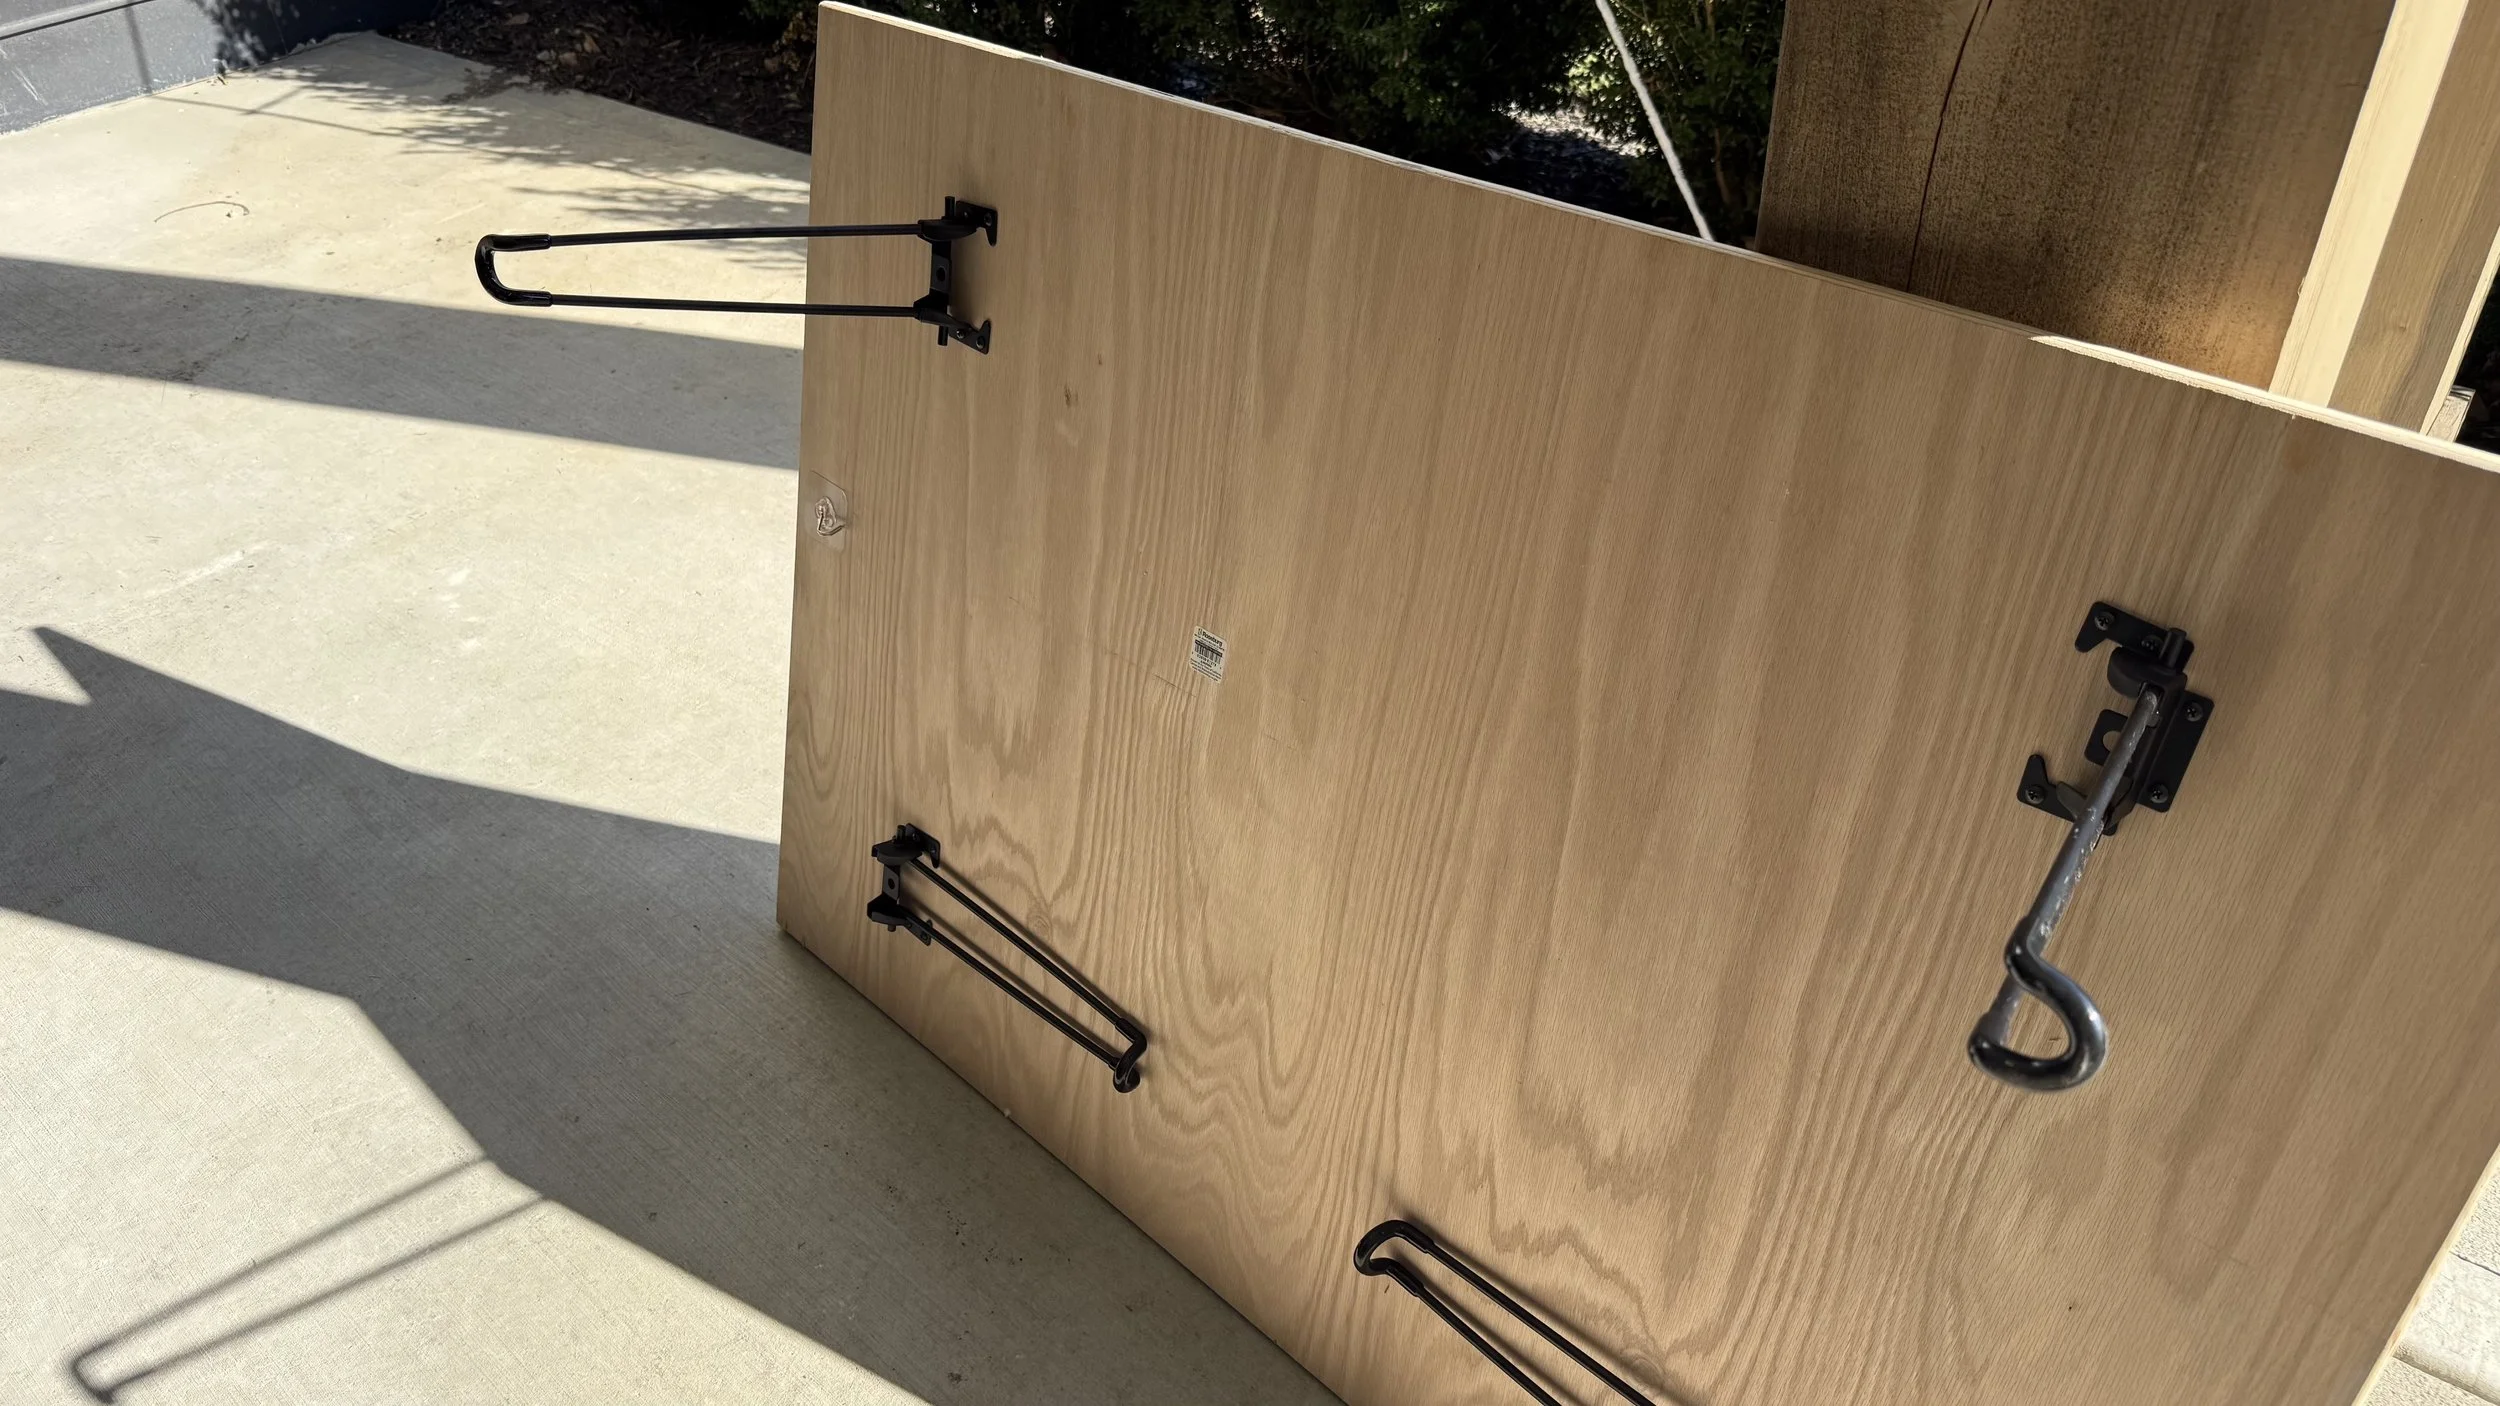
Step 3: Attach the legs
Flip each tabletop upside down.
Position four folding hairpin legs (12.5" tall) in the corners, leaving about 6-7" inset from each edge.
Drill pilot holes to avoid splitting the wood.
Secure the legs with screws.
Step 5: Add seating
I used 30 soft floor cushions so all the kids had a comfy spot to sit around the tables.
Final Results
Each table is low to the ground, folds flat for storage, and can easily seat several kids with floor cushions. They worked perfectly for crafts, snacks, and games at the party!
Pro tip: You can paint or seal the tabletops if you want them to match your party theme or to protect from spills, but I left mine natural for a clean, timeless look.
Links At A Glance
If you like this, you might be interested in the Fairy Birthday Party Recap!

Our Living Room Smart Shades

When we started planning our window treatments, I knew I wanted something that wasn’t just pretty but also smart, practical, and easy to live with every day. Enter: Serena Smart Shades from Lutron.
We installed these shades ourselves (yes, even 18 feet in the air!) and honestly, they’re DIY-friendly. Would I recommend using scaffolding for fun? Definitely not. They’re much easier to install when you’re safe on the ground, but the point is, it can be done without hiring out if you’re comfortable with a drill.
Custom Look That Blends Right In
For the design, I went with two different fascia styles to blend seamlessly into the windows
White fabric-wrapped inside mount fascia for the windows.
Black architectural outside mount fascia for the doors.
Both styles house shades in the Vista < 3% Crystal fabric, which looks gorgeous while filtering light and maintaining privacy.
If you are unsure about measuring and ordering or have any questions at all about the options, I can confidently say that Lutron has some of, if not the best, customer service I have ever experienced. I called them a few times because I was nervous about making such a large purchase, and they helped me so much. They were kind, knowledgeable, and incredibly patient, which made the whole process feel stress-free.

Whisper-Quiet Operation
One of the things I love most is how quiet they are. You can barely hear them opening and closing, and it feels so luxe compared to clunky blinds.
Battery Power That Lasts
You can buy these shades hardwired, but our windows sit behind massive beams, so that was not an option. We chose the battery-powered version, and it has been great. They run on D batteries that last up to five years, and swapping them out takes less than a minute.

Why We Chose Lutron
We have been slowly building our smart home with Lutron products because they are reliable and high quality. The shades integrate perfectly into their ecosystem. Here is how we control them:
With the Lutron app on our phones
Using Google Home voice commands
With a remote
Or by setting schedules so they open and close automatically at certain times of day
This upgrade has made everyday life smoother. Mornings feel brighter, nights feel cozier, and everything in between feels a little more effortless.
Links At A Glance

Colorful Kids Room Makeover
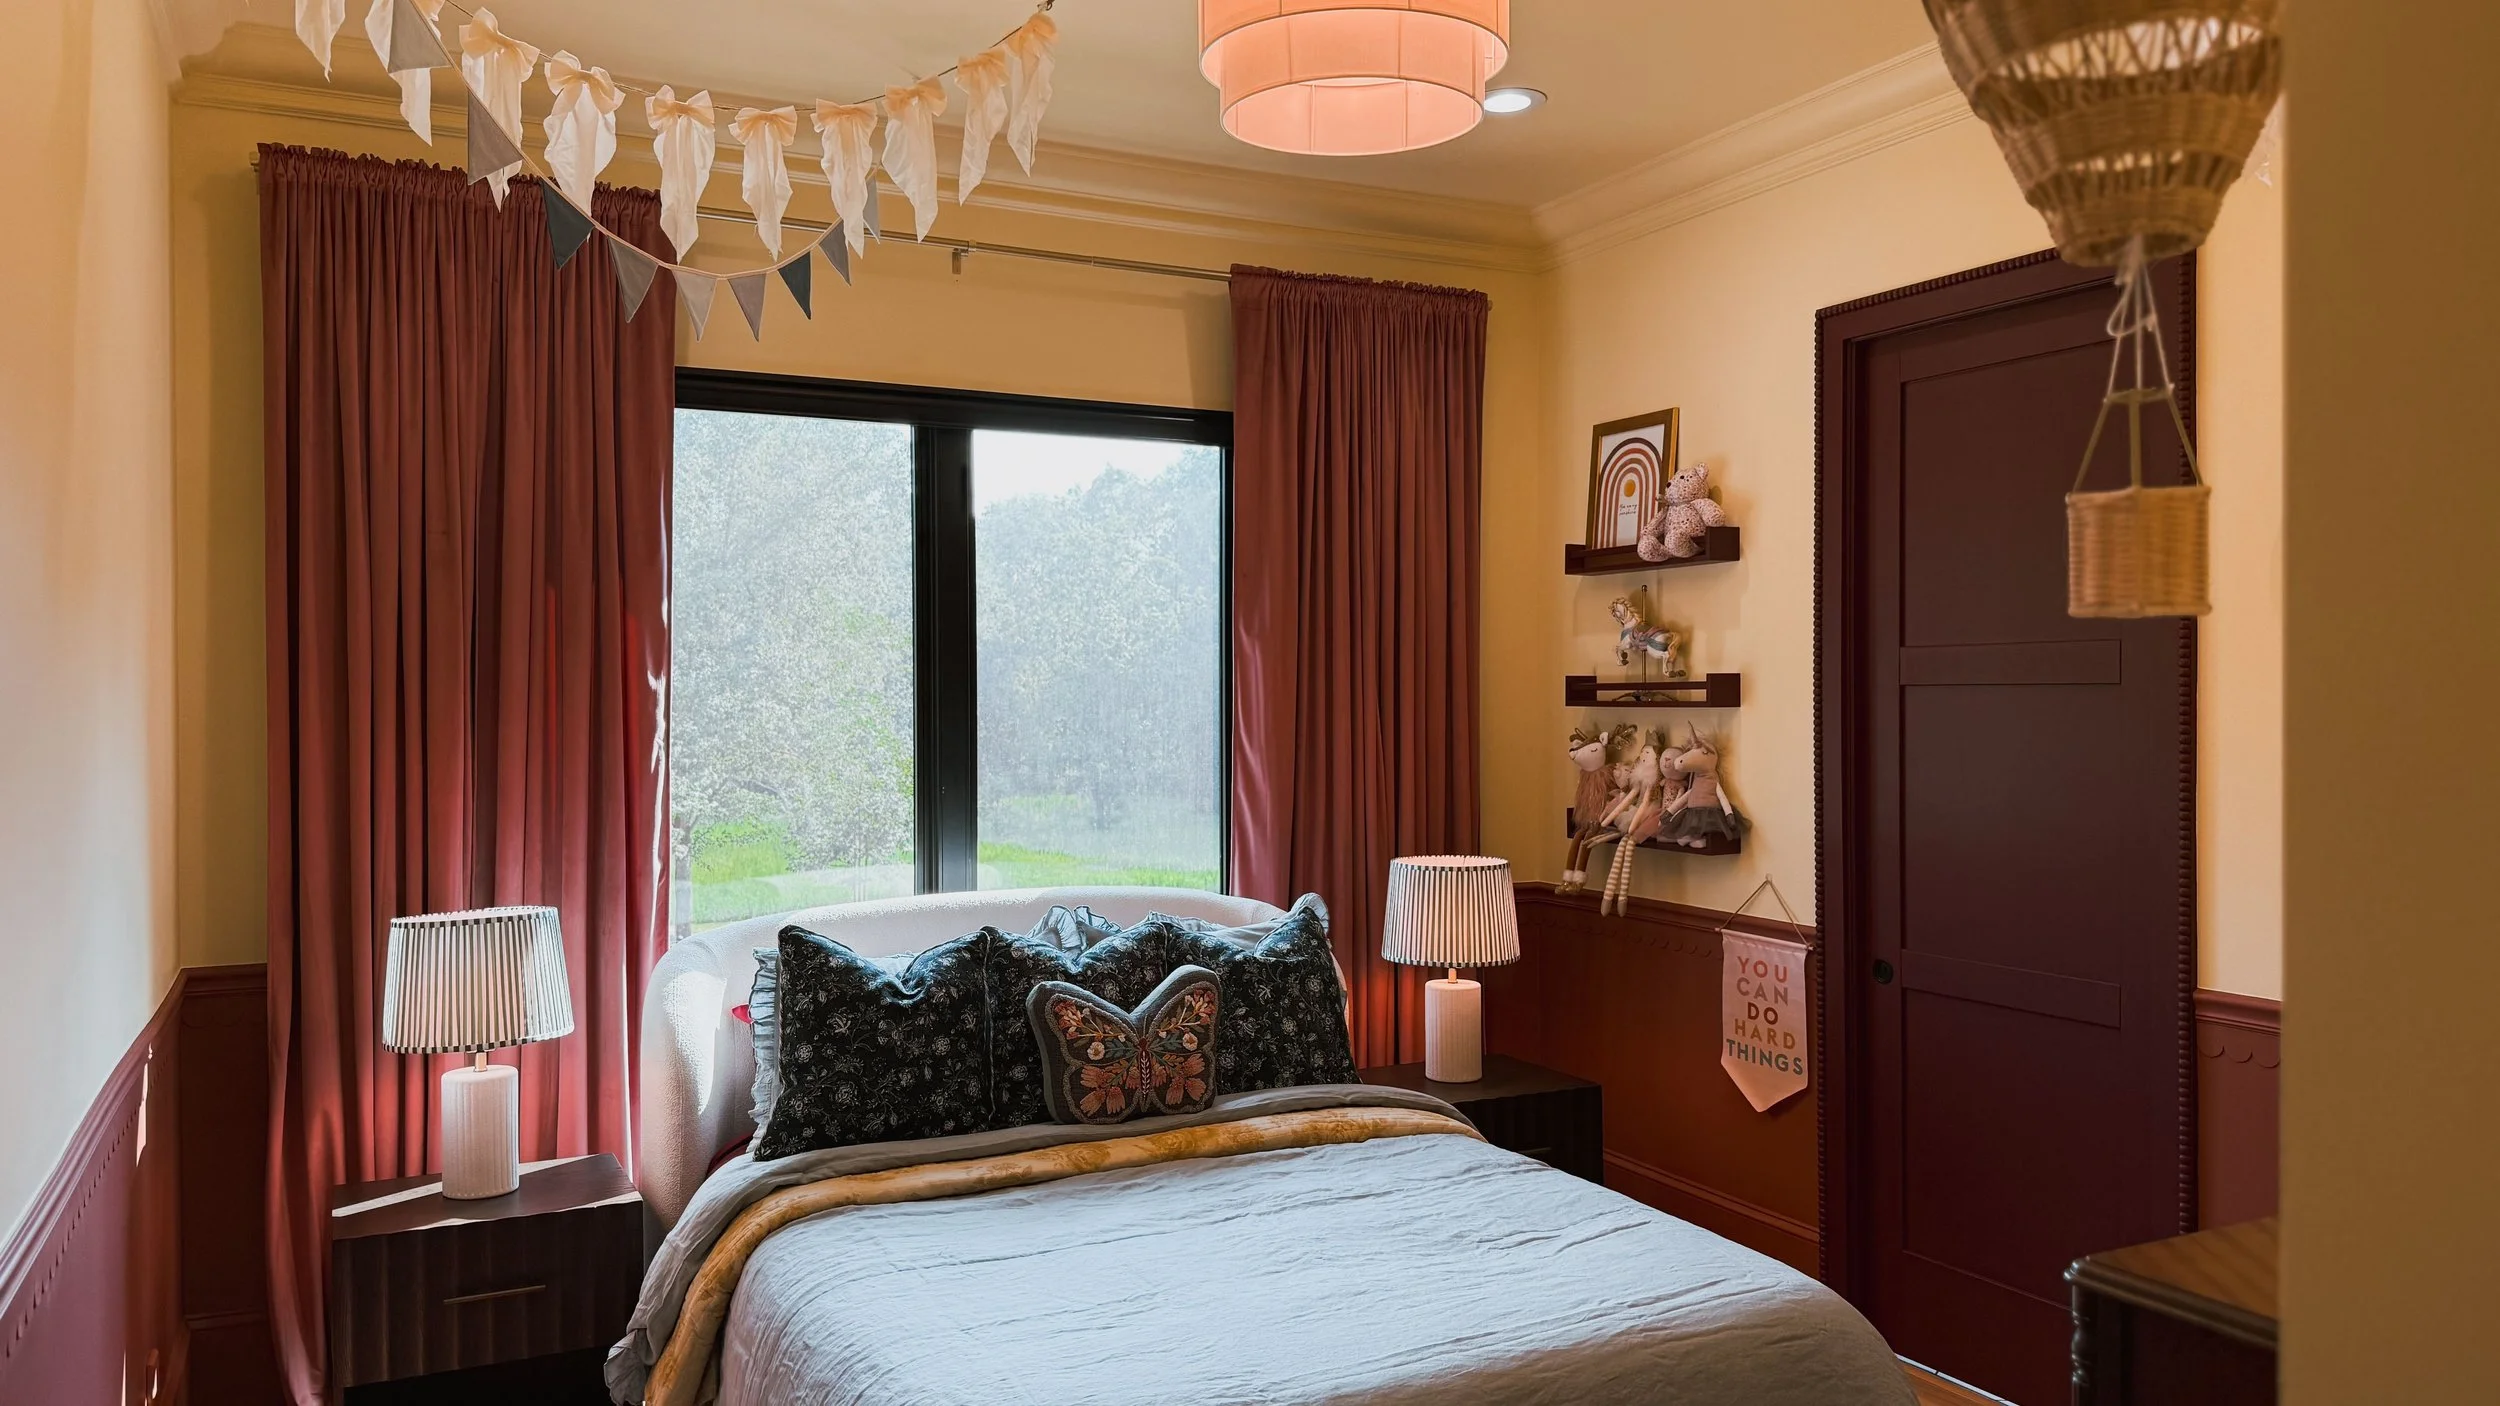
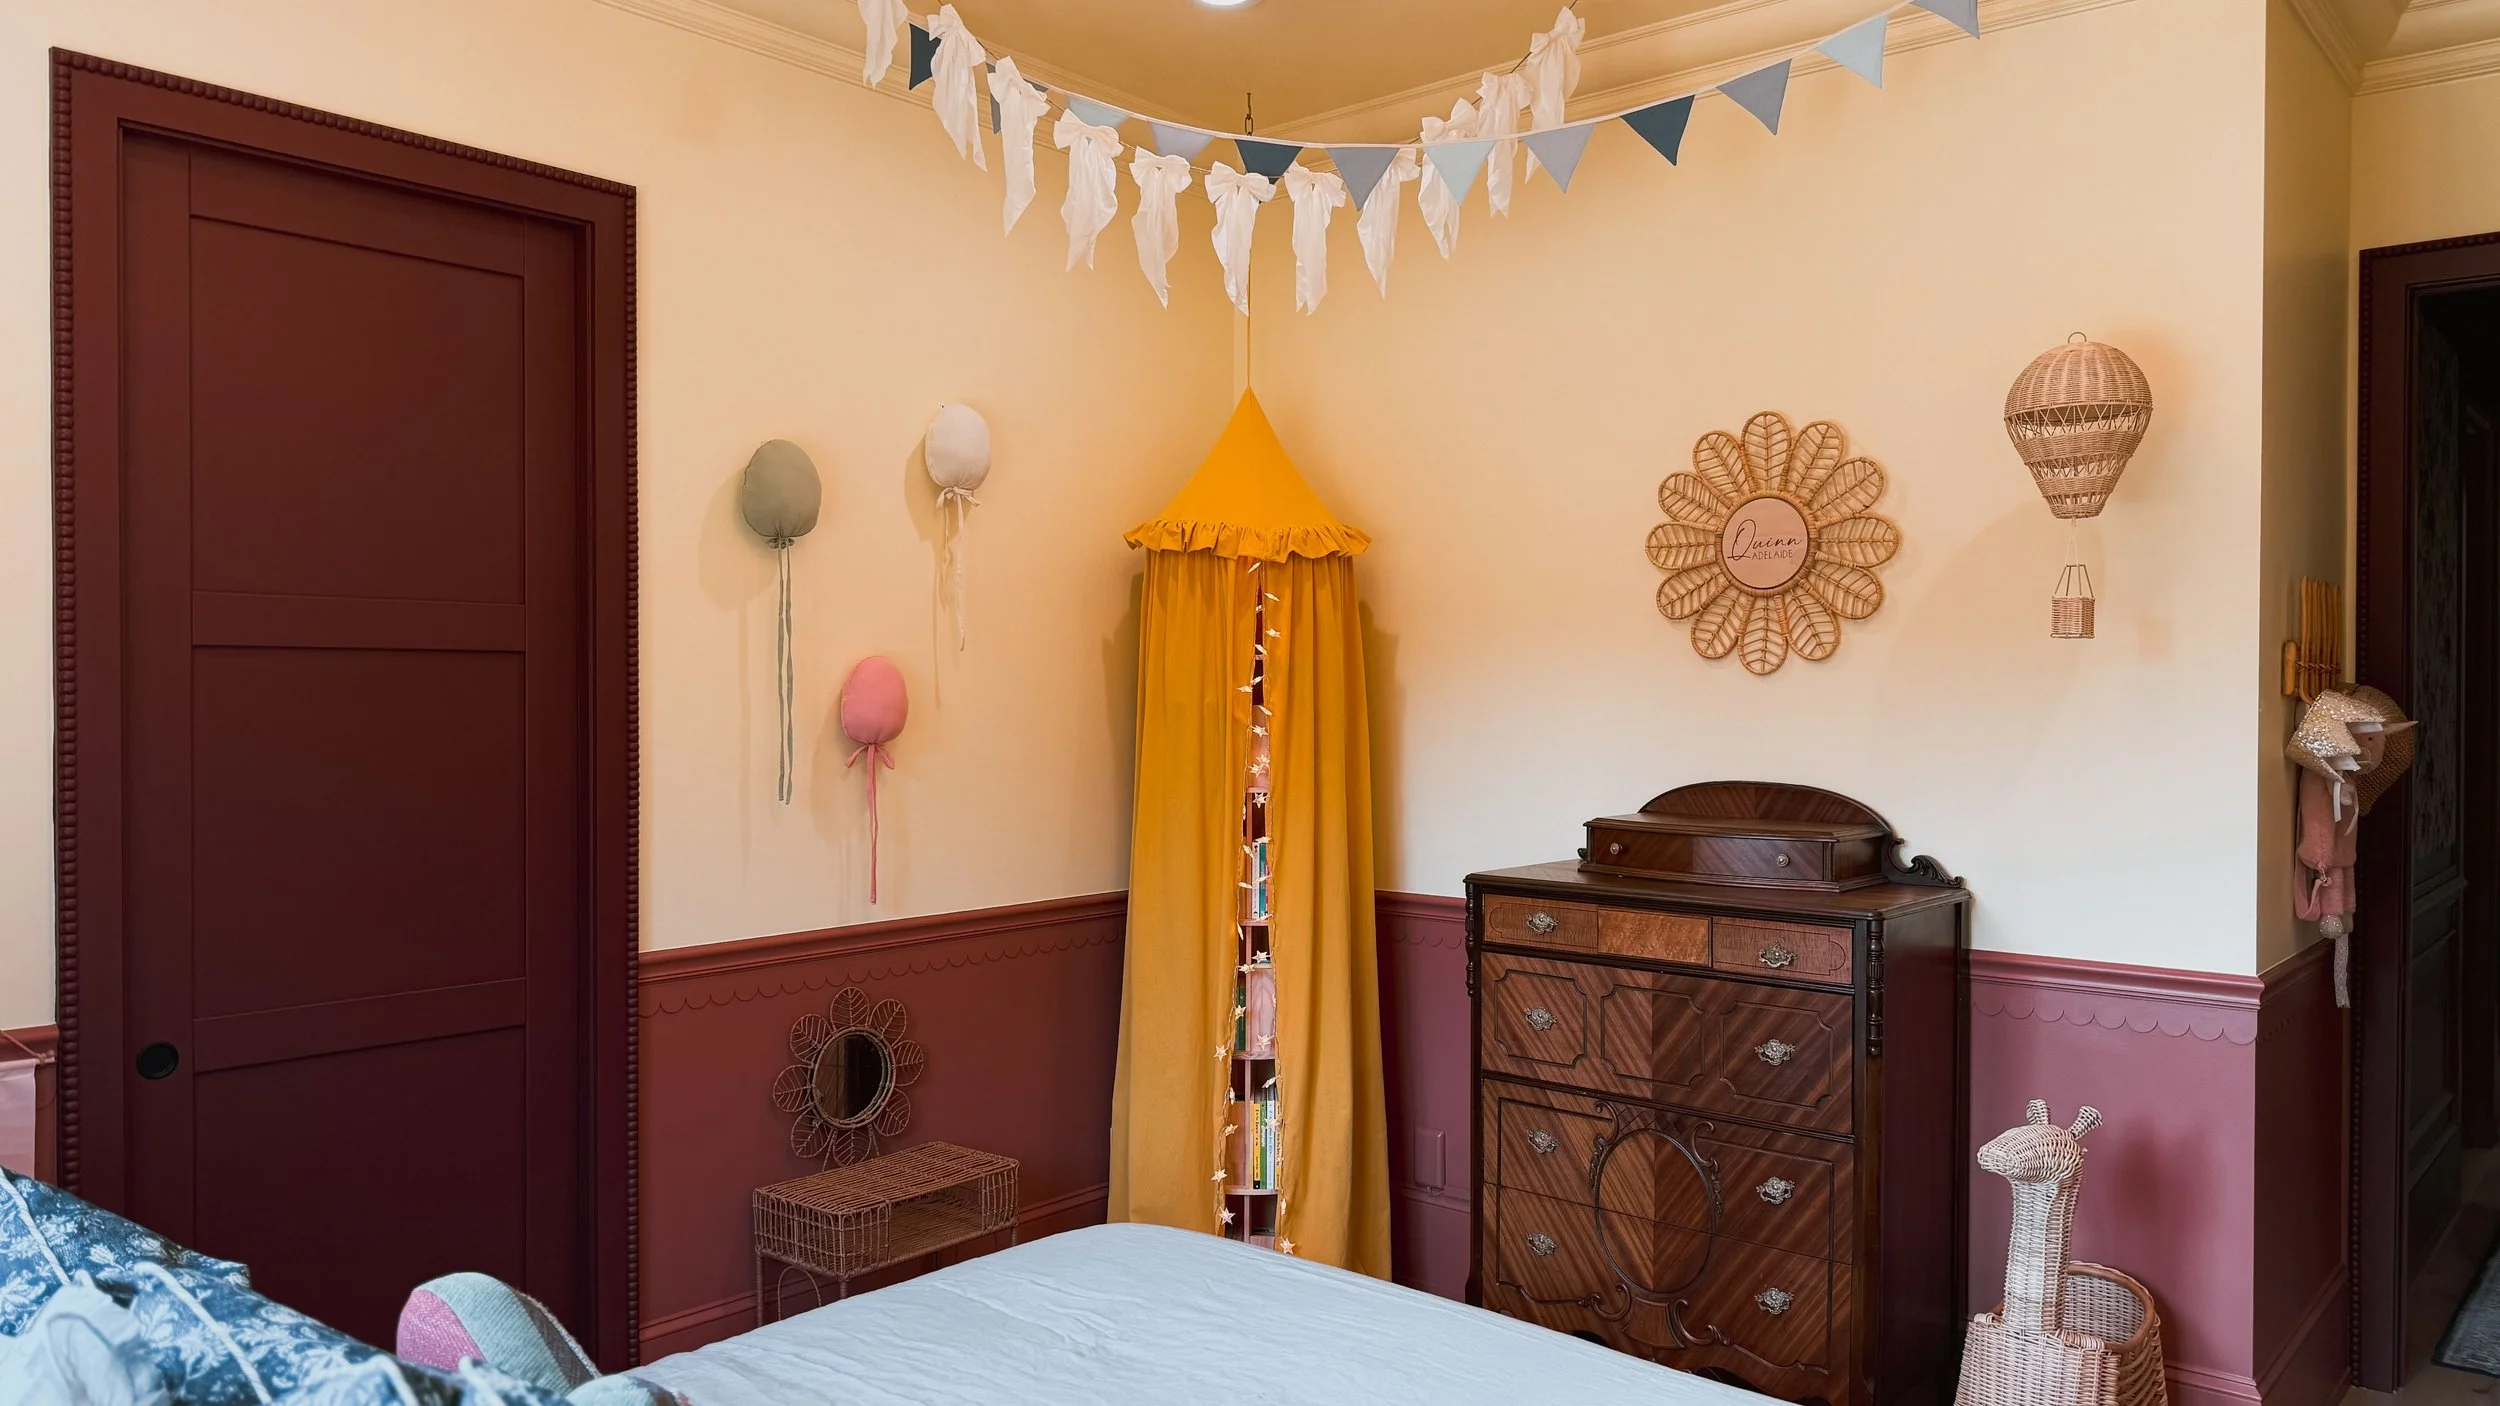
What was once a moody guest bedroom has now transformed into a colorful, whimsical room for my daughter. It's now a space that feels just as joyful as she is. This makeover was all about balancing her love of color with the calmness every bedroom deserves.
Architectural Details That Elevate the Space
Before diving into color, I wanted to give the room more presence through trim and moulding. I added:
Crown moulding at the ceiling
Basecap moulding to the baseboards
Chair rail with a removable scallop trim underneath for a playful touch
Beaded trim around the doorways
These details brought so much dimension to the walls and gave me the perfect foundation for layering on color.
A Color Story Inspired by HGTV Home by Sherwin-Williams
The palette came straight from the HGTV Home by Sherwin-Williams 2026 Color Collection of the year: Honest Essentials.
The ceiling and upper walls are painted in Lemon Chiffon, a soft, happy yellow that instantly brightens the room.
From the chair rail down, I used Reddend Earth which is also the same color as the hallway leading into her room
For the doors and doorways I used Cordovan
Together, these colors create a playful but sophisticated backdrop.
Layering in Color and Whimsy
Since my daughter will happily tell you her favorite color is “yellow… and all the colors of the rainbow,” I started with yellow as the anchor and layered in every shade of joy:
Red sheets with a yellow floral quilt
Yellow canopy draped over her spinning bookshelf
Pink curtains for softness
Blue pennant banner and white bows floating across the ceiling

Sweet Finishing Touches
I sprinkled in whimsical details to spark imagination: a hanging rattan hot air balloon, fabric balloons on the wall, and painted shelves in the same red as the door trim for continuity.
A Room Made for Her
This room is cheerful, layered, and full of personality, just like my daughter. By centering yellow (her favorite!) and mixing in colors from across the spectrum, I was able to create a space that feels both vibrant and peaceful, making it the perfect retreat for bedtime and playtime alike.